Multi-Server Splunk Setup with Ansible & SSH
In modern, cloud-native environments, manual infrastructure management has become both inefficient and risky. Automation is no longer a luxury — it’s a necessity for ensuring speed, scalability, and reliability. One of the most widely adopted tools driving this shift is Ansible, a simple yet powerful open-source automation engine.
Ansible enables system administrators and DevOps engineers to define infrastructure as code, manage configurations, deploy software, and orchestrate multi-node environments with consistency and ease. Whether you’re managing a single server or coordinating complex, multi-tier applications, Ansible helps reduce manual effort, minimize human error, and streamline infrastructure operations.
In this blog post, we’ll explore what Ansible is and how it can be used to streamline complex deployments. As a practical example, we’ll walk through automating the installation of Splunk on multiple Linux servers using Ansible.
1. What is Ansible?
Ansible is an open-source IT automation tool, written in Python and developed by Red Hat. It allows you to automate system configuration, deploy applications, and orchestrate complex workflows using simple, human-readable playbooks. Ansible is agentless — meaning it requires no special software on the target machines — just SSH access and Python are needed.
📚 You can explore the full Ansible documentation portal, which includes Ansible Core, Tower, Automation Platform, and more. For this hands-on tutorial, we will focus on Ansible Core.
Core Concepts:
Before diving into real-world automation, it’s important to understand the fundamental building blocks of Ansible. These core concepts form the foundation of how Ansible works and how you structure your automation projects. Whether you’re managing a few servers or deploying complex infrastructure, these concepts will make your workflows cleaner, more scalable, and easier to maintain.
-
Inventory File (inventory.ini or hosts): Defines which servers Ansible will manage. Hosts can be grouped for easier targeting.
-
Playbook: A YAML file that lists tasks to automate. It describes what Ansible should do, step by step.
-
Task: A single action in a playbook, like installing a package or copying a file.
-
Module: Built-in tools that perform specific tasks (e.g., yum, copy, service).
-
Variable: Custom values that make playbooks reusable and flexible for different environments.
-
Handler: A task that only runs when triggered by another task. Often used to restart services after a change.
-
Role: A structured way to organize tasks, variables, and files. Helps make automation reusable and clean.
-
Template: A file with dynamic content, using Jinja2 syntax. Useful for generating config files.
2. Practical Case: Installing Splunk on Multiple Servers with Ansible
This guide demonstrates the automation of a single-instance Splunk deployment using Ansible. While the current setup targets a single server to facilitate understanding of Ansible’s modular and reusable playbook structure, it is designed to be easily extended and adapted for more complex, multi-server Splunk environments.
Splunk is a data analytics platform designed to collect, index, and visualize machine data from various sources. While the implementation targets Splunk, the underlying playbook serves as a flexible foundation for provisioning and configuring other software systems in similar environments.
📚 Explore the official Splunk documentation portal for further guidance.
Prerequisites:
Before executing the Ansible playbook — whether for Splunk or another application — ensure the following prerequisites are met:
-
Control Node: An Ansible control node is required (a Linux machine, such as your local development machine, a VM, or a dedicated server). The control node uses SSH to connect to the target servers and run configuration tasks remotely.
-
Target Servers: Make sure you have at least one Linux server (a mix of Ubuntu and/or CentOS is acceptable), for this case all using x86_64 architecture, Splunk does not support ARM-based systems.
-
Required Files on Targets: For this case (Splunk deployment), the Splunk Enterprise installation package (e.g., splunk-9.x.x-linux-amd64.tgz) must reside on each target server.
Download the splunk-9.x.x-linux-amd64.tgz installation package from Splunk and place it in the designated shared directory on each target server.
⚠️ In this workshop, we assume an offline installation, so the package must be manually pre-copied to each target server. If you’re working in an online environment, you can alternatively configure the Ansible playbook to download the package automatically from a remote source.
- SSH Acces & Sudo: Ensure passwordless SSH access is configured from the control node (where Ansible is executed) to each target server, as the splunk user. The splunk user must have passwordless sudo privileges on the target machines, in order to allow Ansible to perform administrative tasks using become: yes.
become: yes in Ansible enables privilege escalation, allowing the task to be executed with elevated privileges — typically as the root user. It leverages tools like sudo, su, or others defined in the Ansible configuration (become_method). This is essential for performing administrative tasks such as installing packages, modifying system files, or managing services.
If you need to set up SSH access as the splunk user, please follow the steps below. You can skip this section if passwordless SSH access as the splunk user is already configured.
****** Create a Dedicated 'splunk' User on All Servers ******
>  Create the 'splunk' user
`sudo useradd -m splunk`
>  Set a password for the 'splunk' user
`sudo passwd splunk`
>  Create the .ssh directory and set appropriate permissions
`sudo mkdir -p /home/splunk/.ssh`
`sudo chown splunk:splunk /home/splunk/.ssh`
`sudo chmod 700 /home/splunk/.ssh`

****** Install and Enable SSH on All Target Servers ******
>  Update package lists
`sudo apt update`
>  Install OpenSSH server
`sudo apt install openssh-server`
>  Start the SSH service
`sudo systemctl start ssh`
>  Verify the SSH service status
`sudo systemctl status ssh`
>  Enable SSH to start on boot
`sudo systemctl enable ssh`

****** Set Up SSH Key-Based Authentication for Ansible Access ******
>  Generate an RSA key pair (only once); the same key will be copied to all servers for SSH access
`ssh-keygen -t rsa -b 4096 -f ~/.ssh/splunk_rsa`
>  Copy the public key to the server
`ssh-copy-id -i ~/.ssh/splunk_rsa.pub splunk@xxx.xxx.xx.x`

****** Verify Passwordless SSH Connectivity to All Servers ******
`ssh -i ~/.ssh/splunk_rsa splunk@xxx.xxx.xx.x`
⚠️ The commands and steps provided above are tailored for Debian-based Linux distributions such as Ubuntu or Debian. If you’re using a Red Hat-based system (e.g., RHEL, CentOS, AlmaLinux), please adapt the package manager commands (apt → dnf or yum) and service handling accordingly.
2.1. Project Structure Overview
In an Ansible-driven Splunk deployment, maintaining a clear and well-organized folder structure is key to building reliable and scalable automation. As your environment evolves and more components are introduced, a consistent layout makes it significantly easier to manage configurations, reuse roles, and troubleshoot issues.
The following tree illustrates the folder structure used in this Ansible-based Splunk deployment, focusing on inventories, configuration variables, and the installation playbook.
ansible_workshop/
├── inventory.ini  # Defines target hosts and SSH connection settings
├── install_splunk.yml  # Main playbook for Splunk installation and configuration
└── group_vars/  # Group-specific variable definitions
    └── splunk_servers.yml  # Variables applied to hosts in the [splunk_servers] group
2.2. Install Ansible on the Control Node
To manage remote servers using Ansible, you need to install it on a control node — the machine from which Ansible commands and playbooks will be executed. This can be your local development environment (e.g., macOS or Linux) or a dedicated server. The control node communicates with target servers over SSH and orchestrates all automation tasks.
Below are the installation steps for the most common operating systems. After installation, you can confirm Ansible is set up correctly by running ansible –version.
****** macOS (Homebrew)******
`brew install ansible`
`ansible --version`

****** Ubuntu/Debian ******
`sudo apt update`
`sudo apt install software-properties-common -y`
`sudo add-apt-repository --yes --update ppa:ansible/ansible`
`sudo apt install ansible -y`
`ansible --version`

****** Red Hat/CentOS/Rocky ******
`sudo dnf install epel-release -y`
`sudo dnf install ansible -y`
`ansible --version`
2.3. Verify Connectivity to Target Servers (Ping Test)
Use the following command to test whether your Ansible control node can connect to the target servers listed in your inventory.ini file.
ansible all -i inventory.ini -m ping
-
ansible: The CLI tool used to run ad-hoc commands.
-
all: This tells Ansible to run the command on all hosts listed in the inventory.
-
-i inventory.ini: Specifies the inventory file that contains the target hosts (e.g., IP addresses or hostnames).
-
-m ping: Uses the built-in ping module to test connectivity.
⚠️ The ping module doesn’t use ICMP like the system ping command. Instead, it verifies SSH connectivity and Python availability on the remote machine.
Create an inventory.ini file and list the IP addresses or hostnames of your target machines under appropriate group names. Replace xxx.xxx.xx.x with your actual server IPs:
# ==========================
# Inventory File: inventory.ini
# ==========================

# Define your target hosts under a custom group (e.g., [splunk_servers])
[splunk_servers]
splunk1 ansible_host=xxx.xxx.xx.x   # Replace with the actual IP or hostname
splunk2 ansible_host=xxx.xxx.xx.x   # Add/remove hosts as needed

# --------------------------
# Global connection variables
# --------------------------
[all:vars]
# Set the SSH username to connect as (must already exist on the target machines)
ansible_user=splunk
# Define the path to the SSH private key (used for passwordless SSH access)
ansible_ssh_private_key_file=~/.ssh/splunk_rsa  # Ensure this key is pre-generated and authorized on targets
# Specify the Python interpreter path on the remote hosts
ansible_python_interpreter=/usr/bin/python3   # Modify if Python is installed elsewhere (e.g., /usr/local/bin/python3)
Expected output: If the connection is successful, you will see a response similar to the following for each target host:
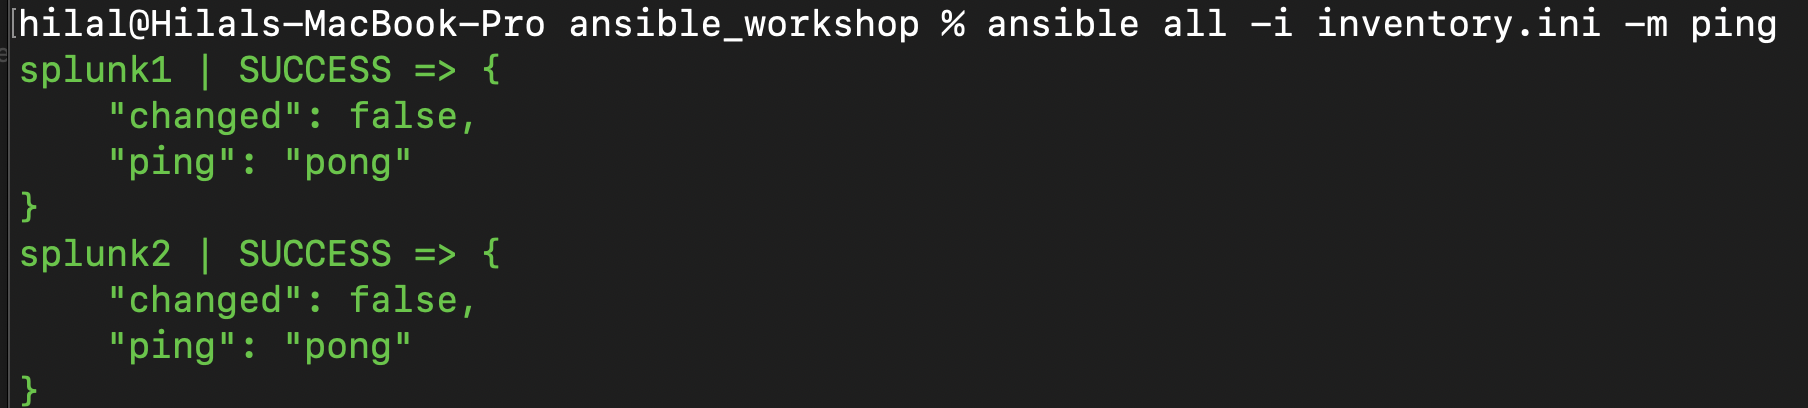
Expected Output: Ansible Ping Module
2.4. Ensure Python is Installed on Managed Hosts
Ansible requires Python to be installed on the target machines, because most Ansible modules (including the default ping module) depend on Python to run remote tasks.
You can check whether python3 is installed on your target hosts by running the following command:
ansible all -i inventory.ini -m command -a "which python3"
Expected output:

Expected Output: which python3 Command
2.5. Install Splunk on Target Servers
To install Splunk across all target machines, run the following Ansible command from your control node:
ansible-playbook -i inventory.ini install_splunk.yml
This command executes the install_splunk.yml playbook, using the hosts defined in inventory.ini.
The playbook performs a series of tasks on each target node. It first locates the Splunk tarball, ensures that the destination directory (typically /opt) exists, and then extracts the archive if necessary. It sets the appropriate ownership for the splunk user, creates the user-seed.cof file to define admin credentials, and starts the Splunk service while accepting the license terms. Finally, it enables Splunk to start automatically on boot and checks the service status to verify successful deployment.
Instead of embedding variables directly into the playbook, we follow Ansible best practices and define them in a dedicated group variable file.
# ==========================
# Group Vars File: group_vars/splunk_servers.yml
# ==========================

# Directory where the Splunk tarball is located on target servers
splunk_tgz_dir: /home/splunk
# Pattern to identify the correct Splunk package
splunk_tgz_pattern: splunk-*.tgz
# Destination directory where Splunk will be extracted
splunk_dest: /opt
# The user that will own the Splunk files; must exist on the system
splunk_user: splunk
# Default admin username to initialize Splunk
splunk_admin_user: admin
# Strong password (should be stored securely via Ansible Vault in production)
splunk_admin_password: YourSecurePassword123

# ==========================
# Installation File: install_splunk.yml
# ==========================

- name: Deploy and initialize Splunk Enterprise from tarball
  hosts: all
  become: yes  # Elevate privilege (typically sudo) to perform system-level tasks

# --------------------------
# Tasks
# --------------------------

tasks:

    - name: Find Splunk tarball
      find:
        paths: ""
        patterns: ""
        file_type: file
      register: found_tgz

    - name: Fail if Splunk tarball not found
      fail:
        msg: "No Splunk .tgz file found in ."
      when: found_tgz.matched == 0

    - name: Debug - Show found tarball path
      debug:
        msg: "Found Splunk archive: "

    - name: Ensure destination directory exists
      file:
        path: ""
        state: directory
        owner: ""
        group: ""

    - name: Extract Splunk tarball
      unarchive:
        src: ""
        dest: ""
        remote_src: yes
        creates: "/splunk"
      register: extract_result

    - name: Debug - Extraction result
      debug:
        var: extract_result

    - name: Fail if extraction failed
      fail:
        msg: "Splunk extraction failed! "
      when: extract_result.failed is defined and extract_result.failed

    - name: Ensure permissions on Splunk directory
      file:
        path: "/splunk"
        state: directory
        recurse: yes
        owner: ""
        group: ""

    - name: Create user-seed.conf for admin credentials
      copy:
        dest: "/splunk/etc/system/local/user-seed.conf"
        content: |
          [user_info]
          USERNAME =
          PASSWORD =
        owner: ""
        group: ""
        mode: '0600'

    - name: Stop Splunk if running (optional cleanup)
      command: "/splunk/bin/splunk stop"
      become_user: ""
      ignore_errors: yes

    - name: Start Splunk and accept license
      command: "/splunk/bin/splunk start --accept-license --answer-yes --no-prompt"
      become_user: ""
      args:
        creates: "/splunk/etc/splunk.version"
      register: start_result
      ignore_errors: yes

    - name: Debug - Splunk start result
      debug:
        var: start_result

    - name: Fail if Splunk did not start successfully
      fail:
        msg: "Splunk failed to start. Check start_result.stderr for more details."
      when: start_result.rc != 0

    - name: Enable Splunk to start at boot
      command: "/splunk/bin/splunk enable boot-start --accept-license --answer-yes --no-prompt"
      become_user: ""
      register: bootstart_result
      ignore_errors: yes

    - name: Debug - Boot-start enable result
      debug:
        var: bootstart_result

    - name: Fail if boot-start enabling failed
      fail:
        msg: "Failed to enable Splunk boot-start."
      when: bootstart_result.rc != 0

    - name: Check Splunk status
      command: "/splunk/bin/splunk status"
      become_user: ""
      register: status_result
      ignore_errors: yes

    - name: Debug - Splunk status
      debug:
        var: status_result
⚠️ For production usage, sensitive values like splunk_admin_password must be stored using Ansible Vault and never hardcoded into the playbook.
Expected output:
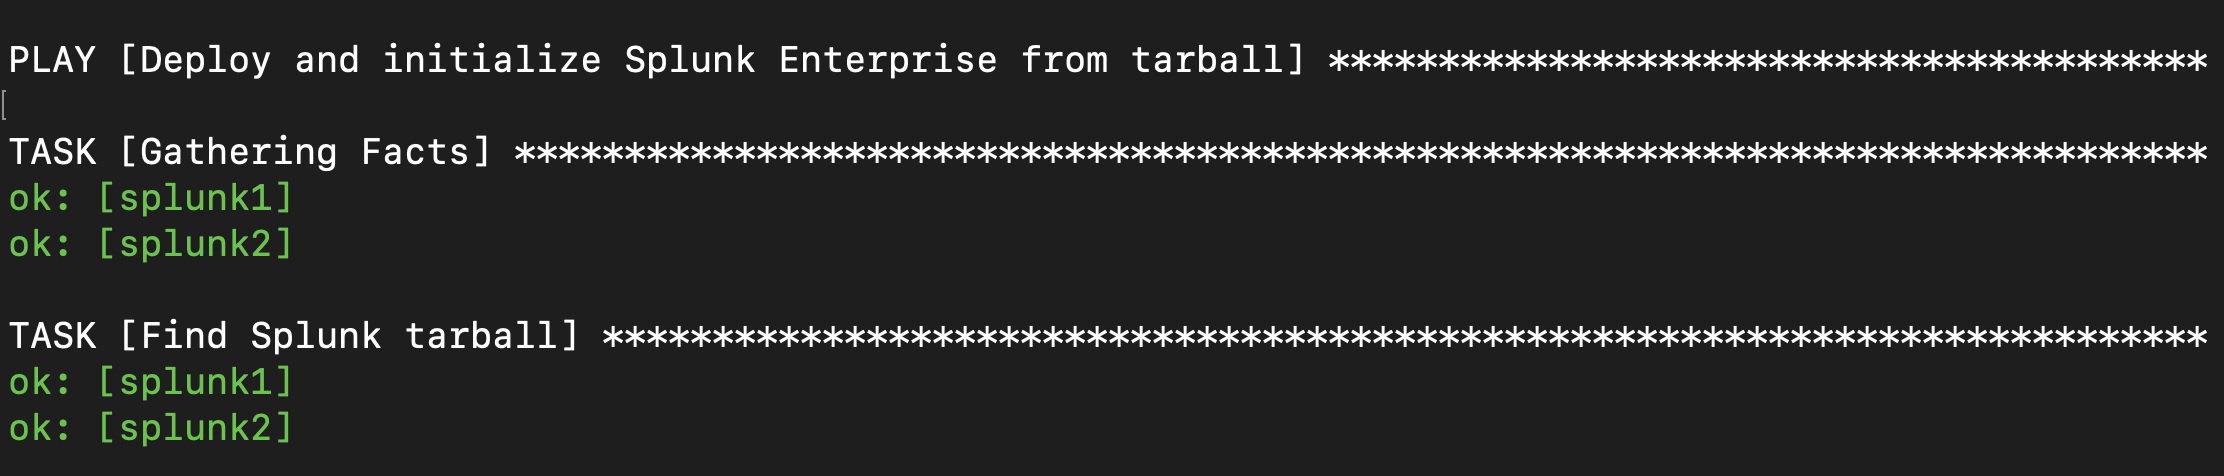
Expected Output: Successful Playbook Run
Ansible reported an “ok” status for all tasks across all target hosts listed in the inventory, indicating successful execution without errors or changes.
This guide shows how Ansible can automate a local deployment, laying the groundwork for scaling to distributed setups or even entirely different tools.