PART 1 — Distributed Splunk in Docker: Building a Complete Clustered Architecture
Understanding Splunk’s distributed architecture can be challenging, especially when multiple components like indexer clusters, search head clusters, cluster managers, deployers, and forwarders start working together. Before deploying Splunk in a real production environment, having a hands-on way to explore how these pieces interact is incredibly valuable.
This article series is split into two parts to make Splunk’s distributed architecture both approachable and practical. Across the two parts, a full lab environment is built with Docker, test data is ingested, and the end-to-end behavior of a distributed Splunk deployment is demonstrated.
Part 1 focuses on creating a realistic distributed Splunk setup with Docker Compose. The environment includes an indexer cluster, a search head cluster, and all required supporting components. By the end of Part 1, a fully functional distributed Splunk environment is ready for use.
Part 2 extends the setup by introducing data ingestion. This includes installing both the Universal Forwarder (UF) and Heavy Forwarder (HF), sending logs into the environment, and examining how ingestion flows within a distributed architecture. The aim is to illustrate not only how the cluster is structured but also how data moves through it.
With this two-part approach, the series provides both structural and practical insight into Splunk’s distributed architecture, from spinning up the cluster to handling log ingestion at scale.
In this setup, to better understand the cluster architecture, application configuration will be done manually.
⚙️ For automated installation using Ansible, see the official guide: Splunk Docs: docker-splunk
📚 If you’re new to Ansible, you can check out my guide: Splunk Multi-Server Setup Using Ansible
Prerequisites:
- Docker & Docker Desktop Make sure Docker is installed and running on your machine. Docker Desktop provides an easy-to-use interface for managing containers.
- VS Code (Optional) Recommended for editing configuration files and running commands efficiently
- Basic Splunk Knowledge A foundational understanding of Splunk’s core components such as Search Heads, Indexers, Cluster Manager, Deployment Server, and the configuration app structure will make it easier to follow the setup and understand how each component works together.
In the architecture diagram, elements shown in red will be completed in Part 1, while those in lilac will be addressed in Part 2.
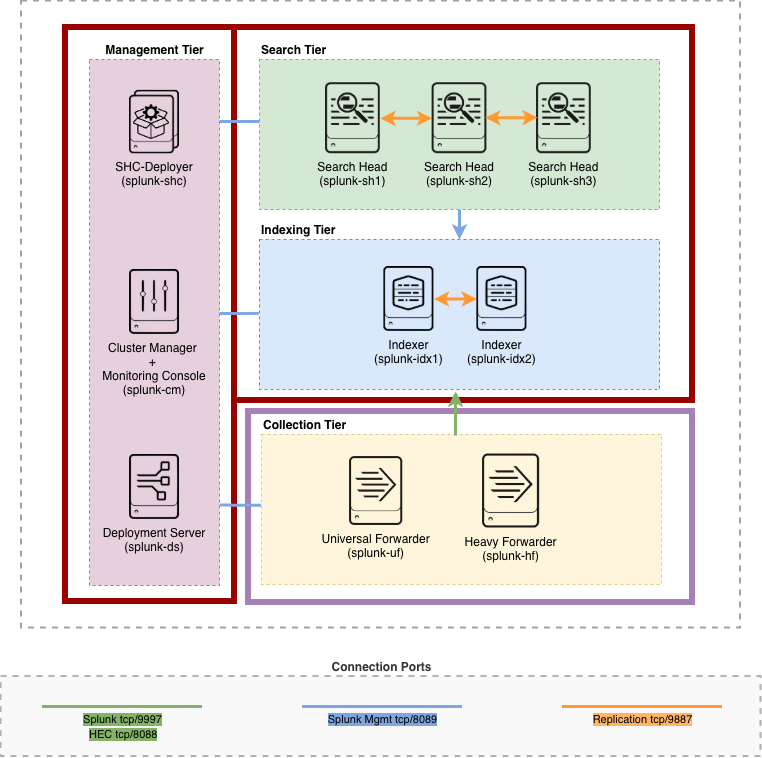
Splunk Lab Architecture
⚠️ Warning!
This Docker-based Splunk deployment is designed for lab, learning, and testing purposes only. It is not intended for production use.
Since multiple Splunk components (such as Search Head, Indexer, Cluster Manager, Deployer, etc.) run on a single host as separate containers, this setup requires relatively high CPU and memory resources.
🧩 Step 1: Build the Compose file
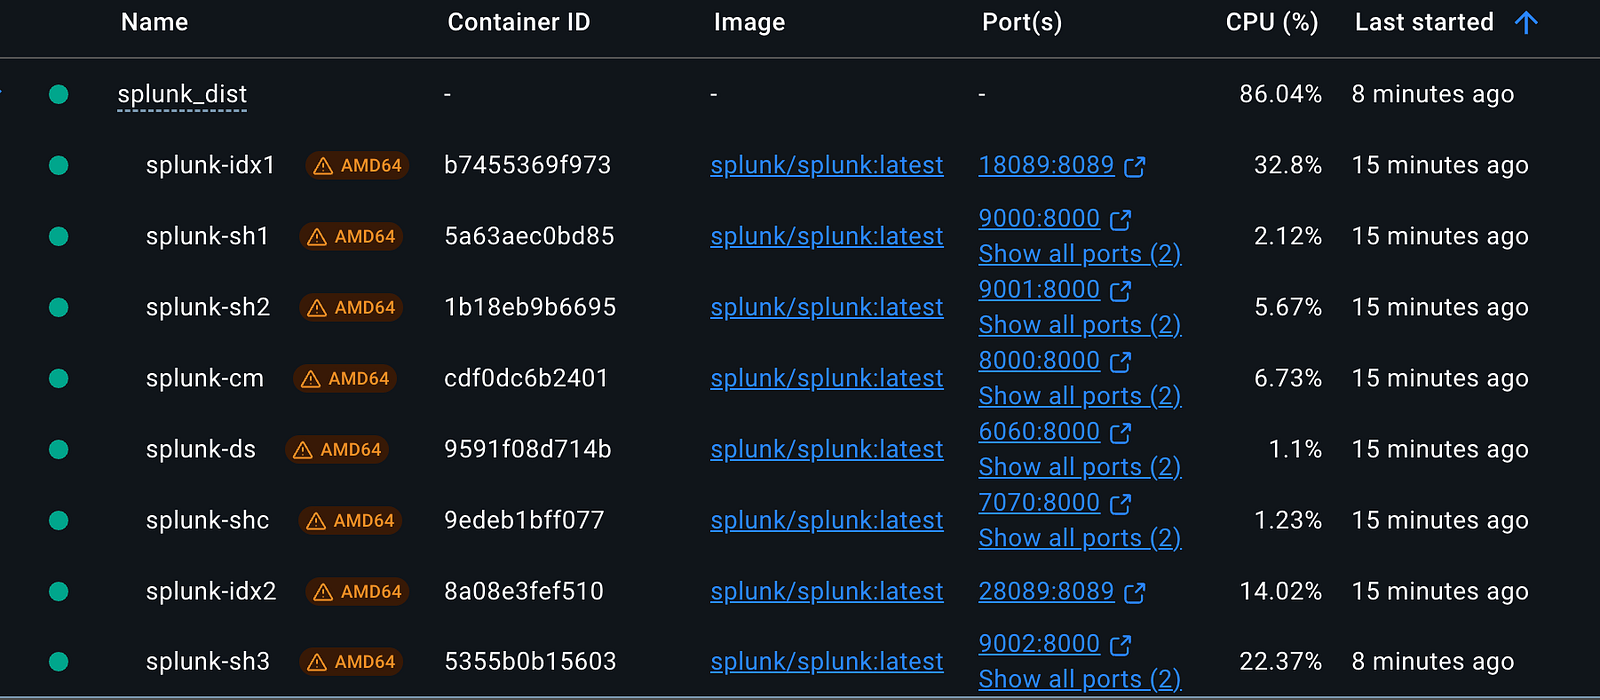
The following Docker Compose file launches 7 individual Splunk containersthat form the foundation of a distributed environment.
It sets up the necessary Splunk instances (Indexer, Search Head, Cluster Manager, Deployment Server, etc.) connected via a shared Docker bridge network (splunk-net) with dedicated persistent volumes for data storage. Each container runs its own Splunk instance with exposed management ports, enabling seamless inter-component communication.
Note that application configuration and cluster setup are separate steps that should be addressed after the containers are up and running.
⚠️ Warning:Ensure that all exposed ports (e.g., 8000, 8089, 9000+, etc.) are free on your host system.
docker-compose.yml:
# docker-compose.yml (snippet)
# Source: https://github.com/seynur/seynur-demos/blob/main/splunk/splunk-cluster-lab-docker/docker-compose.yml

services:
  cm:
    image: splunk/splunk:latest
    container_name: splunk-cm
    hostname: splunk-cm
    platform: linux/amd64
    environment:
      SPLUNK_START_ARGS: "--accept-license"
      SPLUNK_GENERAL_TERMS: "--accept-sgt-current-at-splunk-com"
      SPLUNK_PASSWORD: "admin123"
    ports:
      - "8000:8000"    # CM Web
      - "8089:8089"    # CM Management port
    volumes:
      - cm-etc:/opt/splunk/etc
      - cm-var:/opt/splunk/var
    networks:
      - splunk-net

  idx1:
    image: splunk/splunk:latest
    container_name: splunk-idx1
    ...
⚙️ The platform setting linux/amd64 is optional and can be customized or removed based on your system.
You can view the complete docker-composefile here. Although the full configuration includes both Heavy Forwarder (HF) and Universal Forwarder (UF) services, the sections marked as Part 2 can be removed for the setup demonstrated in Part 1. The environment can be fully deployed and tested without the forwarders, which will be introduced and configured in Part 2.
Run the following command to start all containers for the Splunk distributed environment:
docker compose -p splunk_dist up -d
Monitor running containers in Docker Desktop under the Containers section.
Docker Containers
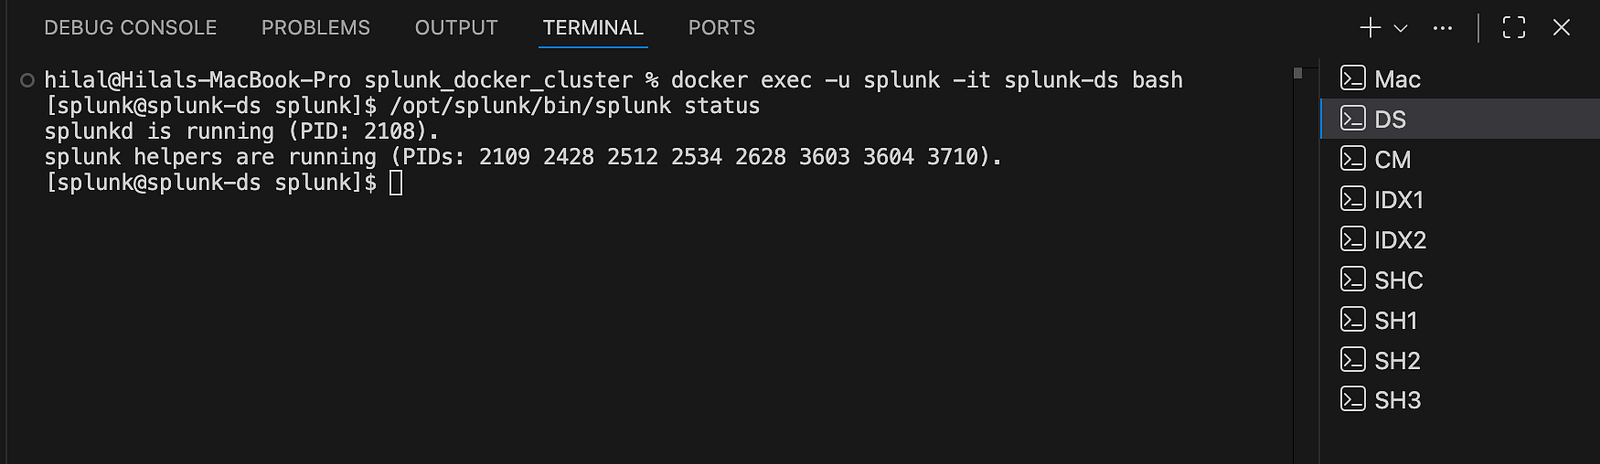
Access the bash shell of any Splunk container as the splunk user using the -u splunk option with docker exec. This ensures proper file permissions and the correct environment context for Splunk processes:
# Access the container shell as the 'splunk' user
docker exec -u splunk -it splunk-ds bash      # Deployment Server
docker exec -u splunk -it splunk-cm bash      # Cluster Manager
docker exec -u splunk -it splunk-idx1 bash    # Indexer 1
docker exec -u splunk -it splunk-idx2 bash    # Indexer 2
docker exec -u splunk -it splunk-shc bash     # Search Head Cluster
docker exec -u splunk -it splunk-sh1 bash     # Search Head 1
docker exec -u splunk -it splunk-sh2 bash     # Search Head 2
docker exec -u splunk -it splunk-sh3 bash     # Search Head 3
You can use VS Code’s integrated terminal to easily connect to and manage any running Splunk container.
VS Code Terminal
For easier browser access, add the following entries to your /etc/hosts file (edit with sudo vi /etc/hosts):
127.0.0.1 splunk-cm
127.0.0.1 splunk-ds
127.0.0.1 splunk-shc
127.0.0.1 splunk-sh1
127.0.0.1 splunk-sh2
127.0.0.1 splunk-sh3
Note: These instructions are for macOS; adjust accordingly for other operating systems.
Once the containers are up and running, you can access the Splunk Web interface on each instance through their respective exposed ports.
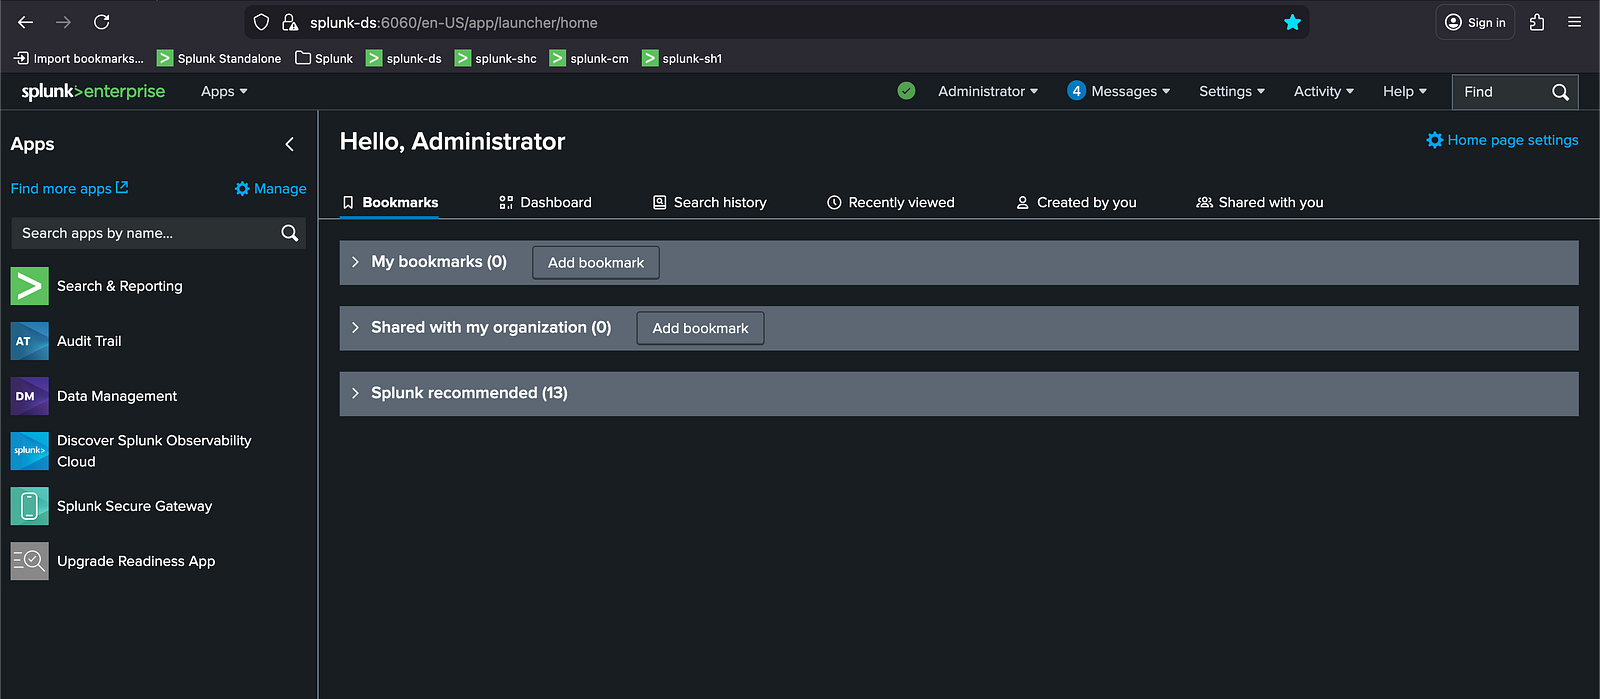
Splunk Web Interface
🧩 Step 2: Clone the repository
Clone the repository to access all required configuration files located under splunk/splunk-cluster-lab-docker in the seynur-demos project:
git clone https://github.com/seynur/seynur-demos
The cloned configuration files will be used during the application configuration phase. Once the configuration set is in place, the deployment workflow proceeds through four main phases: first, set up the Deployment Server (DS); next, configure the Cluster Manager (CM) and Indexers (IDXs); then deploy the Search Head Cluster (SHC) and Search Heads (SH); and finally, set up the Monitoring Console (MC).
ℹ️ This guide does not cover the internal structure of the configuration files; instead, it focuses on how these configurations are deployed within the environment.
🧩 Step 3: Configure the Deployment Server
The Deployment Server requires both local configuration apps and deployment apps intended for distribution to forwarders and other Splunk components.
1. Copy Configuration Apps to the Deployment Server
Apps placed under /opt/splunk/etc/apps are used locally by the Deployment Server itself. To copy the necessary configuration apps from the local machine into the Docker container, run the following commands:
docker cp <path_to_cloned_repo>/seynur-demos/splunk/splunk-cluster-lab-docker/ds/:opt:splunk:etc:apps/org_all_search_base splunk-ds:/opt/splunk/etc/apps/
docker cp <path_to_cloned_repo>/seynur-demos/splunk/splunk-cluster-lab-docker/ds/:opt:splunk:etc:apps/org_ds_outputs splunk-ds:/opt/splunk/etc/apps/
docker cp <path_to_cloned_repo>/seynur-demos/splunk/splunk-cluster-lab-docker/ds/:opt:splunk:etc:apps/org_full_license_server splunk-ds:/opt/splunk/etc/apps/
2. Copy Deployment Apps for Distribution
Apps placed under /opt/splunk/etc/deployment-apps are distributed to forwarders and other Splunk components through Deployment Server server classes. Use the commands below to copy the deployment apps:
docker cp <path_to_cloned_repo>/seynur-demos/splunk/splunk-cluster-lab-docker/ds/:opt:splunk:etc:deployment-apps/org_all_indexes splunk-ds:/opt/splunk/etc/deployment-apps/
docker cp <path_to_cloned_repo>/seynur-demos/splunk/splunk-cluster-lab-docker/ds/:opt:splunk:etc:deployment-apps/org_all_search_base splunk-ds:/opt/splunk/etc/deployment-apps/
docker cp <path_to_cloned_repo>/seynur-demos/splunk/splunk-cluster-lab-docker/ds/:opt:splunk:etc:deployment-apps/org_all_search_outputs splunk-ds:/opt/splunk/etc/deployment-apps/
docker cp <path_to_cloned_repo>/seynur-demos/splunk/splunk-cluster-lab-docker/ds/:opt:splunk:etc:deployment-apps/org_APP_TEMPLATE splunk-ds:/opt/splunk/etc/deployment-apps/
docker cp <path_to_cloned_repo>/seynur-demos/splunk/splunk-cluster-lab-docker/ds/:opt:splunk:etc:deployment-apps/org_forwarder_outputs splunk-ds:/opt/splunk/etc/deployment-apps/
docker cp <path_to_cloned_repo>/seynur-demos/splunk/splunk-cluster-lab-docker/ds/:opt:splunk:etc:deployment-apps/org_full_license_server splunk-ds:/opt/splunk/etc/deployment-apps/
docker cp <path_to_cloned_repo>/seynur-demos/splunk/splunk-cluster-lab-docker/ds/:opt:splunk:etc:deployment-apps/org_search_bundle_size_distsearch splunk-ds:/opt/splunk/etc/deployment-apps/
3. Adjust File Permissions
To ensure proper file ownership and permissions, enter the Deployment Server container as root and update ownership:
docker exec -u 0 -it splunk-ds bash   # enter as root
chown -R splunk:splunk /opt/splunk
exit
4. Restart Splunk:
Restart the Splunk instance within the container to apply the changes:
docker exec -u splunk -it splunk-ds bash   # re-enter as splunk
/opt/splunk/bin/splunk restart
🧩 Step 4: Configure the Indexer Cluster
This step covers the configuration of both the Cluster Manager (CM) and the Indexer peers (IDX1 & IDX2).
1. Configure the Cluster Manager (CM)
Begin by copying the necessary configuration applications into the Cluster Manager’s app directory:
docker cp <path_to_cloned_repo>/seynur-demos/splunk/splunk-cluster-lab-docker/cm/:opt:splunk:etc:apps/org_all_search_base splunk-cm:/opt/splunk/etc/apps/
docker cp <path_to_cloned_repo>/seynur-demos/splunk/splunk-cluster-lab-docker/cm/:opt:splunk:etc:apps/org_all_search_outputs splunk-cm:/opt/splunk/etc/apps/
docker cp <path_to_cloned_repo>/seynur-demos/splunk/splunk-cluster-lab-docker/cm/:opt:splunk:etc:apps/org_manager_deploymentclient splunk-cm:/opt/splunk/etc/apps/
docker cp <path_to_cloned_repo>/seynur-demos/splunk/splunk-cluster-lab-docker/cm/:opt:splunk:etc:apps/org_multisite_manager_base splunk-cm:/opt/splunk/etc/apps/
Adjust file permissions to ensure correct ownership:
docker exec -u 0 -it splunk-cm bash   # enter as root
chown -R splunk:splunk /opt/splunk
exit
Restart Splunk within the container to apply the changes:
docker exec -u splunk -it splunk-cm bash   # re-enter as splunk
/opt/splunk/bin/splunk restart
2. Configure the Indexer Peers (IDX1 & IDX2)
Copy the required configuration apps to each indexer peer:
# IDX1
docker cp <path_to_cloned_repo>/seynur-demos/splunk/splunk-cluster-lab-docker/idx1/:opt:splunk:etc:apps/org_cluster_indexer_base splunk-idx1:/opt/splunk/etc/apps/

# IDX2
docker cp <path_to_cloned_repo>/seynur-demos/splunk/splunk-cluster-lab-docker/idx2/:opt:splunk:etc:apps/org_cluster_indexer_base splunk-idx2:/opt/splunk/etc/apps/
Adjust permissions on both indexers:
# IDX1
docker exec -u 0 -it splunk-idx1 bash # enter as root
chown -R splunk:splunk /opt/splunk
exit

# IDX2
docker exec -u 0 -it splunk-idx2 bash # enter as root
chown -R splunk:splunk /opt/splunk
exit
Restart Splunk on each indexer:
# IDX1
docker exec -u splunk -it splunk-idx1 bash # re-enter as splunk
/opt/splunk/bin/splunk restart

# IDX2
docker exec -u splunk -it splunk-idx2 bash # re-enter as splunk
/opt/splunk/bin/splunk restart
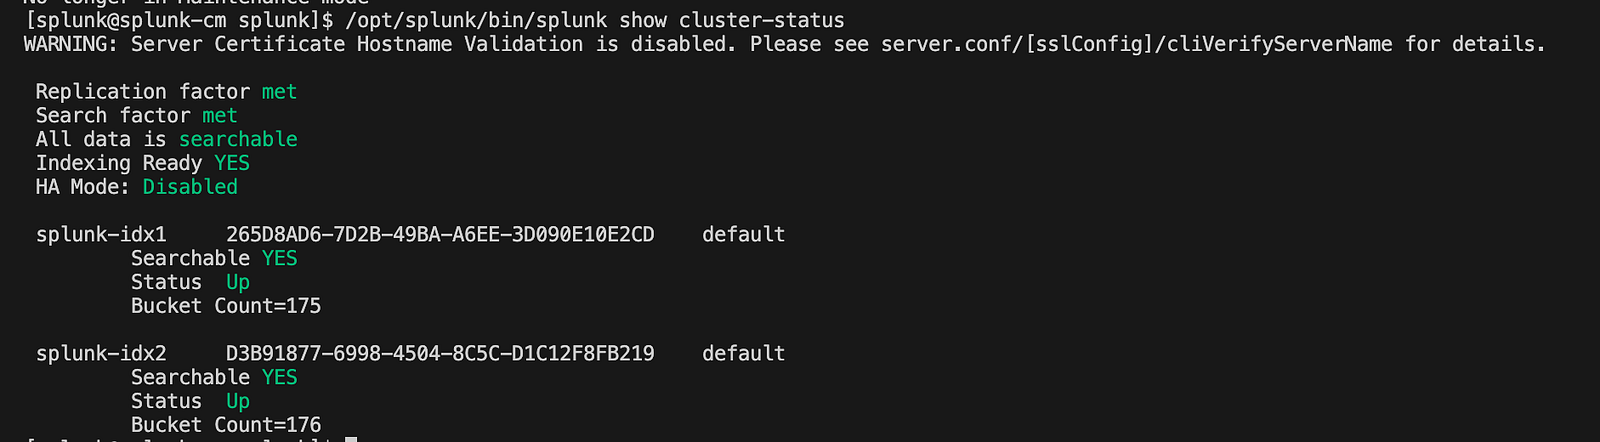
3. Validate the Indexer Cluster Health
With the Cluster Manager and indexer peers configured and restarted, the next step is to validate the overall health of the indexer cluster.
Run the following command on the Cluster Manager to confirm that peers are connected, replication is functioning, and the cluster is operational:
/opt/splunk/bin/splunk show cluster-status
You should see an output similar to the one shown in the screenshot below.
Splunk Web Interface
4. Verify Deployment Server & Configure Server Classes for Indexer Cluster
4.1. Verify Deployment Server Connectivity:
After configuring the Cluster Manager and Indexer peers, confirm that the Cluster Manager is registered with the Deployment Server. This ensures that communication between the two components is functioning correctly.
- Navigate to: Settings → Agent Management
- Confirm that splunk-cm is listed among the connected deployment clients.

The presence of splunk-cm indicates successful retrieval of the deploymentclient.conf file by the Cluster Manager and a healthy connection with the Deployment Server.
4.2. Create a Server Class for Indexer Cluster Applications:
Once the Cluster Manager connection is verified, create a server class to distribute the configuration apps required for the indexer cluster.
- Navigate to: Settings → Agent Management → Server Classes → New Server Class
- Enter the server class name as
sc_idx_cluster_appsand save.
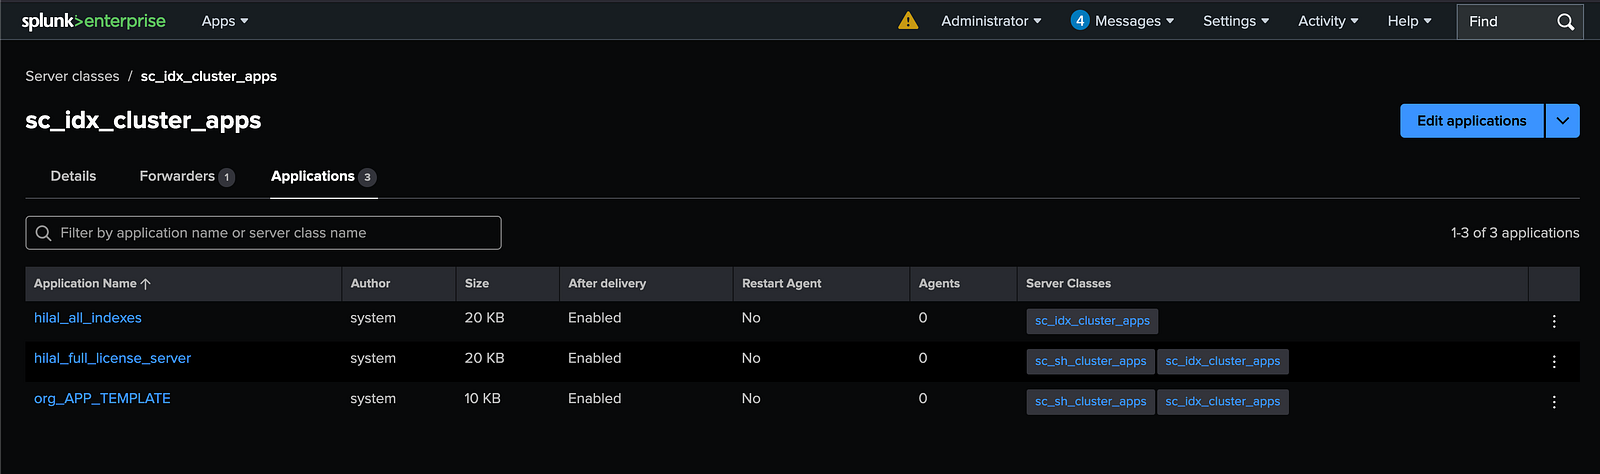
4.3. Assign Applications to the Server Class
Associate the required configuration apps with the newly created server class.
- Go to: Settings → Agent Management → Server Classes → sc_idx_cluster_apps
- Add the following apps:
org_all_indexesorg_full_license_serverorg_APP_TEMPLATE
Save the changes to enable automatic distribution to deployment clients in this server class.
4.4. Add the Cluster Manager as a Deployment Agent:
Specify the Cluster Manager as the recipient for these apps.
- Navigate to: Settings → Agent Management → Server Classes → sc_idx_cluster_apps → Agents
- Under the Include section, add
splunk-cm.
After completion, the server class should show one forwarder, splunk-cm, along with the assigned applications.
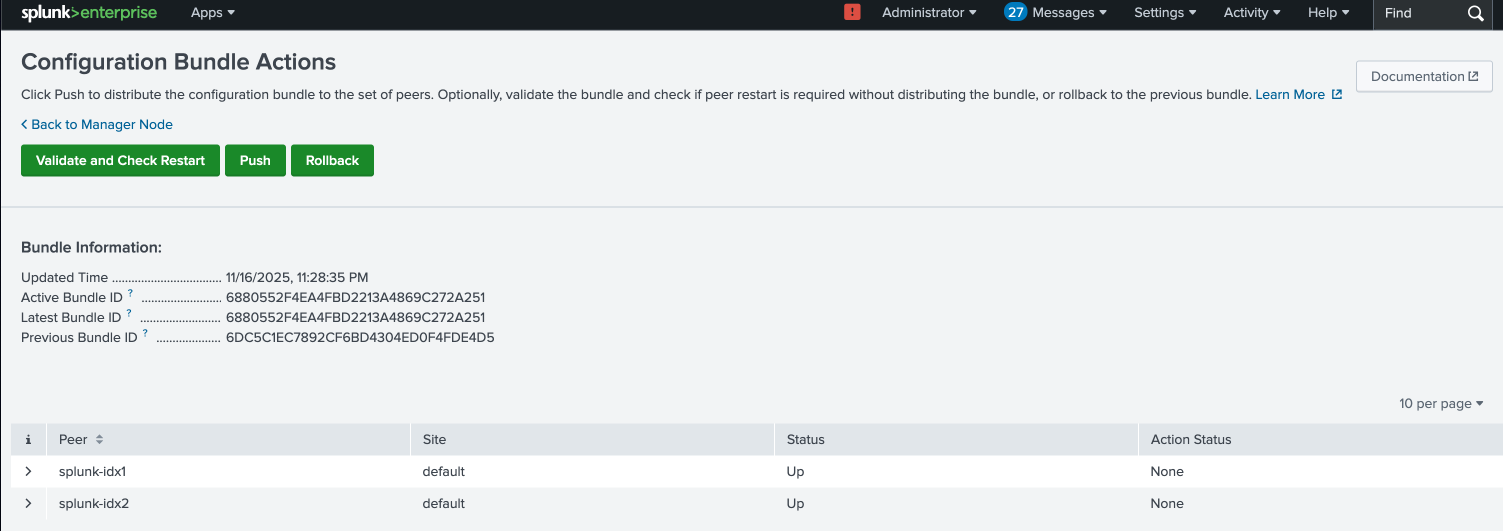
4.5. Push the Changes:
After completing the server class configuration, navigate to the Cluster Manager’s Splunk Web interface. Under **Settings → Indexer Clustering → Configuration Bundle Actions (see section “Use Splunk Web to validate the bundle and check restart” on the Splunk site), perform the following steps:
- Validate the bundle to ensure all configurations are correct and consistent.
- Check the deployment status and verify there are no errors.
- Push the configuration bundle to apply the changes across the cluster.
In this interface, all Indexer peers should be visible, confirming their registration with the Cluster Manager and readiness to receive the updated configuration.
🧩 Step 5: Configure the Search Head Cluster
This step covers the configuration of both the Search Head Deployer (SHC Deployer) and the Search Heads (SH1 & SH2 & SH3).
1. Setup SHC Deployer:
Start by copying the required configuration apps into the SHC Deployer container:
docker cp <path_to_cloned_repo>/seynur-demos/splunk/splunk-cluster-lab-docker/shc/:opt:splunk:etc:apps/org_all_search_base splunk-shc:/opt/splunk/etc/apps
docker cp <path_to_cloned_repo>/seynur-demos/splunk/splunk-cluster-lab-docker/shc/:opt:splunk:etc:apps/org_shcdeployer_deploymentclient splunk-shc:/opt/splunk/etc/apps
Then, add the following settings to the server.conf file located at /opt/splunk/etc/system/local/server.conf inside the SHC Deployer container (use docker exec -u splunk -it splunk-shc bash):
[shclustering]
pass4SymmKey = z4KdE2b23bxY3leW
shcluster_label = ORG Search Head Cluster
Adjust file ownership to ensure proper permissions:
docker exec -u 0 -it splunk-shc bash # enter as root
chown -R splunk:splunk /opt/splunk
exit
Finally, restart Splunk within the container:
docker exec -u splunk -it splunk-shc bash # re-enter as splunk
/opt/splunk/bin/splunk restart
2. Verify Deployment Server & Configure Server Classes for the Search Head Cluster
2.1. Verify Deployment Server Connectivity:
In the Deployment Server UI, you should see splunk-shc under the list of agents.

2.2. Create a Server Class for Search Head Cluster Applications:
Once the Search Head Deployer connection is verified, create a server class to distribute the configuration apps required for the Search Head Cluster.
- Navigate to: Settings → Agent Management → Server Classes → New Server Class
- Enter the server class name as
sc_sh_cluster_appsand save.
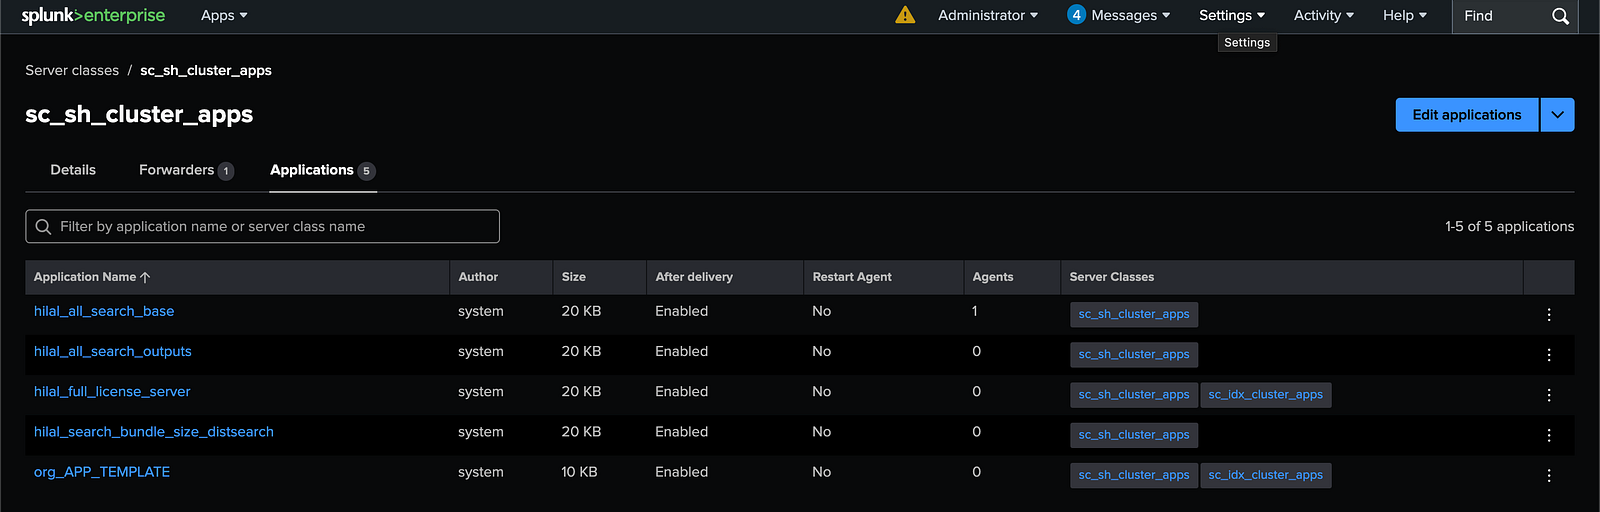
2.3. Assign Applications to the Server Class:
Associate the required configuration apps with the newly created server class.
- Go to: Settings → Agent Management → Server Classes → sc_sh_cluster_apps
- Add the following apps:
org_all_search_baseorg_all_search_outputsorg_full_license_serverorg_search_bundle_size_distsearchorg_APP_TEMPLATE
Save the changes to enable automatic distribution to deployment clients in this server class.
2.4. Add the Search Head Deployer as a Deployment Agent:
Specify the Search Head Deployer as the recipient for these apps.
- Navigate to: Settings → Agent Management → Server Classes → sc_sh_cluster_apps → Agents
- Under the Include section, add
splunk-shc.
After completion, the server class should show one forwarder, splunk-shc, along with the assigned applications.
2.5. Push the Changes:
Push the changes via the Cluster Manager.
3. Initialize SHC Members:
Each Search Head member (splunk-sh1, splunk-sh2, splunk-sh3) must be individually configured to join the Search Head Cluster (SHC). This involves setting cluster-specific parameters and ensuring the member can communicate with the SHC Deployer and other cluster nodes. The configuration is applied by running the following command on each member:
# This command initializes the Search Head Cluster (SHC) configuration and updates the server.conf file located at /opt/splunk/etc/system/local/server.conf on the Search Head member where it is run.

/opt/splunk/bin/splunk init shcluster-config \
 -mgmt_uri https://<your_splunk-sh_name>:8089 \
 -replication_port 9887 \
 -conf_deploy_fetch_url https://splunk-shc:8089 \
 -secret z4KdE2b23bxY3leW \
 -shcluster_label "ORG Search Head Cluster"

# Restart Splunk

/opt/splunk/bin/splunk restart
4. Bootstrap the Cluster Captain
On the first Search Head member (splunk-sh1), the cluster captain role must be initialized (bootstrapped). The cluster captain is responsible for coordinating the activities within the Search Head Cluster (SHC), such as managing configuration updates and coordinating searches.
Run the following command on splunk-sh1:
/opt/splunk/bin/splunk bootstrap shcluster-captain \
 -servers_list https://splunk-sh1:8089,https://splunk-sh2:8089,https://splunk-sh3:8089
5. Integrate Search Heads with the Cluster Manager
5.1. Configure Cluster Integration on Each Search Head:
To enable communication between the Search Heads and the Cluster Manager (CM), each Search Head must be configured to integrate with the indexer cluster. This configuration ensures the Search Heads are aware of the cluster state and can distribute search workloads appropriately.
Run the following command on each Search Head to apply the cluster integration settings:
# This command writes the cluster integration settings to the server.conf file located at /opt/splunk/etc/system/local/server.conf on each Search Head.

/opt/splunk/bin/splunk edit cluster-config \
 -mode searchhead \
 -manager_uri https://splunk-cm:8089 \
 -secret meJKB2b23bilWDoP

# Restart Splunk to activate the updated configuration

/opt/splunk/bin/splunk restart
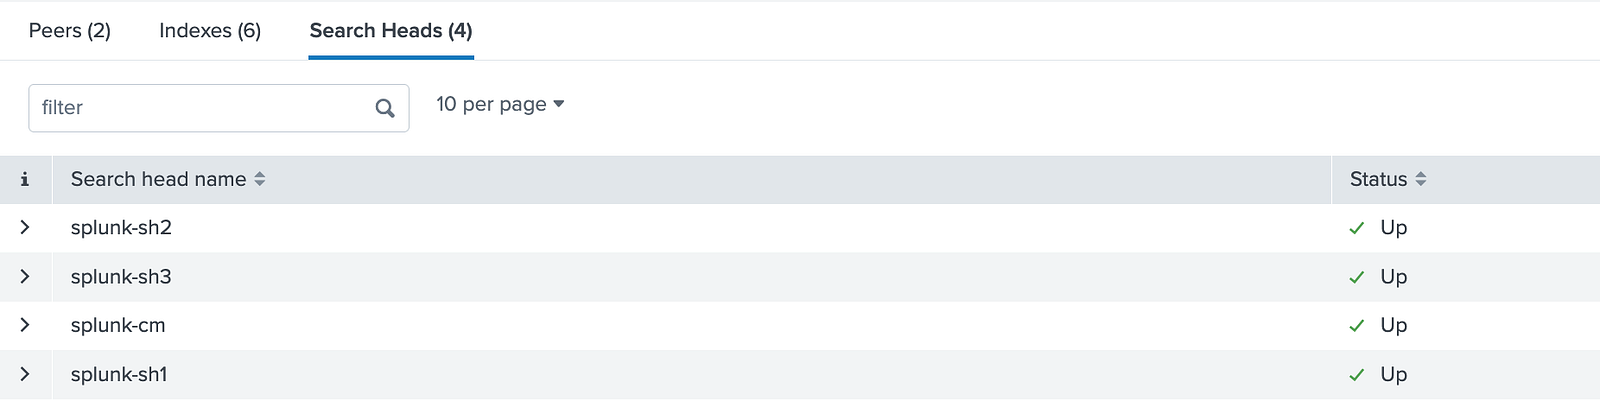
5.2. Validate Search Head Integration Status:
You should see a screen similar to the one below, displaying the Search Heads connected to the Cluster Manager with a status of Up, confirming successful integration.
6. Apply the SHCluster Bundle
From the SHC Deployer, the configuration bundle must be pushed to the Search Head Cluster members. This ensures that all Search Heads receive the latest configurations and apps managed by the Deployer.
Run the following command on the SHC Deployer to push the bundle to a target Search Head member (e.g., splunk-sh1):
/opt/splunk/bin/splunk apply shcluster-bundle -target https://splunk-sh1:8089
This command uploads the bundle and distributes it across the cluster, synchronizing the configurations.
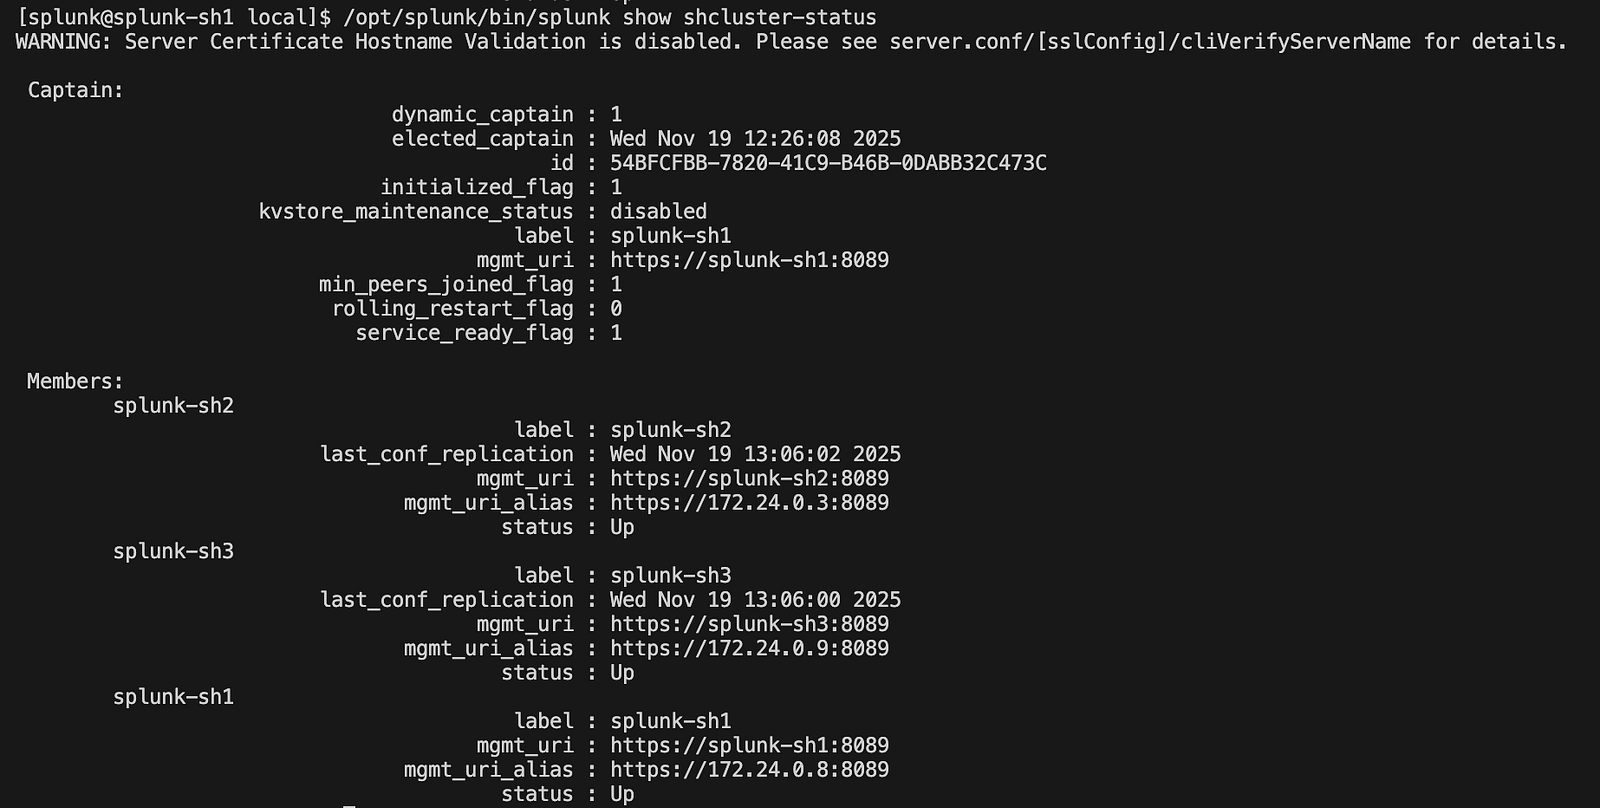
7. Verify the SHC Status
After applying the bundle, verify the health and status of the Search Head Cluster. This can be done from any Search Head member by running the status command:
/opt/splunk/bin/splunk show shcluster-status
This command displays the current state of the cluster, showing connected members, their roles, and whether the cluster is functioning correctly.
🧩 Step 6: Configure the Monitoring Console
To monitor a distributed Splunk environment effectively, the Monitoring Console (MC) needs to be configured in distributed mode. Follow these steps to set it up:
1. Enable Distributed Mode
Navigate to the Monitoring Console settings and enable distributed mode to allow the MC to communicate with multiple Splunk instances:
- Go to MC (CM) → Settings → Distributed Search → Distributed Search Setup
- Select Distributed Mode
- Click Save to apply the changes.
2. Add Search Peers
Add the key servers in your environment as Search Peers so the MC can gather data from them: Go to MC → Settings → Distributed Search → Search Peers → New Search Peer
Add the following peer URLs one by one:
Deployment Server (DS) Peer URL: https://splunk-ds:8089
Search Head Cluster (SHC) Peer URL: https://splunk-shc:8089
Search Head1 (SH1) Peer URL: https://splunk-sh1:8089
Search Head2 (SH2) Peer URL: https://splunk-sh2:8089
Search Head3 (SH3) Peer URL: https://splunk-sh3:8089
3. Switch Monitoring Console to Distributed Mode
After adding the peers, configure the MC itself to operate in distributed mode to correctly display data across the environment:
- Navigate to Settings → Monitoring Console → Settings → General Setup
- Select Distributed mode
- Click Continue
- Apply the changes by clicking Apply Changes and then Save.
4. Assign and Verify Server Roles
Once distributed mode is active, check that each server has the correct role assigned in the MC. Adjust roles if necessary to ensure accurate monitoring and reporting.
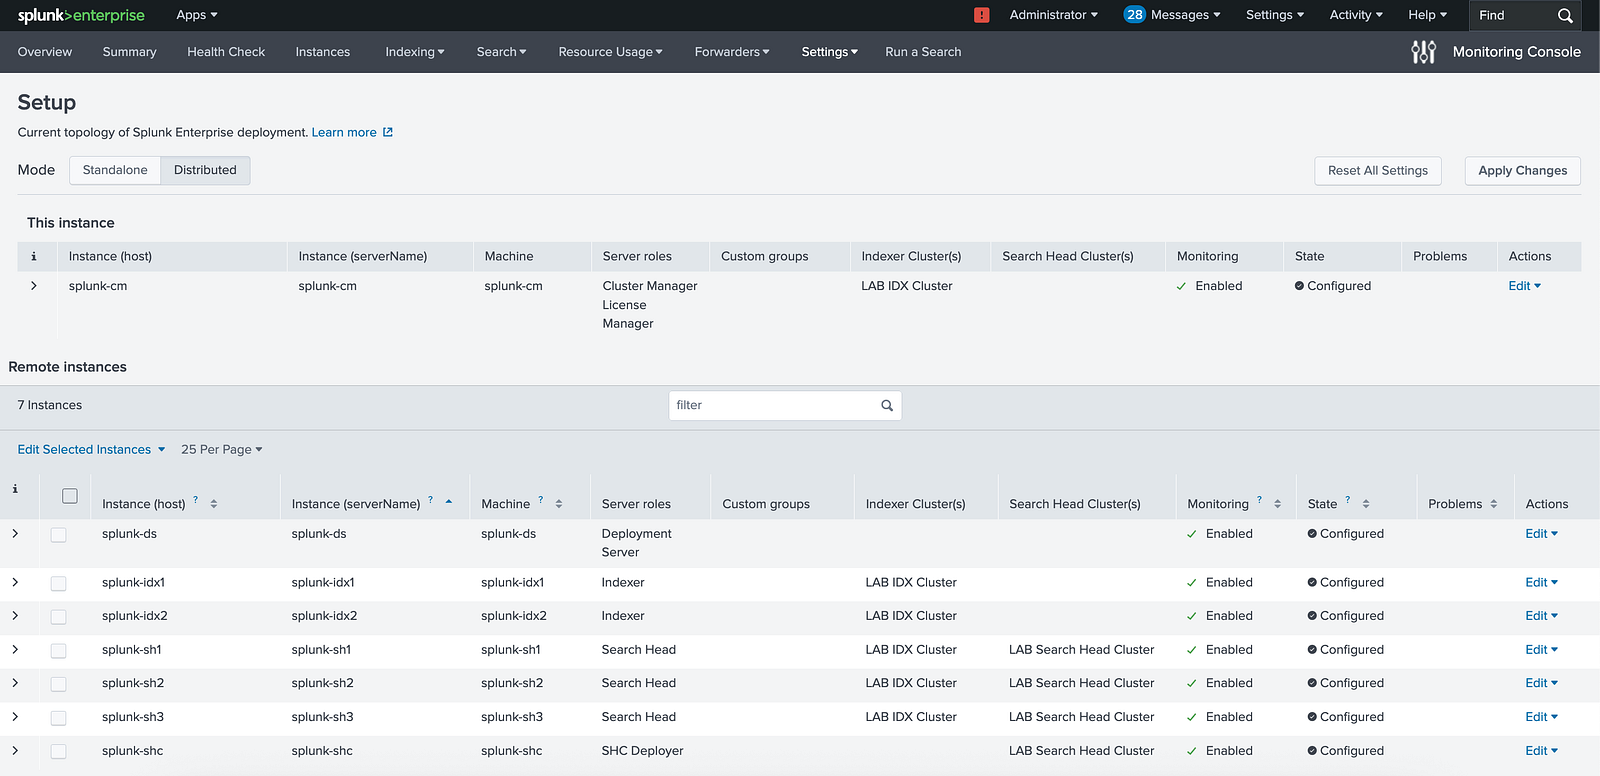
Monitoring Console
Final Checks
Docker Volume Deletion Risks
Before completing the setup, here are some critical points to ensure your Splunk distributed environment remains stable and your data stays safe.
⚠️ High-Risk Commands (Volume Deletion & Data Loss): The following Docker commands will remove volumes and permanently delete all Splunk configuration and indexed data. Use with extreme caution:
docker compose down -v
docker rm -v <container>
docker volume rm cm-etc ds-etc ...
docker system prune -a --volumes
✅ Safe Commands (No Volume Impact):
These commands are safe to use and will not delete any volumes, as long as you keep the same project name and use the same docker-compose.yml:
docker stop <container>
docker start <container>
docker compose stop
docker compose up -d
These commands only stop/start the containers and will preserve all Splunk configuration and data stored in volumes.
Deployment App Flow Overview
The Deployment Server (DS) stores all deployment apps under /opt/splunk/etc/deployment-apps, grouped mainly as sc_idx_cluster_appsand sc_sh_cluster_apps. These app bundles are distributed either to the Cluster Manager or to the Search Head Cluster, depending on their purpose.
The Cluster Manager (CM) receives the sc_idx_cluster_appsfrom the DS and places them in its local directory at /opt/splunk/etc/manager-apps. From the CM UI, you follow the standard workflow — Validate, Check Restart Required, and finally Push the bundle. Once pushed, the apps are propagated to each Indexer (IDX1, IDX2), where they land under /opt/splunk/etc/peer-apps.
Similarly, the Search Head Cluster (SHC) receives the sc_sh_cluster_appsfrom the DS, which are stored on the SHC members at /opt/splunk/etc/shcluster/apps. To distribute these applications across the cluster, you run the apply shcluster-bundle command on the captain node of the Search Head Cluster. After the bundle is applied, the apps are deployed to all SH members (e.g., SH1 and SH2) under the standard app directory /opt/splunk/etc/apps.
Ensuring pass4SymmKey Consistency in Splunk Cluster Deployments
- In a multisite environment, the
pass4SymmKeyvalue in both the multisite_manager_base and cluster_indexer_base must be identical. The Cluster Manager and its cluster members must agree on this setting. - For the Search Head (SH), the
pass4SymmKeyspecified in/opt/splunk/etc/system/local/server.confmust also be the same as the cluster keys. - When you edit the
server.conffile to specify or change thepass4SymmKey, the Splunk platform encrypts (hashes) the key after a restart. Be sure to remember your key in plaintext, as recovering it if forgotten is very difficult.