PART 1 — Understanding Keepalived for High Availability
🫧 This post is divided into two parts. The first part explains the fundamentals of Keepalived and how it provides high availability through VRRP. The second part focuses on a practical setup, showing how to integrate Keepalived with syslog-ng to ensure uninterrupted log forwarding.
In modern infrastructures, resilience is the foundation of reliable operations. Ensuring service continuity and maintaining telemetry visibility require robust high-availability and load-balancing strategies.
Load balancing distributes network traffic across a cluster of real servers, thus forming one or more virtual services that remain accessible even under stress or failure. However, when designing such topologies, it’s critical to account not only for the availability of backend servers but also for the resilience of the load balancer itself.
To prevent the load balancer from becoming a single point of failure, high availability (HA) safeguards uninterrupted log collection during server outages or maintenance. A single host or gateway failure can compromise critical visibility and disrupt operations.
This is where Keepalived plays a pivotal role. It provides both load balancing and HA capabilities by managing a floating virtual IP through VRRP and automatically handling failover between master and backup nodes. With Keepalived, log collectors and shippers always have a stable endpoint, so that even if one server fails, log flow continues seamlessly and visibility into your environment remains available.
1. What is Keepalived?
Keepalived is a Linux daemon that provides high availability (HA) and load balancing for LVS (Linux Virtual Server) clusters. It uses the VRRP (Virtual Router Redundancy Protocol) to manage a VIP (Virtual IP Address) that can automatically move between servers in a cluster, enabling seamless failover and continuous service availability.
Keepalived operates through two main components, each serving a different network layer:
| Feature                  | Layer               | Description                                                  |
|--------------------------|---------------------|--------------------------------------------------------------|
| IPVS (Load Balancing)    | Layer 4 (Transport) | Routes traffic based on TCP/UDP connection information.      |
| VRRP (High Availability) | Layer 3 (Network)   | Provides IP failover and manages active-passive transitions. |
By combining these two mechanisms, Keepalived delivers both load balancing and high availability within a single, lightweight framework.
In a typical failover setup, Keepalived continuously monitors the health of each node. When the active (master) server becomes unavailable, the standby node automatically takes over the virtual IP (VIP). Clients continue to connect to the same virtual address without interruption, maintaining stable connectivity throughout the failover process.
By eliminating single points of failure, Keepalived provides redundancy, minimizes downtime, and ensures uninterrupted service delivery. This makes it an ideal solution for building resilient infrastructure.
2. Environment Setup
Step 1: Install a Virtualization Tool
-
MacBook: Use UTM (for Apple Silicon) or VirtualBox (for Intel)
-
Windows: Use VirtualBox or VMware Workstation Player
Step 2: Create Two Linux Virtual Machines & Configure Network Interfaces
Create two Linux VMs (Ubuntu 22.04 or CentOS recommended) and name them syslog1 and syslog2.
Assign static IPs on their bridged interfaces so both machines are in the same subnet.
  Hostname   |    IP Address   |        Purpose
------------------------------------------------------------
   syslog1   |    10.0.0.11    |   Primary Syslog Server
   syslog2   |    10.0.0.12    |   Secondary Syslog Server
Each VM should have two network interfaces:
⚠️ Why two interfaces?
The bridged interface (enp0s1) simulates the local network where Keepalived advertises VRRP heartbeats and manages the virtual IP. The NAT interface (enp0s2) is only used for outbound internet access, ensuring that package downloads and system updates do not interfere with HA testing.
  Interface  |     Mode     |    Purpose
------------------------------------------------------------------------
  enp0s1     |    Bridged   |   LAN / VIP / Failover tests (static IP)
  enp0s2     |     NAT      |   Internet access for package installation
Follow the steps below to configure the static IPs and network interfaces for each VM.
🧩 syslog1:
# /etc/netplan/00-installer-config.yaml
# enp0s1: Bridged interface with static IP (10.0.0.11) for LAN and VIP failover
# enp0s2: NAT interface with DHCP for internet access

network:
  version: 2
  ethernets:
    enp0s1:
      dhcp4: no
      addresses:
        - 10.0.0.11/24
    enp0s2:
      dhcp4: yes
🧩 syslog2:
# /etc/netplan/00-installer-config.yaml
# enp0s1: Bridged interface with static IP (10.0.0.12) for LAN and VIP failover
# enp0s2: NAT interface with DHCP for internet access

network:
  version: 2
  ethernets:
    enp0s1:
      dhcp4: no
      addresses:
        - 10.0.0.12/24
    enp0s2:
      dhcp4: yes
Apply the configuration on each VM: sudo netplan apply
Verify the routing and interface setup: ip route
Expected output:
default via <NAT_GATEWAY_IP> dev enp0s2 proto dhcp src <NAT_IP> metric 100
10.0.0.0/24 dev enp0s1 proto kernel scope link src <STATIC_IP>
<NAT_SUBNET>/24 dev enp0s2 proto kernel scope link src <NAT_IP> metric 100
<LAN_GATEWAY_IP> dev enp0s2 proto dhcp scope link src <NAT_IP> metric 100
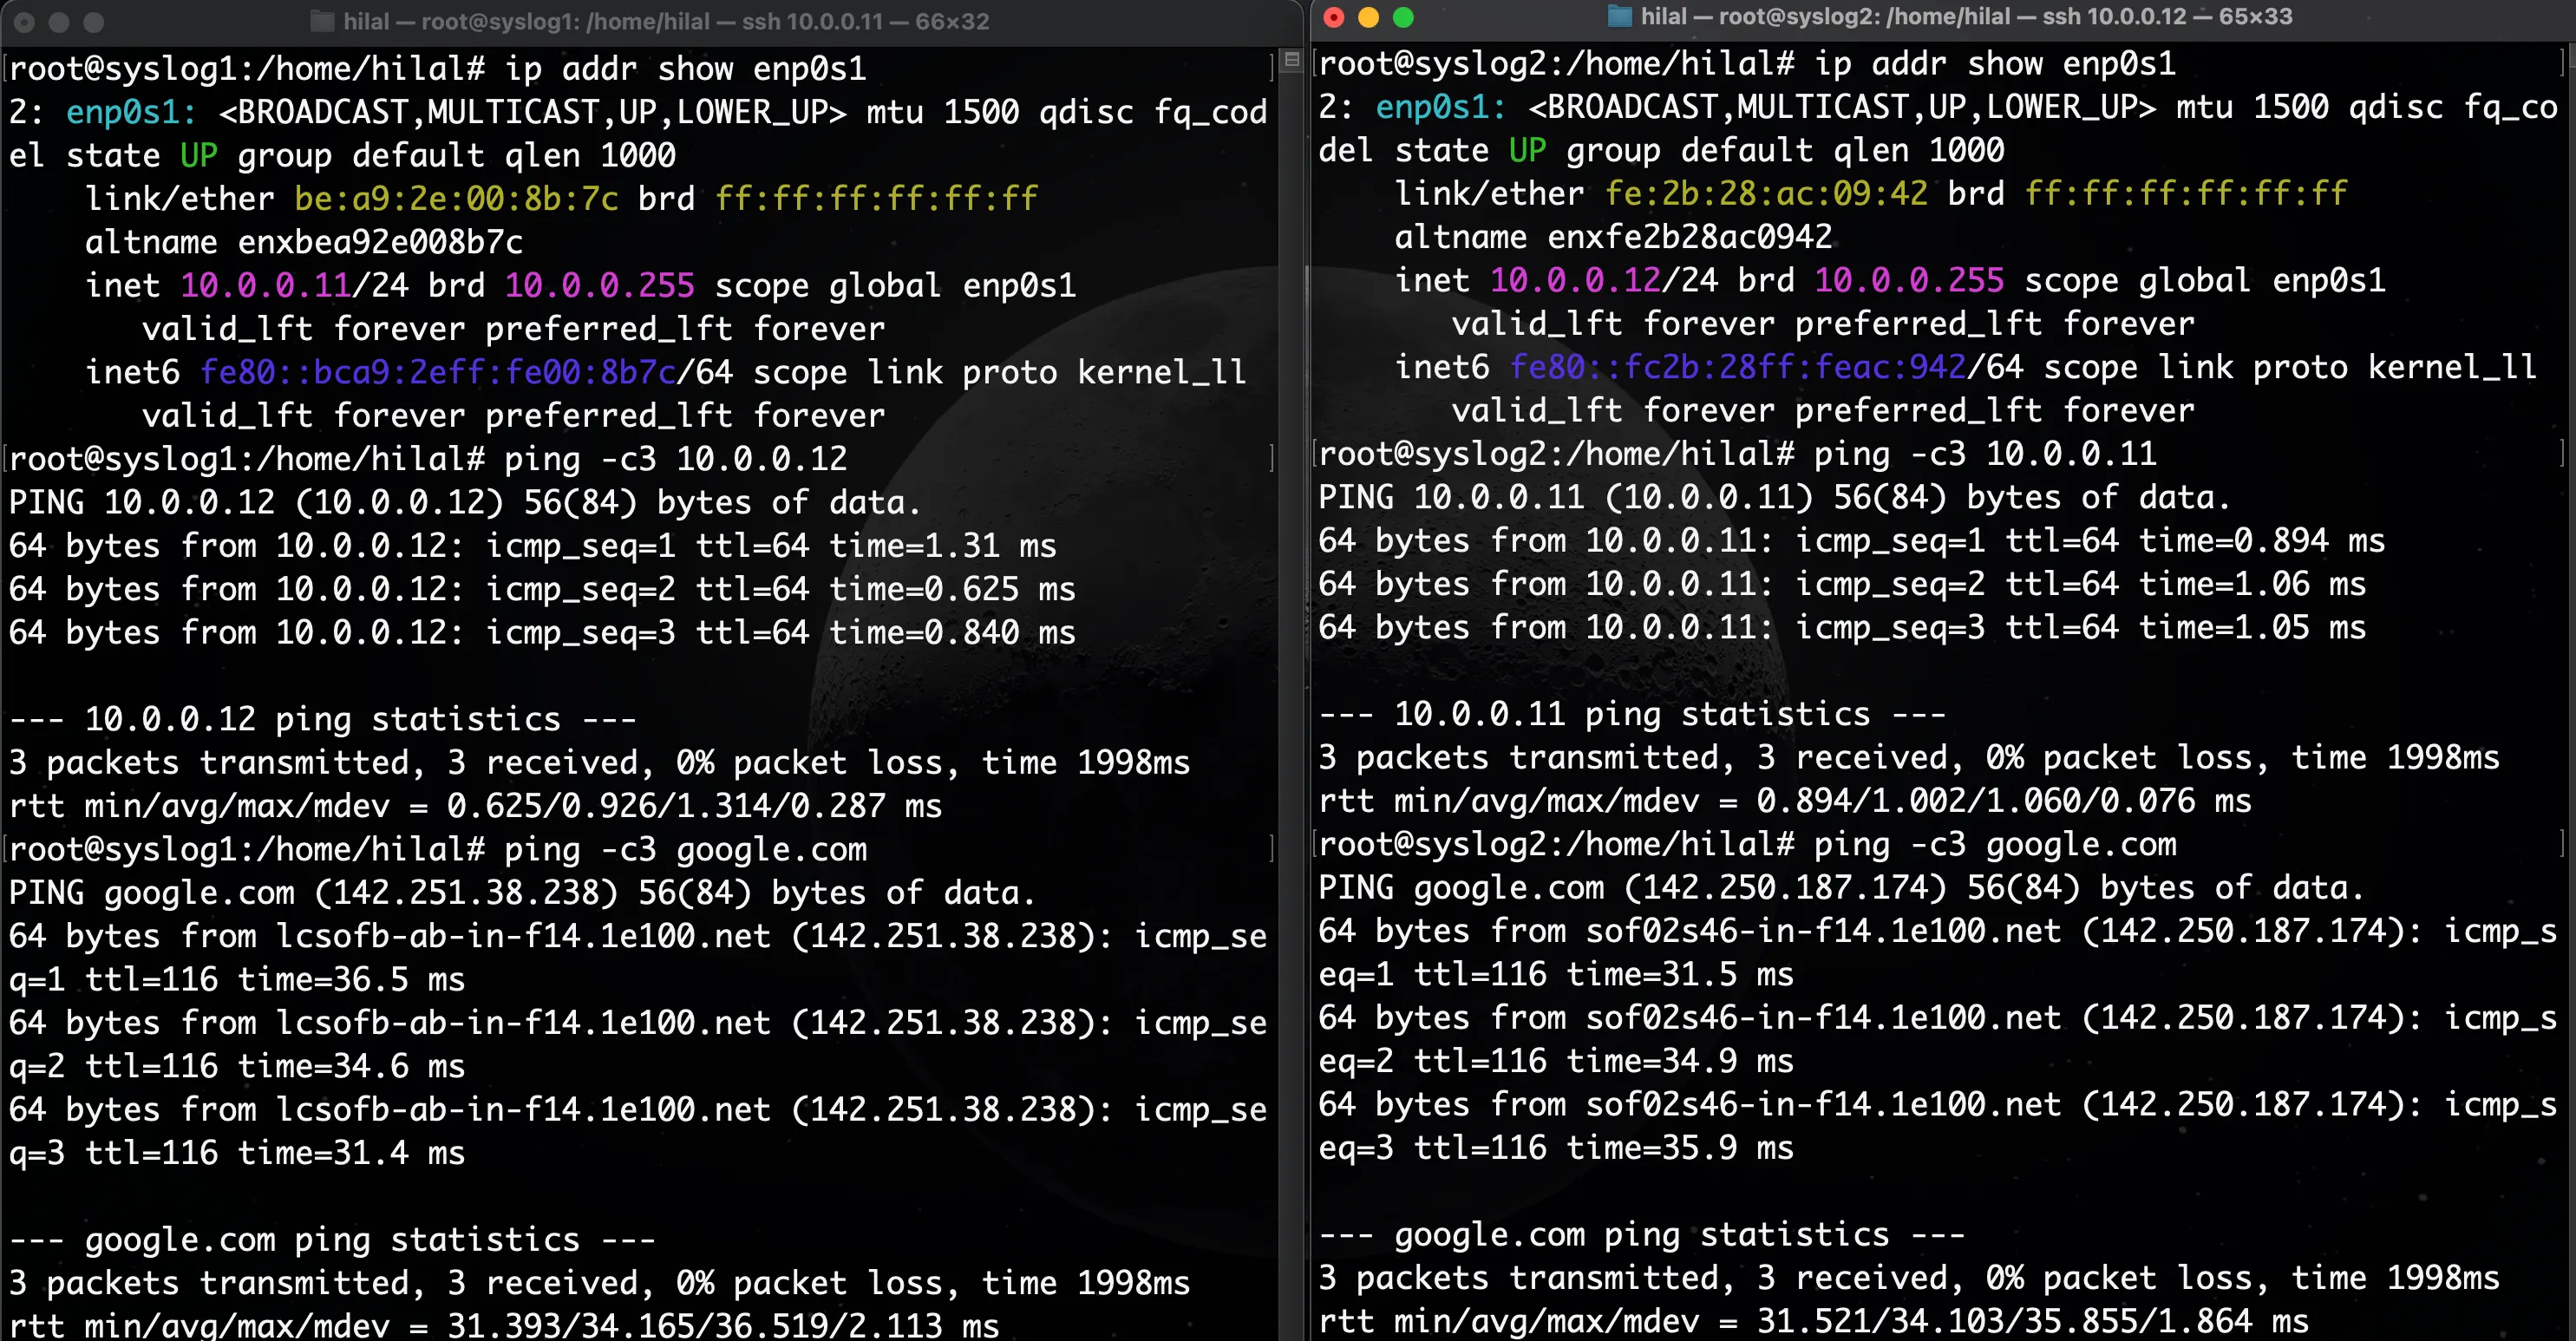
Step 3: Verify Network Connectivity
Test LAN / Bridged interface connectivity:
# Test LAN / Bridged Interface Connectivity
ping -c3 10.0.0.11  # from syslog2
ping -c3 10.0.0.12  # from syslog1

# Test Internet / NAT Interface Connectivity
ping -c3 google.com # from both syslog1 & syslog2
Successful ping replies confirm that both machines are reachable over the bridged network.
Expected output:
🫧 Optional: Assign a static IP (e.g., 10.0.0.100) to your laptop on the same subnet for direct SSH access. Replace en0 with your active network interface:
sudo ip addr add 10.0.0.100/24 dev en0
ssh 10.0.0.11
3. Keepalived Setup & Failover Configuration
Step 1: Syslog Server Architecture
                         ┌──────────────────┐
                         |     Clients      |
                         |  10.0.0.10 (VIP) |
                         └────────┬─────────┘
                                  |
                  ┌───────────────┴───────────────┐
                  |                               |
          ┌──────────────┐               ┌──────────────┐
          |   syslog1    |               |   syslog2    |
          |  10.0.0.11   |               |  10.0.0.12   |
          |   (MASTER)   |               |   (BACKUP)   |
          └──────────────┘               └──────────────┘
In this setup:
-
Both nodes are configured with the same Virtual IP (VIP) 10.0.0.10, which clients use to connect.
-
Keepalived manages the ownership of this VIP between the two servers.
-
Each node runs a Keepalived instance that continuously exchanges VRRP heartbeats.
-
If the MASTER node or its Keepalived process fails, the BACKUP node automatically takes over the VIP, ensuring uninterrupted service availability.
Step 2: MASTER & BACKUP Node Configuration
Begin by updating package repositories and installing Keepalived on both nodes. This service will handle virtual IP management and failover between the master and backup.
sudo apt update
sudo apt install -y keepalived
🧩 syslog1 (MASTER):
# /etc/keepalived/keepalived.conf
# --------------------------------------------------------
# Keepalived MASTER configuration
# Purpose: provide automatic failover for keepalived service
# --------------------------------------------------------

vrrp_instance VI_1 {
  state MASTER               # This node starts as MASTER
  interface enp0s1           # Network interface for VRRP
  virtual_router_id 1        # Unique VRRP group ID (must match on both nodes)
  priority 150               # Higher priority → becomes MASTER
  advert_int 1               # Advertisement interval in seconds

# Unicast communication (recommended in many environments)
  unicast_src_ip 10.0.0.11
  unicast_peer {
    10.0.0.12                  # IP of BACKUP node
  }
  authentication {
    auth_type PASS             # Simple password authentication
    auth_pass mysecret         # Shared key (must match on both nodes)
  }
  virtual_ipaddress {
    10.0.0.10/24 dev enp0s1    # Shared virtual IP (VIP)
  }
}
🧩 syslog2 (BACKUP):
# /etc/keepalived/keepalived.conf
# --------------------------------------------------------
# Keepalived BACKUP configuration
# Purpose: take over VIP when MASTER fails or service stops
# --------------------------------------------------------

vrrp_instance VI_1 {
  state BACKUP                 # This node starts as BACKUP
  interface enp0s1
  virtual_router_id 1          # Must match MASTER
  priority 100                 # Lower priority → stays BACKUP
  advert_int 1
  unicast_src_ip 10.0.0.12
  unicast_peer {
    10.0.0.11                  # IP of MASTER node
  }
  authentication {
    auth_type PASS
    auth_pass mysecret
  }
  virtual_ipaddress {
    10.0.0.10/24 dev enp0s1
  }
}
Step 3: Start and Verify Keepalived
Enable and start the Keepalived service on both nodes:
sudo systemctl enable --now keepalived
sudo systemctl status keepalived
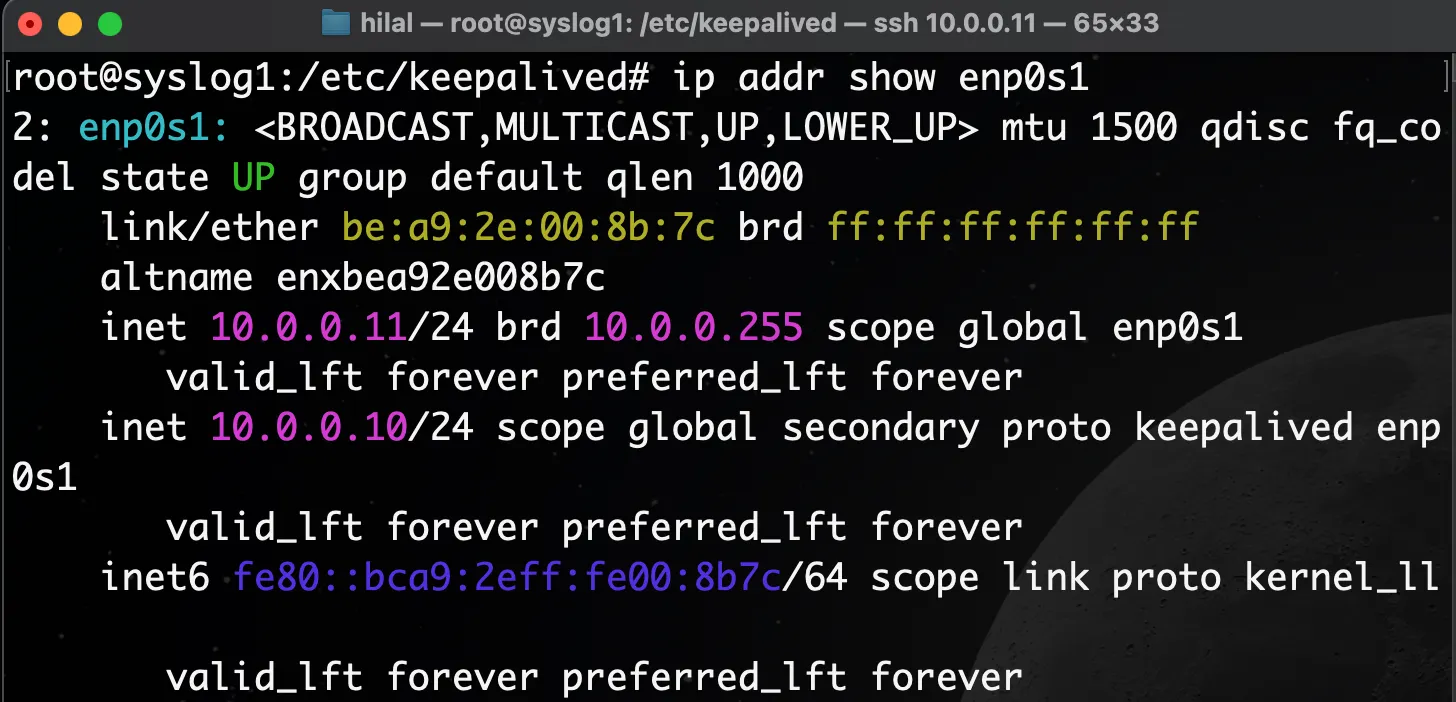
Check which node currently holds the VIP:
ip addr show enp0s1
10.0.0.10 should appear under enp0s1 on syslog1 (MASTER).
Expected output:
Step 4: Test Failover
Stop Keepalived on the MASTER:
sudo systemctl stop keepalived
sudo systemctl status keepalived
On syslog2, check the interface again:
ip addr show enp0s1
The VIP 10.0.0.10 should now be assigned to syslog2 (BACKUP), confirming a successful failover.
Expected output:

Restart Keepalived on syslog1 and verify that the VIP returns:
sudo systemctl start keepalived
sudo systemctl status keepalived
4. Debugging and Monitoring
This section helps you verify that Keepalived is running correctly and provides essential troubleshooting and monitoring commands to ensure reliable operation.
4.1. Syntax Validation:
Before starting the service, always validate the configuration file to detect syntax or structural errors early:
sudo keepalived -t
4.2. Inspecting Service Logs:
If Keepalived fails to start, review the system logs for detailed error messages.:
sudo journalctl -xeu keepalived.service
Reviewing these logs can help identify issues such as invalid interface names, authentication mismatches, or conflicting VIPs.
4.3. Live Monitoring:
To observe runtime behavior and failover activity in real time:
sudo journalctl -u keepalived -f
This command streams live logs, allowing you to monitor heartbeat exchanges, state transitions (MASTER → BACKUP), and VIP reassignment events.
🫧 Continue to Part 2 — Implementing Keepalived Failover with syslog-ng for the hands-on implementation.