PART 2 — Implementing Keepalived Failover with syslog-ng
🫧 For background and foundational concepts, check out Part 1 — Understanding High Availability with Keepalived.
Syslog-ng is a powerful and flexible log management tool designed to collect, process, and forward logs from multiple sources. It plays a critical role in centralized logging architectures by ensuring consistent and reliable log delivery. However, in production environments, a single Syslog-ng instance can become a single point of failure (SPOF). If the active node or its network interface fails, log forwarding stops, leading to data loss and visibility gaps.
To overcome this limitation, Syslog-ng can be deployed in an active-passive high-availability setup using Keepalived. Keepalived manages a floating Virtual IP (VIP) through VRRP, automatically handling failover between two Syslog-ng servers. This approach ensures uninterrupted log collection and maintains visibility even during node or network failures.
1. Environment Setup
Step 1: VM Creation & Network Configuration
In this step, we’ll prepare the environment by creating two Linux virtual machines — syslog1 and syslog2.
Both VMs should be placed on the same subnet to ensure smooth communication and accurate failover testing.
Each machine also needs internet access so that the required packages, such as Syslog-ng and Keepalived, can be downloaded and installed without connectivity issues.
This setup was covered in detail in Part 1, so only a brief overview is provided here before moving on to the configuration steps.
Step 2: Configure Syslog-ng
Next, we’ll install and configure Syslog-ng on both servers to receive and store incoming logs locally. These configurations prepare the environment for high availability in later steps.
# Update package lists
sudo apt update

# Install Syslog-ng and Keepalived
sudo apt install -y syslog-ng-core keepalived
Syslog-ng uses dedicated directories for buffered log storage and incoming remote logs. We’ll create these and assign the correct ownership to the syslog user.
sudo mkdir -p /var/log/syslog-ng/buffers /var/log/remote
sudo chown -R syslog:syslog /var/log/syslog-ng /var/log/remote
Finally, open the syslog ports to allow external systems to send logs to these servers.
sudo ufw allow 514/udp
sudo ufw allow 514/tcp
🧩 On both syslog1 & syslog2:
# /etc/systemd/system/syslog-ng.service

[Unit]
Description=Syslog-ng system logger
After=network-online.target syslog.target
Wants=network-online.target
[Service]
Type=notify
ExecStart=/usr/sbin/syslog-ng -F --no-caps -f /etc/syslog-ng/syslog-ng.conf
ExecReload=/usr/bin/kill -HUP $MAINPID
Restart=on-failure
RestartSec=3s
TimeoutStartSec=20
TimeoutStopSec=20
# Security and resource limits
PrivateTmp=true
ProtectSystem=read-only
ReadWritePaths=/var/log /run /etc/syslog-ng
ProtectHome=true
NoNewPrivileges=true
LimitNOFILE=65536
[Install]
WantedBy=multi-user.target
This service definition ensures Syslog-ng starts automatically at boot and restarts in case of transient failures, improving reliability in production setups.
If you modify the Syslog-ng systemd unit file (/etc/systemd/system/syslog-ng.service), don’t forget to reload systemd: sudo systemctl daemon-reload
🧩 On both syslog1 & syslog2:
# /etc/syslog-ng/syslog-ng.conf

@version: 4.4
@include "scl.conf"
options {
  chain_hostnames(no);
  time_reopen(10);
  create_dirs(yes);
  log_fifo_size(4096);
  stats(freq(600));
  flush_lines(100);
  ts_format(iso);
  use_dns(no);
  use_fqdn(no);
  keep_hostname(yes);
};
# Network sources (UDP & TCP)
source s_net {
  udp(ip("0.0.0.0") port(514));
  tcp(ip("0.0.0.0") port(514) so-keepalive(yes));
};
# Destination: write logs to /var/log/remote/<host>/<year>/<month>/<day>.log
destination d_local {
  file("/var/log/remote/$HOST/$YEAR-$MONTH-$DAY.log"
       create-dirs(yes)
       disk-buffer(
         mem-buf-size(64M)
         disk-buf-size(2G)
         reliable(yes)
         dir("/var/log/syslog-ng/buffers")
       )
       persist-name("remote-file"));
};
# Log path: from network sources to local storage
log { source(s_net); destination(d_local); };
This configuration enables Syslog-ng to receive logs over both UDP and TCP (port 514) and store them in structured folders under /var/log/remote.
Understanding TCP Keep-Alive vs Keepalived (VIP): It’s important to distinguish between Syslog-ng’s so-keepalive() parameter and Keepalived, as they operate at different layers of the network stack:
- so-keepalive(yes) (Syslog-ng parameter): Operates at the transport layer (L4). It helps detect and close broken TCP connections.
- Keepalived (Network layer service): Operates at the network layer (L3). It manages the Virtual IP (VIP) and handles automatic failover between nodes.
🫧 Summary: so-keepalive() ensures connection-level reliability, while Keepalived ensures network-level availability. Together, they provide comprehensive fault tolerance across multiple layers.
Step 3: Test the Syslog-ng Service
Once both configuration files are in place, enable and start Syslog-ng:
sudo systemctl enable --now syslog-ng
sudo systemctl status syslog-ng
Check that port 514 is open on both servers:
ss -tlnp | grep 514
Expected output:

Send a test log from each node to verify message delivery:
# From syslog1 to itself
nc 10.0.0.11 514
HELLO SYSLOG

# From syslog2 to itself
nc 10.0.0.12 514
HELLO SYSLOG
Then confirm log creation:
cat /var/log/remote/<client>/<date>.log
You should see the test messages stored successfully on both servers.
Expected output:

2. Keepalived Setup & Failover Configuration
Step 1: Syslog Server Architecture
                        ┌──────────────────┐
                        |     Clients      |
                        |  10.0.0.10 (VIP) |
                        └────────┬─────────┘
                                 |
                 ┌───────────────┴───────────────┐
                 |                               |
          ┌──────────────┐               ┌──────────────┐
          |   syslog1    |               |   syslog2    |
          |  10.0.0.11   |               |  10.0.0.12   |
          |   (MASTER)   |               |   (BACKUP)   |
          └──────────────┘               └──────────────┘
In this configuration:
-
Both servers share the Virtual IP (VIP) 10.0.0.10, which clients use to send logs.
-
Keepalived manages VIP ownership between the two nodes.
-
A built-in health check monitors whether syslog-ng is running — if not, the VIP automatically fails over to the BACKUP node.
Step 2: MASTER & BACKUP Node Configuration
🧩 syslog1 (MASTER):
# /etc/keepalived/keepalived.conf
# --------------------------------------------------------
# Keepalived MASTER configuration
# Inline systemd-based health check (no external script)
# Purpose: provide automatic failover for syslog-ng service
# --------------------------------------------------------

global_defs {
  enable_script_security        # Enable secure execution of scripts
  script_user root              # Run health checks as root
}
# Inline health check using systemd
vrrp_script chk_syslogng {
  script "/usr/bin/systemctl is-active --quiet syslog-ng"
  interval 2                   # Check every 2 seconds
  fall 2                       # Mark as failed after 2 consecutive failures
  rise 2                       # Mark as healthy after 2 consecutive successes
}
vrrp_instance VI_1 {
  state MASTER                 # This node starts as MASTER
  interface enp0s1             # Network interface for VRRP
  virtual_router_id 1          # Unique VRRP group ID (must match on both nodes)
  priority 150                 # Higher priority → becomes MASTER
  advert_int 1                 # Advertisement interval in seconds
  # Unicast communication (recommended in many environments)
  unicast_src_ip 10.0.0.11
  unicast_peer {
    10.0.0.12                  # IP of BACKUP node
  }
  authentication {
    auth_type PASS             # Simple password authentication
    auth_pass mysecret         # Shared key (must match on both nodes)
  }
  virtual_ipaddress {
    10.0.0.10/24 dev enp0s1    # Shared virtual IP (VIP)
  }
  track_script {
    chk_syslogng weight -80    # Reduce priority by 80 if syslog-ng fails
                               # → 150 - 80 = 70 (less than BACKUP's 100)
                               # → triggers VIP failover
  }
  # Send Gratuitous ARP to update neighboring devices after failover
  garp_master_delay 1
  garp_master_repeat 5
  garp_master_refresh 10
  garp_master_refresh_repeat 2
  }
🧩 syslog2 (BACKUP):
# /etc/keepalived/keepalived.conf
# --------------------------------------------------------
# Keepalived BACKUP configuration
# Inline systemd-based health check (no external script)
# Purpose: take over VIP when MASTER fails or service stops
# --------------------------------------------------------

global_defs {
  enable_script_security
  script_user root
}
vrrp_script chk_syslogng {
  script "/usr/bin/systemctl is-active --quiet syslog-ng"
  interval 2                   # Check every 2 seconds
  fall 2                       # Fail after 2 bad checks
  rise 2                       # Recover after 2 good checks
}
vrrp_instance VI_1 {
  state BACKUP                 # This node starts as BACKUP
  interface enp0s1
  virtual_router_id 1          # Must match MASTER
  priority 100                 # Lower priority → stays BACKUP
  advert_int 1
  unicast_src_ip 10.0.0.12
  unicast_peer {
    10.0.0.11                  # IP of MASTER node
  }
  authentication {
    auth_type PASS
    auth_pass mysecret
  }
  virtual_ipaddress {
    10.0.0.10/24 dev enp0s1
  }
  track_script {
    chk_syslogng weight -80    # Same health check and weighting as MASTER
  }
  garp_master_delay 1
  garp_master_repeat 5
  garp_master_refresh 10
  garp_master_refresh_repeat 2
  } > **🫧 Optional: ARP Behavior Optimization**    This optional step fine-tunes ARP handling for the Keepalived Virtual IP (VIP). It prevents **duplicate IP or MAC address conflicts** during failover events by controlling how ARP announcements are made.    *sudo tee /etc/sysctl.d/keepalived.conf > /dev/null <<'EOF'    net.ipv4.conf.all.arp_ignore=1   net.ipv4.conf.all.arp_announce=2   net.ipv4.conf.default.arp_ignore=1    net.ipv4.conf.default.arp_announce=2   EOF*
Step 3: Enable & Verify Keepalived
Start and enable the service on both nodes:
sudo systemctl enable --now keepalived
sudo systemctl status keepalived
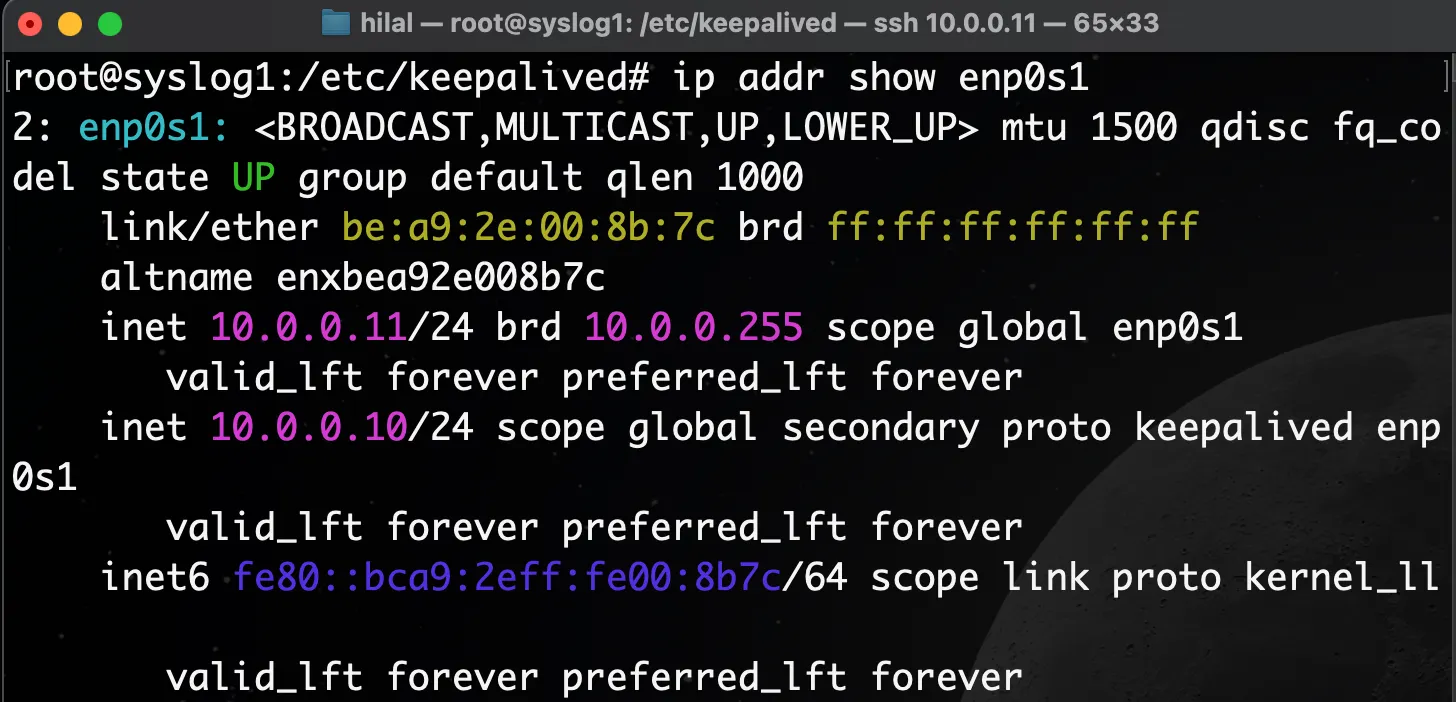
Check if the VIP is active on the MASTER:
ip addr show enp0s1
You should see the VIP listed as 10.0.0.10 under enp0s1.
Expected output:
3. Syslog-ng Health Check & Failover Validation
Keepalived continuously monitors the Syslog-ng service using the built-in vrrp_script health check. Let’s simulate a failure scenario to see how it triggers an automatic failover to the backup node.
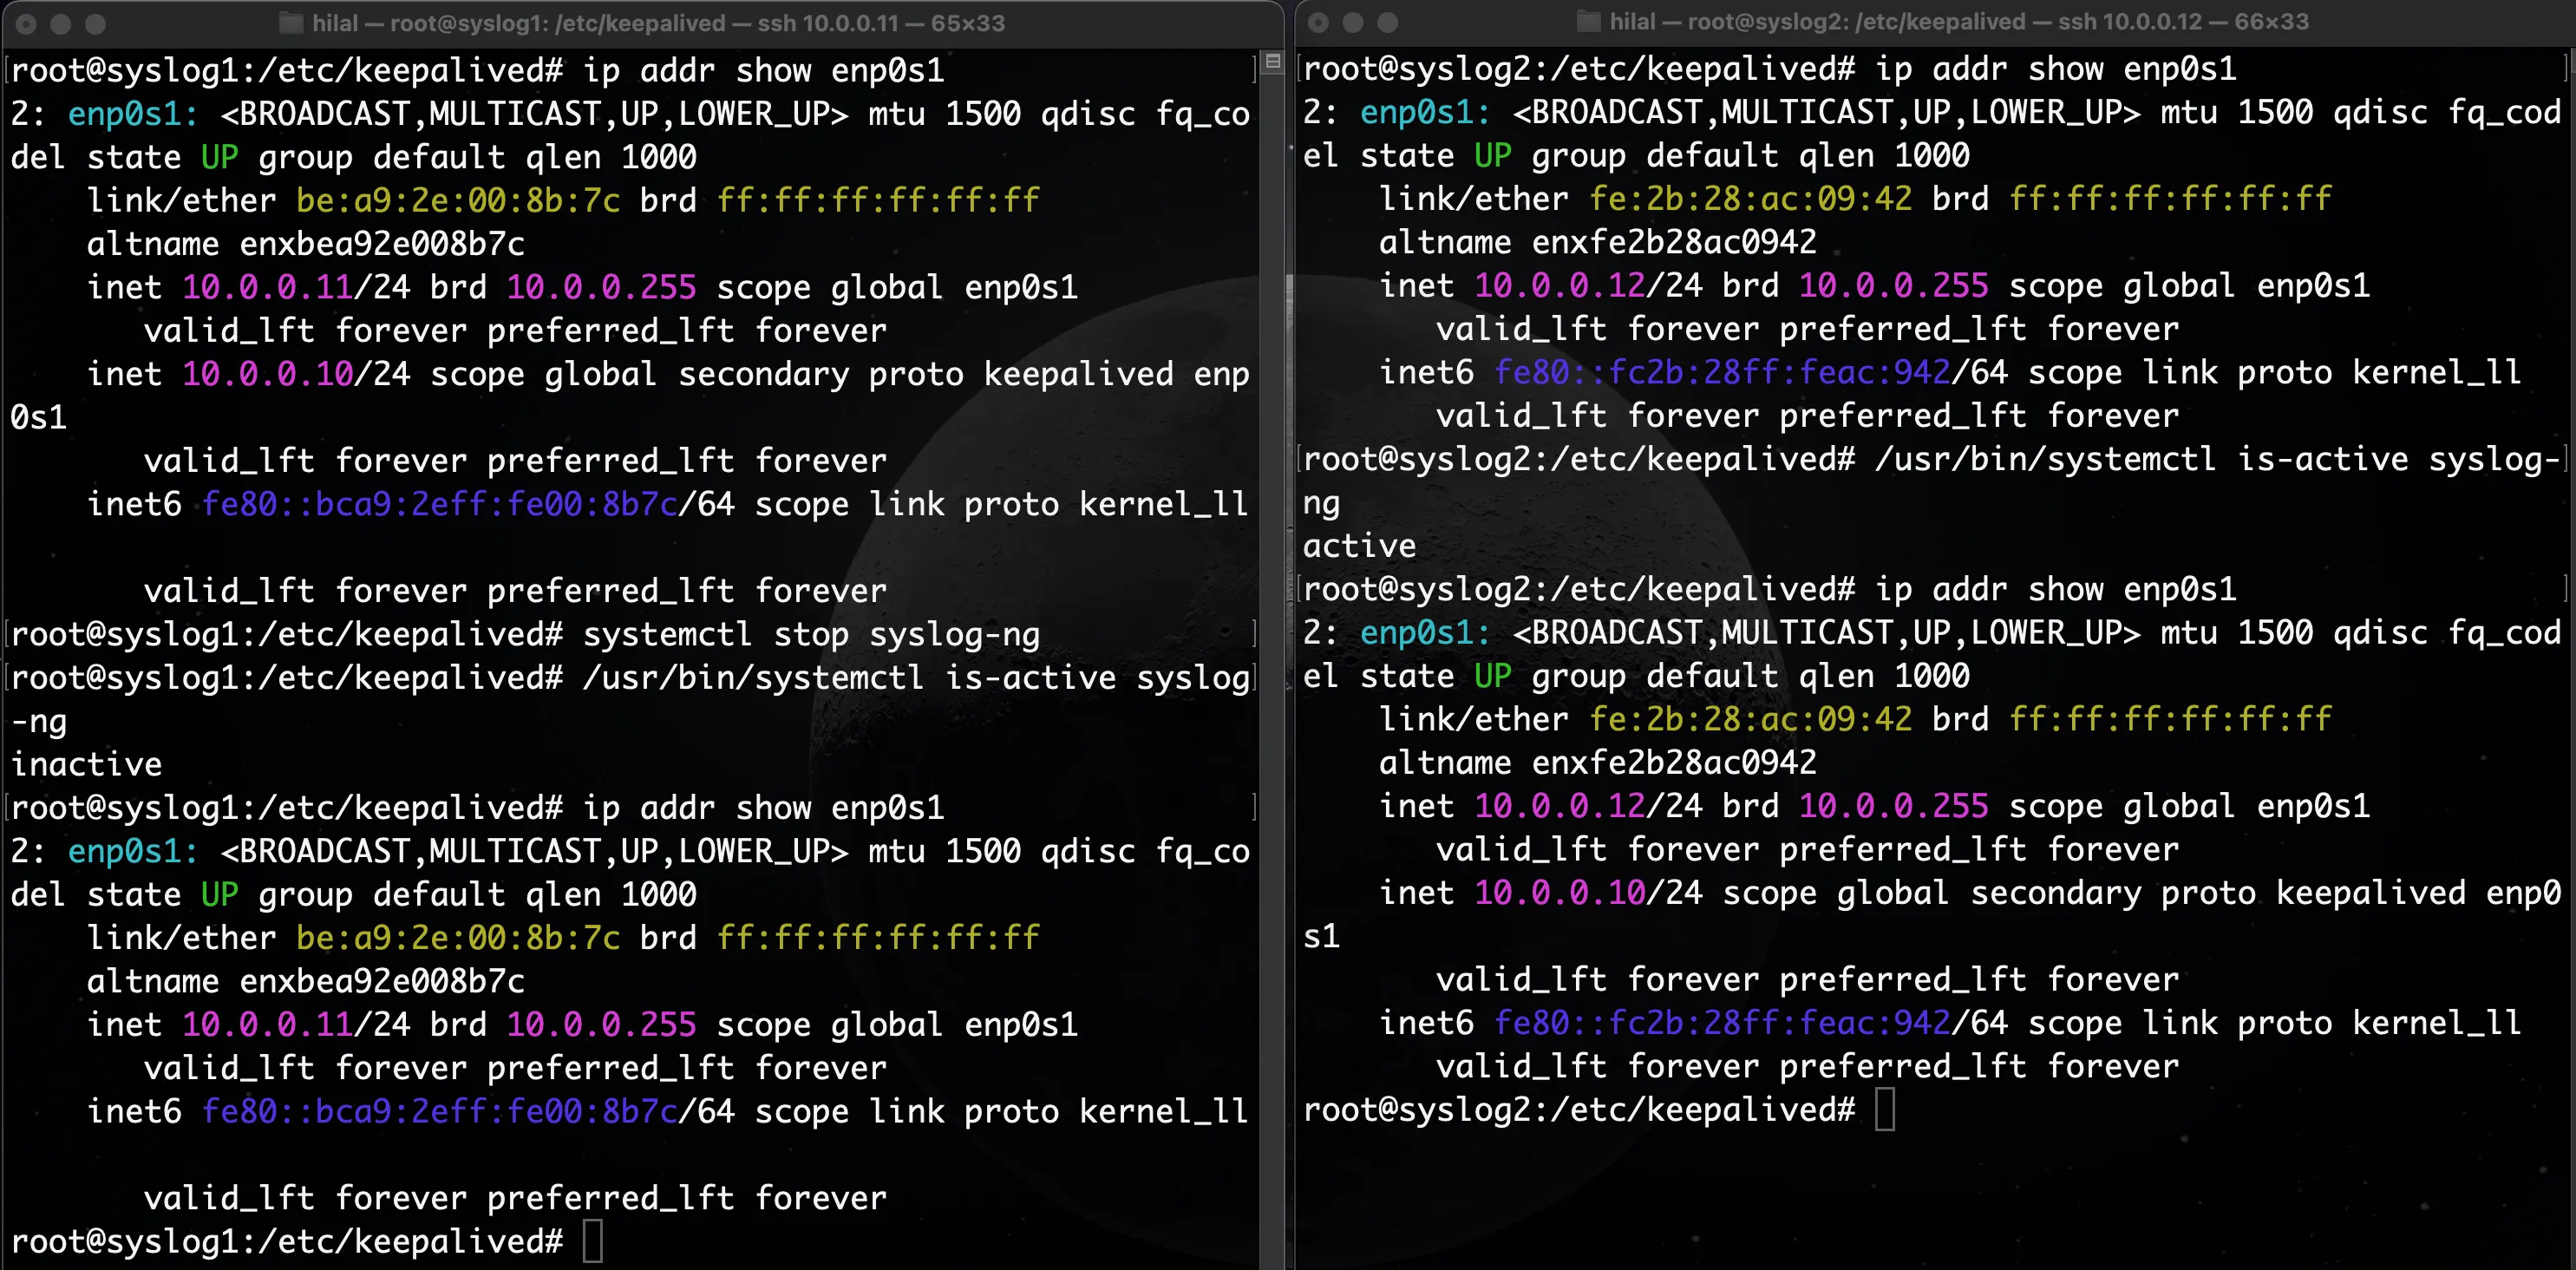
Step 1: Stop Syslog-ng on the MASTER
sudo systemctl stop syslog-ng
sudo systemctl status syslog-ng
Within a few seconds, Keepalived will detect the failure.
As a result, the BACKUP node (syslog2) will automatically take over the Virtual IP (VIP).
Step 2: Verify on the BACKUP Node
On syslog2, run the following command to verify the VIP assignment:
ip addr show enp0s1
You should now see the Virtual IP (10.0.0.10) present on the BACKUP node, confirming a successful failover.
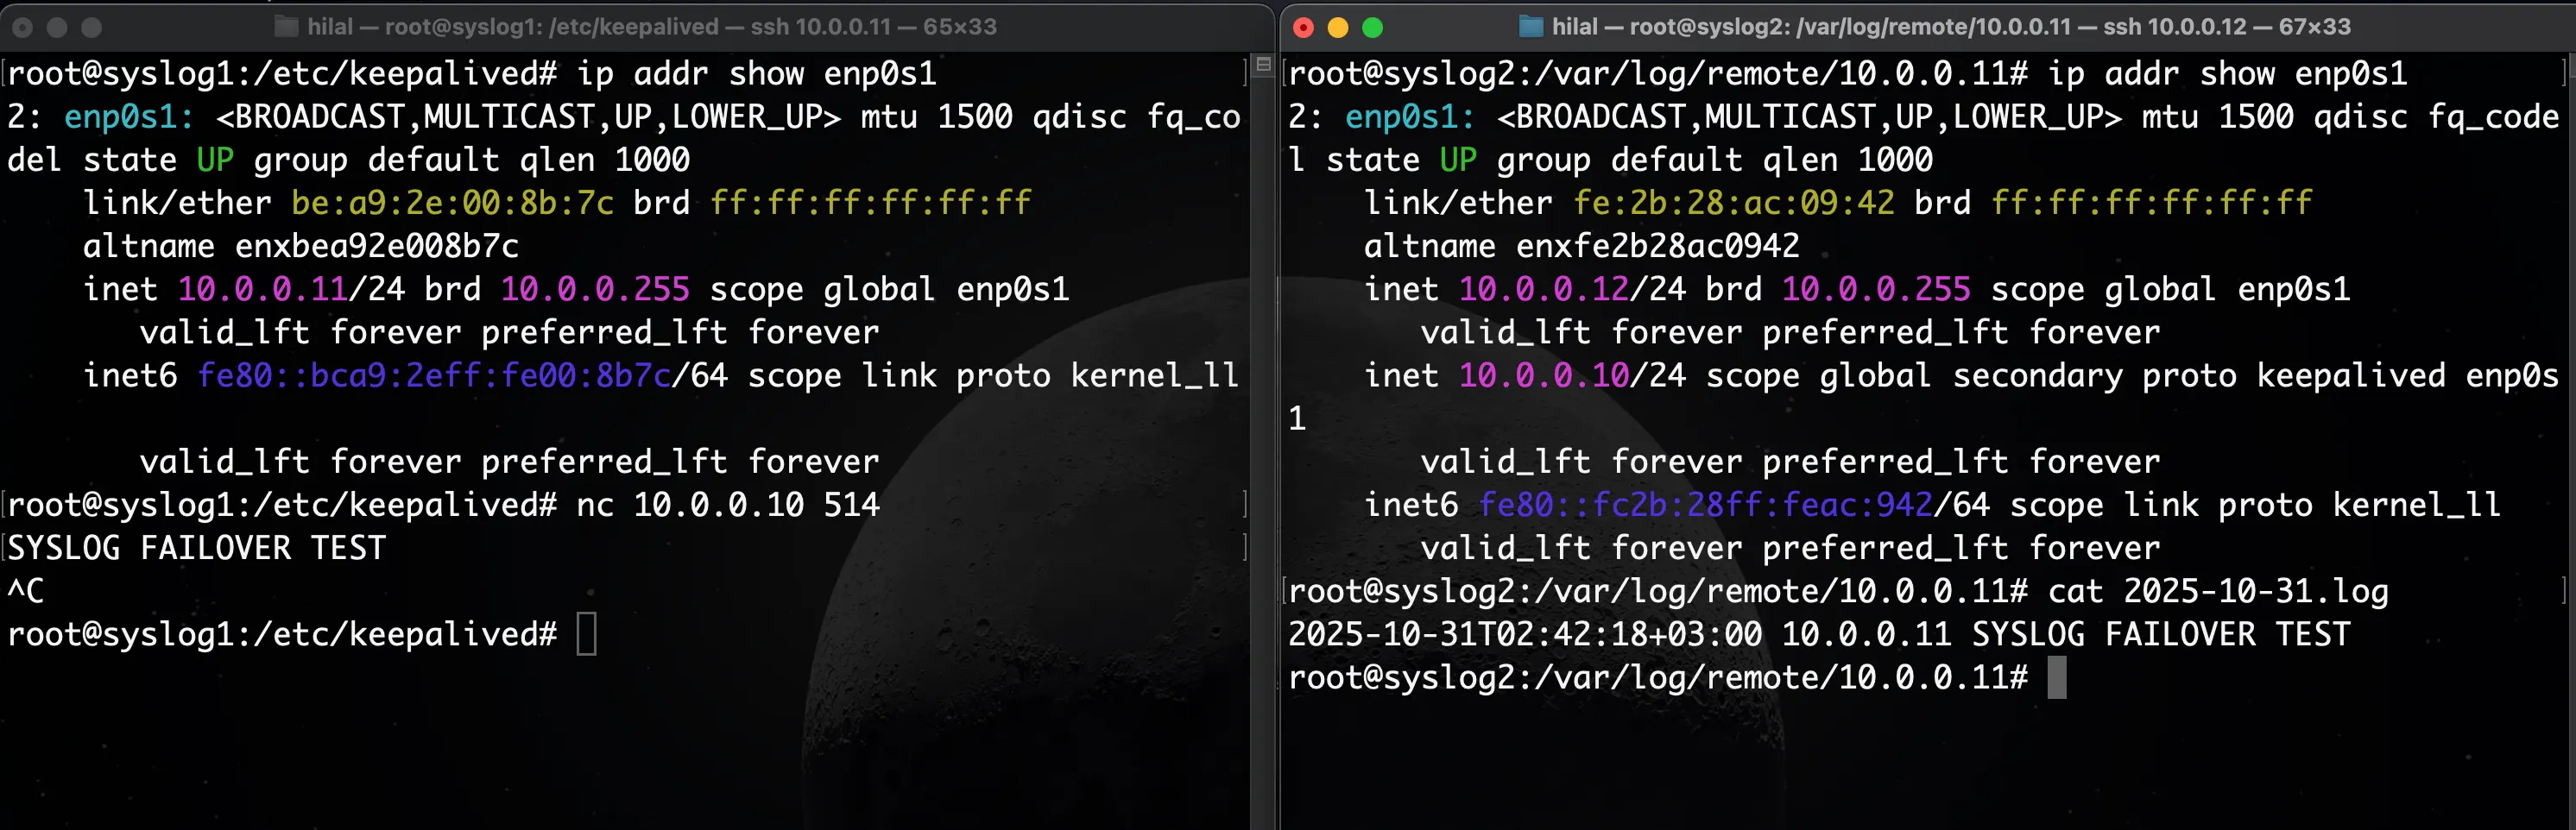
Send a test log to confirm that message ingestion continues through the new active node:
nc 10.0.0.10 514
SYSLOG FAILOVER TEST
Then verify log creation on the backup server:
cat /var/log/remote/<client>/<date>.log
Expected output:
Step 3: Restore Syslog-ng on the MASTER
Once syslog-ng is restarted on syslog1, Keepalived will detect that it’s healthy again and automatically reassign the VIP back to the MASTER node.
sudo systemctl start syslog-ng
sudo systemctl status syslog-ng
The VIP (10.0.0.10) automatically returns to syslog1, and log forwarding continues without interruption — confirming that both failover and recovery function as expected.
Expected output:
4. Debugging & Monitoring
This section helps you verify that both Syslog-ng and Keepalived are running correctly and provides essential troubleshooting commands for configuration validation, error inspection, and real-time monitoring.
4.1. Syntax Check:
Before starting the services, validate their configuration files to ensure there are no syntax errors.
sudo syslog-ng -t
sudo keepalived -t
If the configuration is valid, both commands should return “Configuration file OK” or a similar confirmation message.
4.2. Check Service Errors:
If either Syslog-ng or Keepalived fails to start, inspect the system logs to identify the root cause and review any related error messages:
sudo journalctl -xeu syslog-ng.service
sudo journalctl -xeu keepalived.service
4.3. Real-Time Monitoring:
To observe runtime behavior, connection attempts, and failover events in real time, follow the live service logs:
sudo journalctl -u syslog-ng -f
sudo journalctl -u keepalived -f
This is especially useful during failover testing, allowing you to watch how Keepalived reacts when syslog-ng stops or recovers.