Archiving Splunk Frozen Buckets to S3 on LocalStack
Hey there! In my previous post, I shared how to set up a local S3 environment using Docker and LocalStack. We had some fun uploading and retrieving files with the AWS CLI—all without needing to touch any real AWS infrastructure!
Now, I’m excited to dive into a practical use case: automatically archiving frozen Splunk buckets to S3 with our handy LocalStack setup.
🎯 What We’re Building
Splunk provides the option to create a coldToFrozenScript, a customized script that runs whenever a bucket transitions from cold to frozen.
In this project, we will use this script to:
- Determine when a bucket is ready to be frozen
- Upload only the
journal.zstfile from that bucket to our LocalStack-powered S3 bucket, following the path format<repo-name>/<index-name>/<bucket-name>/rawdata/journal.zst
Feel free to check out the app in our seynur-tools repository on GitHub!
I’m excited to show you how everything comes together!
⚙️ Environment Setup
Before we dive in, let’s make sure you’ve got everything set up. If you haven’t already, check out the previous blog post here for some helpful instructions. Here’s a quick recap of what you need to do:
- First, make sure you have Docker installed on your machine.
- Next, fire up LocalStack using Docker with this command:
docker run --rm -it -p 4566:4566 -p 4571:4571 localstack/localstack
Friendly Reminder: Don’t forget to add your dummy credentials as environment variables! 😊
- Finally, create a test S3 bucket with this command:
aws s3 mb s3://s3-frozen-test-bucket --endpoint-url=http://localhost:4566
Now that you’re all set up, let’s move on to configuring Splunk and writing the script!
🐍 The coldToS3.py Script
Hey there! I’ve got a great idea for you: why not create a custom app to manage the coldToS3.py script? It’s a smart practice!
Quick Reminder: Don’t forget to make sure the
coldToS3.pyfile is executable!
🗂 App Structure: Here’s how your app should look:
my_frozen_buckets_to_cloud_app/
├── bin/
|   └── coldToS3.py
├── local/
│   └── app.conf
└── metadata/
    └── local.meta
📄 app.conf
[install]
state = enabled

[package]
check_for_updates = false

[ui]
is_visible = false
is_manageable = false
📄 local.meta
[]
access = read : [ * ], write : [ admin ]
export = system
📄 coldToS3.py
!/usr/bin/env python3
import os
import sys
import boto3
from botocore.exceptions import BotoCoreError, ClientError

# === CONFIGURATION ===
S3_BUCKET_NAME = "s3-frozen-test-bucket"
LOCALSTACK_ENDPOINT = "http://localhost:4566"

def archive_journal_to_s3(bucket_path, index_name, bucket_name):
    journal_path = os.path.join(bucket_path, "rawdata", "journal.zst")

    if not os.path.isfile(journal_path):
        print(f"[SKIP] journal.zst not found at {journal_path}")
        return

    s3_key = f"{index_name}/{bucket_name}/rawdata/journal.zst"
    print(f"Uploading {journal_path} → s3://{S3_BUCKET_NAME}/{s3_key}")

    try:
        # if use_localstack:
        print("[INFO] Using LocalStack endpoint:", LOCALSTACK_ENDPOINT)
        s3 = boto3.client(
            "s3",
            endpoint_url=LOCALSTACK_ENDPOINT,
            aws_access_key_id="test",
            aws_secret_access_key="test",
            region_name="us-east-1"
        )
        s3.upload_file(journal_path, S3_BUCKET_NAME, s3_key)
        print("[OK] Upload complete.")

    except (BotoCoreError, ClientError) as e:
        print(f"[ERROR] Upload failed: {e}")
        sys.exit(1)

# === ENTRY POINT ===
if __name__ == "__main__":
    if len(sys.argv) < 2:
        sys.exit("Usage: python coldToS3.py <bucket_path>")

    bucket_path = sys.argv[1]

    if not os.path.isdir(bucket_path):
        sys.exit(f"[ERROR] Invalid bucket path: {bucket_path}")

    index_name = os.path.basename(os.path.dirname(os.path.dirname(bucket_path)))
    bucket_name = os.path.basename(bucket_path)

    archive_journal_to_s3(bucket_path, index_name, bucket_name)
📁 Index Configuration in indexes.conf
Let’s update your index stanza! For this example, I will use the oyku_test index, which should look like this:
[oyku_test]
coldPath = $SPLUNK_DB/oyku_test/colddb
homePath = $SPLUNK_DB/oyku_test/db
thawedPath = $SPLUNK_DB/oyku_test/thaweddb
coldToFrozenScript = "$SPLUNK_HOME/bin/python" "$SPLUNK_HOME/etc/apps/my_frozen_buckets_to_cloud_app/bin/coldToS3.py"
frozenTimePeriodInSecs = 10
maxHotSpanSecs = 10
maxHotBuckets = 1
maxWarmDBCount = 1
maxDataSize = auto_low_volume
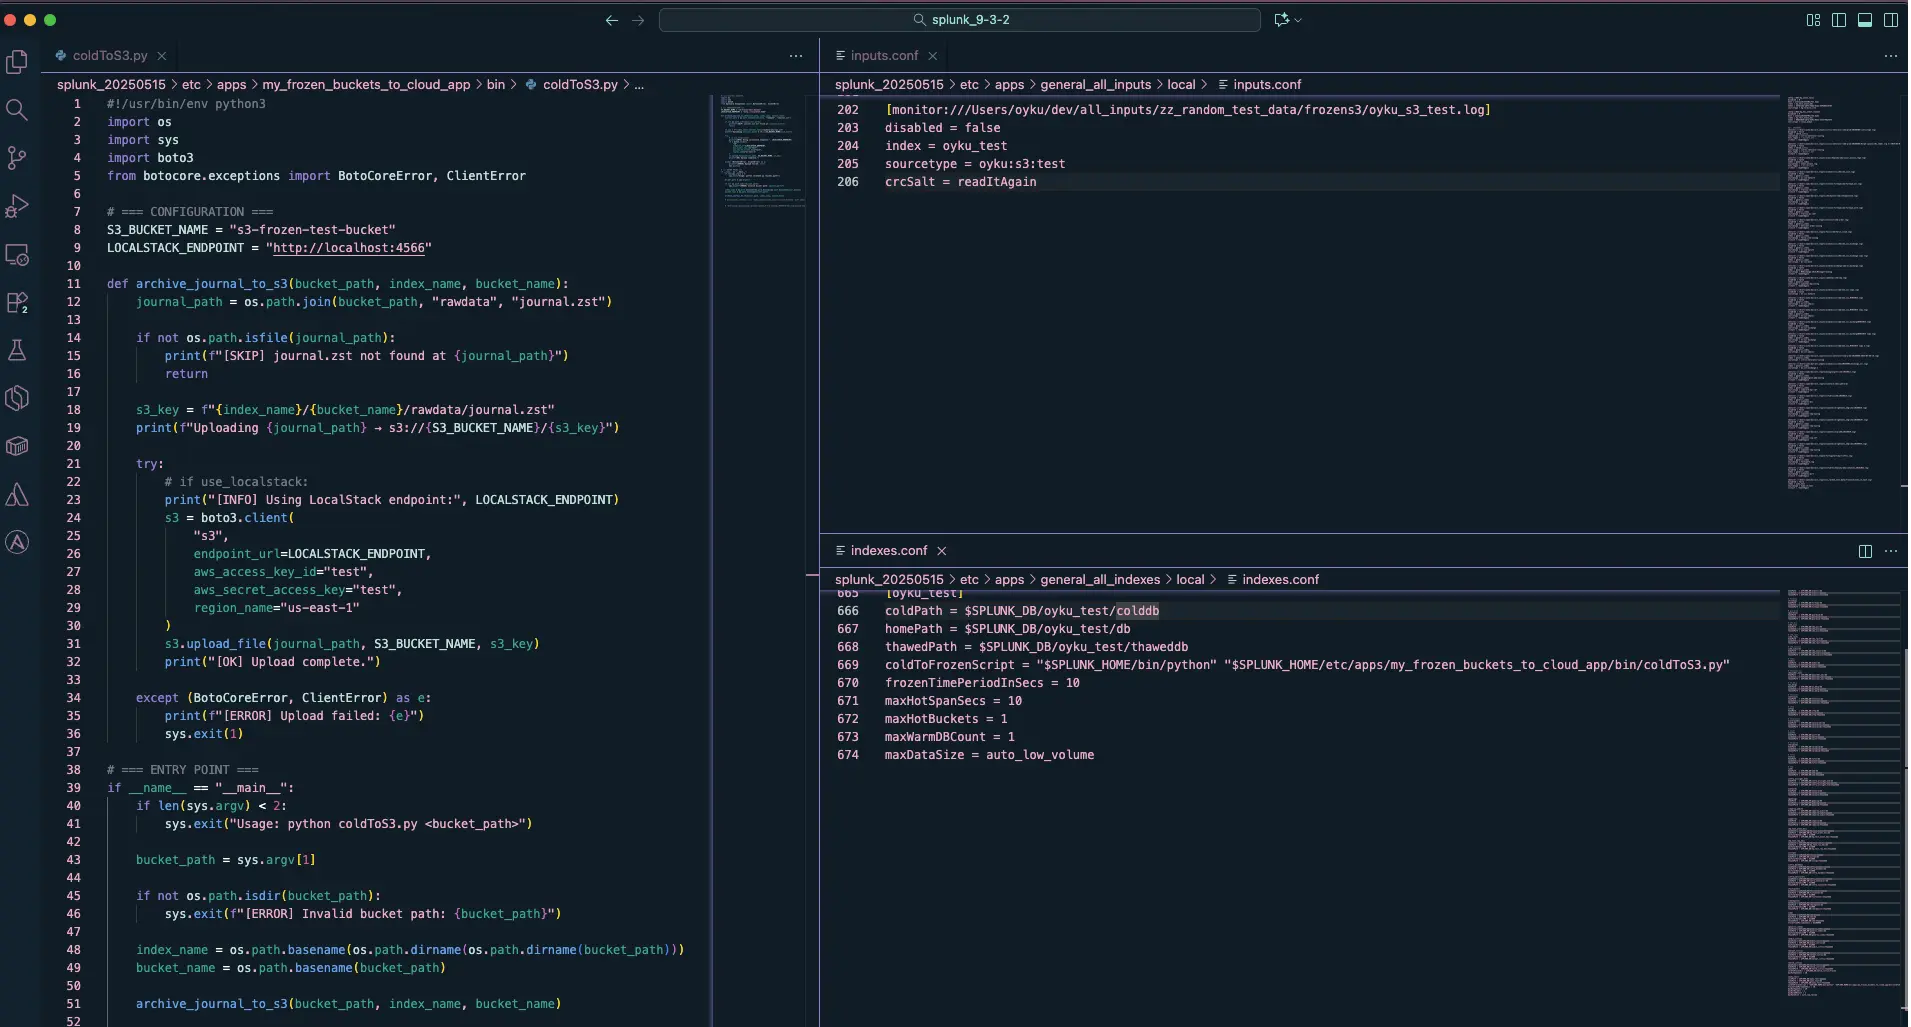
This setup will ensure that any buckets older than 10 seconds get rolled over and trigger your script. You can see my configuration in the image below.
 |
|---|
| Figure 1: A snapshot of my Splunk setup. |
🧪 Test It!
Step 1: Start by generating some test events in the oyku_test index. Here’s a handy command:
curl -k https://localhost:8088/services/collector -H 'Authorization: Splunk <TOKEN>' -d '{"event": "demo", "sourcetype": "test", "index": "oyku_test"}'
Feel free to use any event ingestion method you prefer! 🐣
Step 2: If you’re feeling a bit impatient, you can manually force roll hot to warm buckets with this command:
$SPLUNK_HOME/bin/splunk _internal call /data/indexes/oyku_test/roll-hot-buckets -auth admin:admin123
Just a little reminder: I’m using one of the secret credentials, so let’s keep that between us! 🫶🏼😌
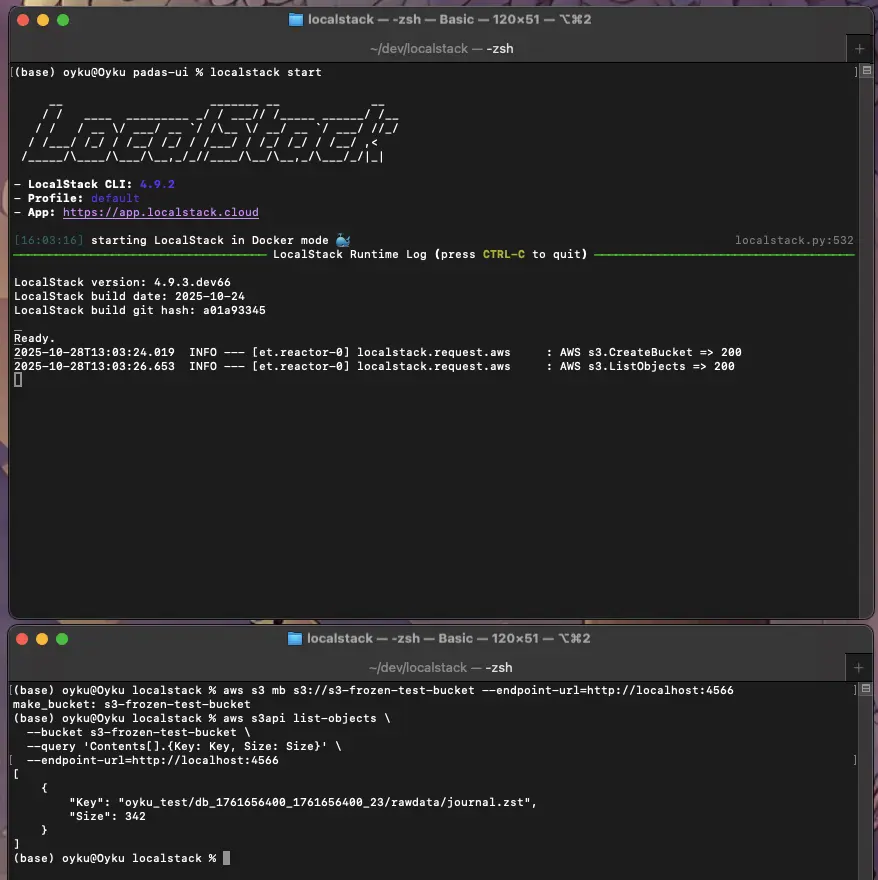
Step 3: Now, check your bucket in LocalStack:
aws --endpoint-url=http://localhost:4566 s3 ls s3://s3-frozen-test-bucket/oyku_test/
You should see your bucket’s journal.zst located at a path like this:
oyku_test/db_1761656400_1761656400_23/rawdata/journal.zst
Take a look at my results in Figure 2 below!
 |
|---|
| Figure 2 Terminal image of the LocalStack image. |
Now you’re all set! You can use this data for downstream testing, restoring, or even to practice long-term archival scenarios. Happy coding! 🌟
📦 Wrapping Up
Hey there! 🎉 Congratulations on making it this far! You’ve successfully set up automatic frozen bucket archiving in Splunk using the coldToFrozenScript and sent your aged data to a local S3-compatible bucket with LocalStack.
This is such an awesome achievement! Not only does it give you a powerful workflow that feels like production, but it also helps you avoid any real cloud costs. Perfect for testing, CI pipelines, or simulating air-gapped archival strategies!
Whether you’re looking to test recovery procedures, play around with object lifecycle policies, or simply want more control over your frozen data, this setup gives you all the flexibility and speed you could need.
Here’s a quick recap of what you’ve achieved:
- ✅ An automatic
coldToFrozenScriptthat’s all set to go - 🪣 S3-compatible frozen data neatly archived in LocalStack
- 🧪 A local testing environment that’s just right for backup strategies and disaster recovery pipelines
In the next post, we’ll switch things up and talk about restoring those archived frozen buckets back into Splunk’s thawed path so you can start searching them again! 🔄
Got any questions or suggestions about this blog? I’d love to hear from you! Feel free to reach out to me on my LinkedIn account.
Until next time-happy testing! ☁️🐍
🔜 Coming Up Next
Hey there! In our next post, we’re excited to show you how to take those archived buckets and bring them back to life in Splunk’s thaweddb directory. We’ll walk you through the process of turning them into a readable format using the journal.zst file.
Thanks for joining us on this journey, and we can’t wait to share more with you soon! Stay tuned!
References:
- [1] Seynur. (2025). org_frozen_buckets_to_cloud_app [Computer software]. GitHub. https://github.com/seynur/seynur-tools/tree/main/org_frozen_buckets_to_cloud_app
- [2] Can, Ö. 2025. Getting Started with LocalStack: Local S3 Bucket Creation and File Operations. https://blog.seynur.com/localstack/2025/10/24/getting-started-with-localstack-local-s3-bucket-creation-and-file-operations.html
- [3] LocalStack (2025). Webpage. https://www.localstack.cloud/
- [4] LocalStack (2025). Welcome to LocalStack for AWS Docs. https://docs.localstack.cloud/aws/?__hstc=108988063.0ee2f30eaf277f10554eb6d4f1260de9.1761130776473.1761305608218.1761389372142.4&__hssc=108988063.1.1761389372142&__hsfp=597304104
- [5] Amazon Web Services, Inc. (2025). Amazon S3. Amazon. https://aws.amazon.com/s3/?trk=b2e0b71d-6f5d-4607-94dc-18f7ddd5339a&sc_channel=ps&ef_id=EAIaIQobChMI6aOUp5q_kAMVaGZBAh07tDl-EAAYASAAEgLyVPD_BwE:G:s&s_kwcid=AL!4422!3!645208988806!e!!g!!s3!19580264380!143903638703&gad_campaignid=19580264380&gbraid=0AAAAADjHtp9YgzsvVgxdkeRljJzdtAzXU&gclid=EAIaIQobChMI6aOUp5q_kAMVaGZBAh07tDl-EAAYASAAEgLyVPD_BwE
- [6] Amazon Web Services, Inc. (2025). AWS Command Line Interface. Amazon. https://aws.amazon.com/cli/
- [7] Docker Inc. (2025). Webpage. https://www.docker.com/