Splunk Connect for Syslog (SC4S): Installation, Usage & Implementations
This blog outlines the usage of SC4S to import syslog input data into Splunk, addressing various use cases including custom and complex configurations. From the installation of SC4S and establishing connections to ensuring accurate timestamping and field mappings on indexed data, each step is crucial for effective log management and analysis. By providing insights and tips, this article aims to empower users to optimize their syslog integration process, ensuring accurate and actionable insights from their log data within Splunk. If you want to learn more information about SC4S you can check Splunk Connect for Splunk official documentation page, Splunk Connect for Syslog: Extending the Platform .conf2020 presentation and Syslog Data Collection (SC4S) for Splunk and Custom Inputs blog written by Splunk, Mark Bonsack/Ryan Faircloth and Merih Bozbura Türk respectively. After reading this, you may also want to check the GitHub page of SC4S and syslog-ng administration guide to understand and to create different types of filters in the future for your custom or known vendor inputs.
SC4S, Splunk Connect for Syslog is an open-source and Splunk supported solution that utilizes syslog-ng (Open Source Edition) to transport data directly to Splunk via the Splunk HTTP Event Collector (HEC) without reading data from somewhere on the disk [1]. This also implies that there is no requirement for a Universal/Heavy Forwarder or extensive disk space on SC4S server(s) during the data collection process.
Below, you’ll find a list of the use cases covered in this blog. If you prefer, you can skip the installation section and dive directly into the use cases using the provided links. I hope you enjoy reading this article and find it helpful.
- SC4S Use-Cases
- Known Vendor Use-Cases
- Custom Vendor Use-Cases
- CASE 2.1 : SC4S can’t recognize and can’t parse automatically - to change index, sourcetype fields
- CASE 2.2 : SC4S can’t recognize and can’t parse automatically - to change timestamp, index, sourcetype, some custom fields due to message context
- CASE 2.3 : SC4S can’t recognize and can’t parse automatically - to delete due to message context
Before Starting
Before starting, be sure which ports will be used and that there are no connection issues between SC4S and Splunk Servers. This is basic but one of the most common issues. The SC4S documentation says that there are several pre-defined indexes that Splunk should have if data from known vendors is to be imported, and HTTP Event Collector (HEC) needs to be defined in Splunk. So, be sure both of them are defined correctly for your deployment, and check the SC4S official documentation page, getting started for planning your deployment and other basics.
Notes : If you don’t know how to create HEC inputs, please check the documentation. Below you can find inputs.conf example.
# inputs.conf
[http://sc4sinput]
disabled = 0
token = e8de5f0e-97b1-4485-b111-1191cbf89392
useACK = 0
index = sc4s
To utilize SC4S, you must choose an installation method that suits your needs. The installation can be done offline or online as outlined on the Runtime Configuration page. While installation can be done in any desired method, there will be used two different installation methods in this article as Docker Desktop + Compose (MacOS) and Docker&Podman offline installation.
SC4S Installations:
Docker Desktop will be utilized for both installations. You can refer to the Docker documentation page for proper installation guidance. In this article, we will adhere to the official documentation pages for the two runtime installations as mentioned, without creating any service file. These installations reflect the setup I implemented on my local laptop to test some configurations. If you are installing SC4S in your production environment, you may need to create a service file as outlined in the documentation. Also, don’t forget to check pre-configurations on this page.
-
At the beginning of the SC4S installation, we need to create a volume, which we will call splunk-sc4s-volume with below command, and some directories (<path-of-sc4s>/sc4s and <path-of-sc4s>/sc4s/local) under other than /opt directory to locate and run the Docker Container in our local system for both method.
Notes: If you intend to utilize your local /opt directory to create SC4S directories as outlined in the documentation, ensure that the Docker user executing the operation has the necessary read, write, and delete permissions.
sudo docker volume create splunk-sc4s-volume
-
After this creation we need to define directory mappings between the Docker Container and the local to control SC4S configurations from the local with the docker-compose.yml file. The difference between the online and offline methods can be seen in this step. The online method will get the sc4s image from the Splunk repository directly but we need to deploy the image to Docker in the offline method by ourselves.
Tip: Also, don’t forget target port is your local & published is the Docker Container’s port. If you want, you can change them individually.
Notes: Only 514 (default) port for UDP/TCP protocols are defined in these YAML files for start. We will add more ports when we talk about the use cases section.
-
Online Docker Compose YAML configuration: Docker Desktop + Compose (MacOS)
In the online method, the following docker-compose.yml file which can be located under the sc4s directory, can be used for the latest image of SC4S version 3. If you wish to modify the version, you can simply adjust the container3:latest section in the provided YAML file.
version: "Latest" services: sc4s: deploy: replicas: 1 restart_policy: condition: on-failure image: ghcr.io/splunk/splunk-connect-for-syslog/container3:latest ports: # Default Ports (TCP/UDP): - target: 514 published: 514 protocol: tcp - target: 514 published: 514 protocol: udp env_file: - <path-of-sc4s>/sc4s-latest/env_file volumes: - <path-of-sc4s>/sc4s-latest/local:/etc/syslog-ng/conf.d/local:z - splunk-sc4s-volume:/var/lib/syslog-ng volumes: splunk-sc4s-volume:-
Offline Docker Compose YAML configuration: Docker/Podman
In the offline method, we need to download depending on which version of the sc4s image (oci_container.tar.gz) we want to use from the relevant github repository releases. After this, we need to load the image into Docker with the following command.
docker load < oci_container.tar.gz
After this step, we should list all imported images to determine the ID of the SC4S image and tag it as sc4simage:latest for use in the YAML configuration file provided below.
docker image ls
Once the Image ID for the imported SC4S image is identified, you can utilize the following command. Ensure to replace the placeholder (<image-id>) with the actual Image ID of yours.
docker tag <image-id> sc4simage:latest
Now you can use the following docker-compose.yml file which can be located under the SC4S directory, as the online method.
Notes: It is not the exact docker-compose.yml file in online method. So, be sure you are using the correct version of the method.
     version: "Latest"
     services:
         sc4s:
             deploy:
             replicas: 1
             restart_policy:
                 condition: on-failure
             image: sc4simage:latest
             ports:

             # Default Ports (TCP/UDP):

             - target: 514
               published: 514
               protocol: tcp
             - target: 514
               published: 514
               protocol: udp


             env_file:
             - <path-of-sc4s>/sc4s-latest/env_file
             volumes:
             - <path-of-sc4s>/sc4s-latest/local:/etc/syslog-ng/conf.d/local:z
             - splunk-sc4s-volume:/var/lib/syslog-ng

     volumes:
         splunk-sc4s-volume:
-
-
We need to create the env_file to define relevant ports and communication information with Splunk for SC4S as below.
Tips : The SC4S DEFAULT_TIMEZONE option allows you to change the default time zone of your SC4S to which you want. Also, if you are using the default port, there’s no need to define it in the env_file unless you have specific plans for filtering usage.
Notes: Don’t forget to change <hec-token-that-is-created-in-the-Splunk> as your HEC token.
 SC4S_DEST_SPLUNK_HEC_DEFAULT_URL = https://host.docker.internal:8088
 SC4S_DEST_SPLUNK_HEC_DEFAULT_TOKEN = <hec-token-that-is-created-in-the-Splunk>
 SC4S_DEST_SPLUNK_HEC_DEFAULT_TLS_VERIFY = no

 SC4S_DEFAULT_TIMEZONE=Europe/Istanbul
-
After completing the previous steps, executing one of the commands below will ensure that Docker properly composes with the SC4S image. You can then check the SC4S logs and Splunk Search Head as shown in Figure 1 and Figure 2 respectively to verify if the connection was successfully established.
Notes: If you want to use the first command, you need to ensure you are located under the exact directory that includes the docker-compose.yml file.
-
docker-compose up docker-compose.ymlor
-
docker-compose up -f <path-of-sc4s>/sc4s-latest/docker-compose.yml

Figure 1: Log outputs of SC4S upon successfully connection. 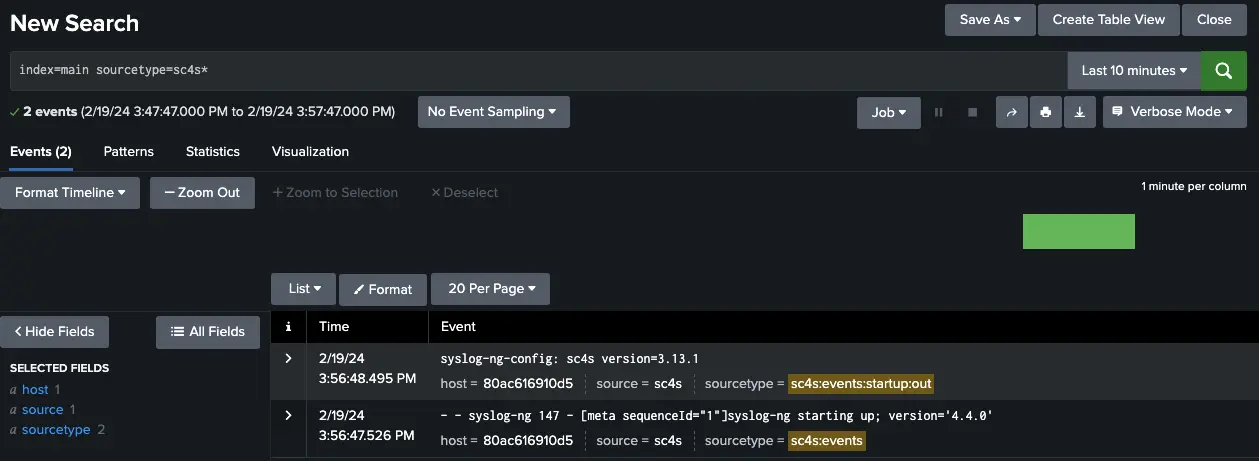
Figure 2: Log outputs of SC4S can be viewed in Splunk Search Head upon successful connection. -
SC4S Use-Cases:
In this section, we will examine various scenarios I encountered when trying to retrieve syslog data via SC4S. These scenarios fall into two categories: known and custom vendors. So, let’s get started.
1. Known Vendor Use-Cases:
A list of known vendors that have already successfully parsed in the SC4S as default, can be found on the documentation page. These are generally well-known and well-used vendors. Also, most probably, you will use at least one of them in your deployment.
-
CASE 1.1 : SC4S recognizes and automatically parses successfully.
In this scenario, let’s assume we’re attempting to ingest Cisco IOS data, as described in below.
<12>Feb 20 09:40:10.326: %LINEPROTO-5-UPDOWN: Line protocol on Interface GigabitEthernet0/1, changed state to upAccording to the documentation, Cisco IOS can be listened to on port 514. As it is a known vendor, it is automatically parsed. Moreover, sourcetype and index information associated with the relevant key can be found here. Therefore, when Cisco IOS is parsed automatically, based on the format we have, its index should be netops and sourcetype should be cisco:ios. Alternatively, we have the option to use either port 514 or any custom port with a preference for a high port. Because it may be difficult to troubleshoot problems that may arise when multiple sources direct data to the same port, custom port usage is important. In this case, you can either choose 514 or let’s say, 5140 ports. Additionally, as mentioned before, if we intend to use a custom port, we must first define it within SC4S. You can simply add the below into docker-compose.yml and env_file. SC4S now will listen 5140 port for both TCP/UDP protocols.
  # For docker-compose.yml

     - target: 5140
       published: 5140
       protocol: tcp
     - target: 5140
       published: 5140
       protocol: udp
# For env_file SC4S_LISTEN_CISCO_IOS_TCP_PORT=5140 SC4S_LISTEN_CISCO_IOS_UDP_PORT=5140Furthermore, there are some pre-configuration requirements that we need to define, as specified in the official SC4S documentation when directing data to the SC4S server. If you wonder what rules and functions work, take a look at app-almost-syslog-cisco_syslog.conf in SC4S github repository. This configuration file will execute perfectly.
Finally, the documentation mentions an add-on for Cisco IOS developed by Mikael Bjerkeland. This add-on contains pre-defined configuration files that are compatible with the Splunk Common Information Model (CIM). Hence, there’s no need to perform key mappings after data ingestion into Splunk. It’s important to note that this add-on is not officially supported by Splunk; any issues should be directed to Mikael Bjerkeland. While using add-ons not created by Splunk is not my preferred approach, since it was recommended on SC4S’s page, I’ve included it here. For greater reliability, consider creating your add-ons.
Now, we can check our final results.
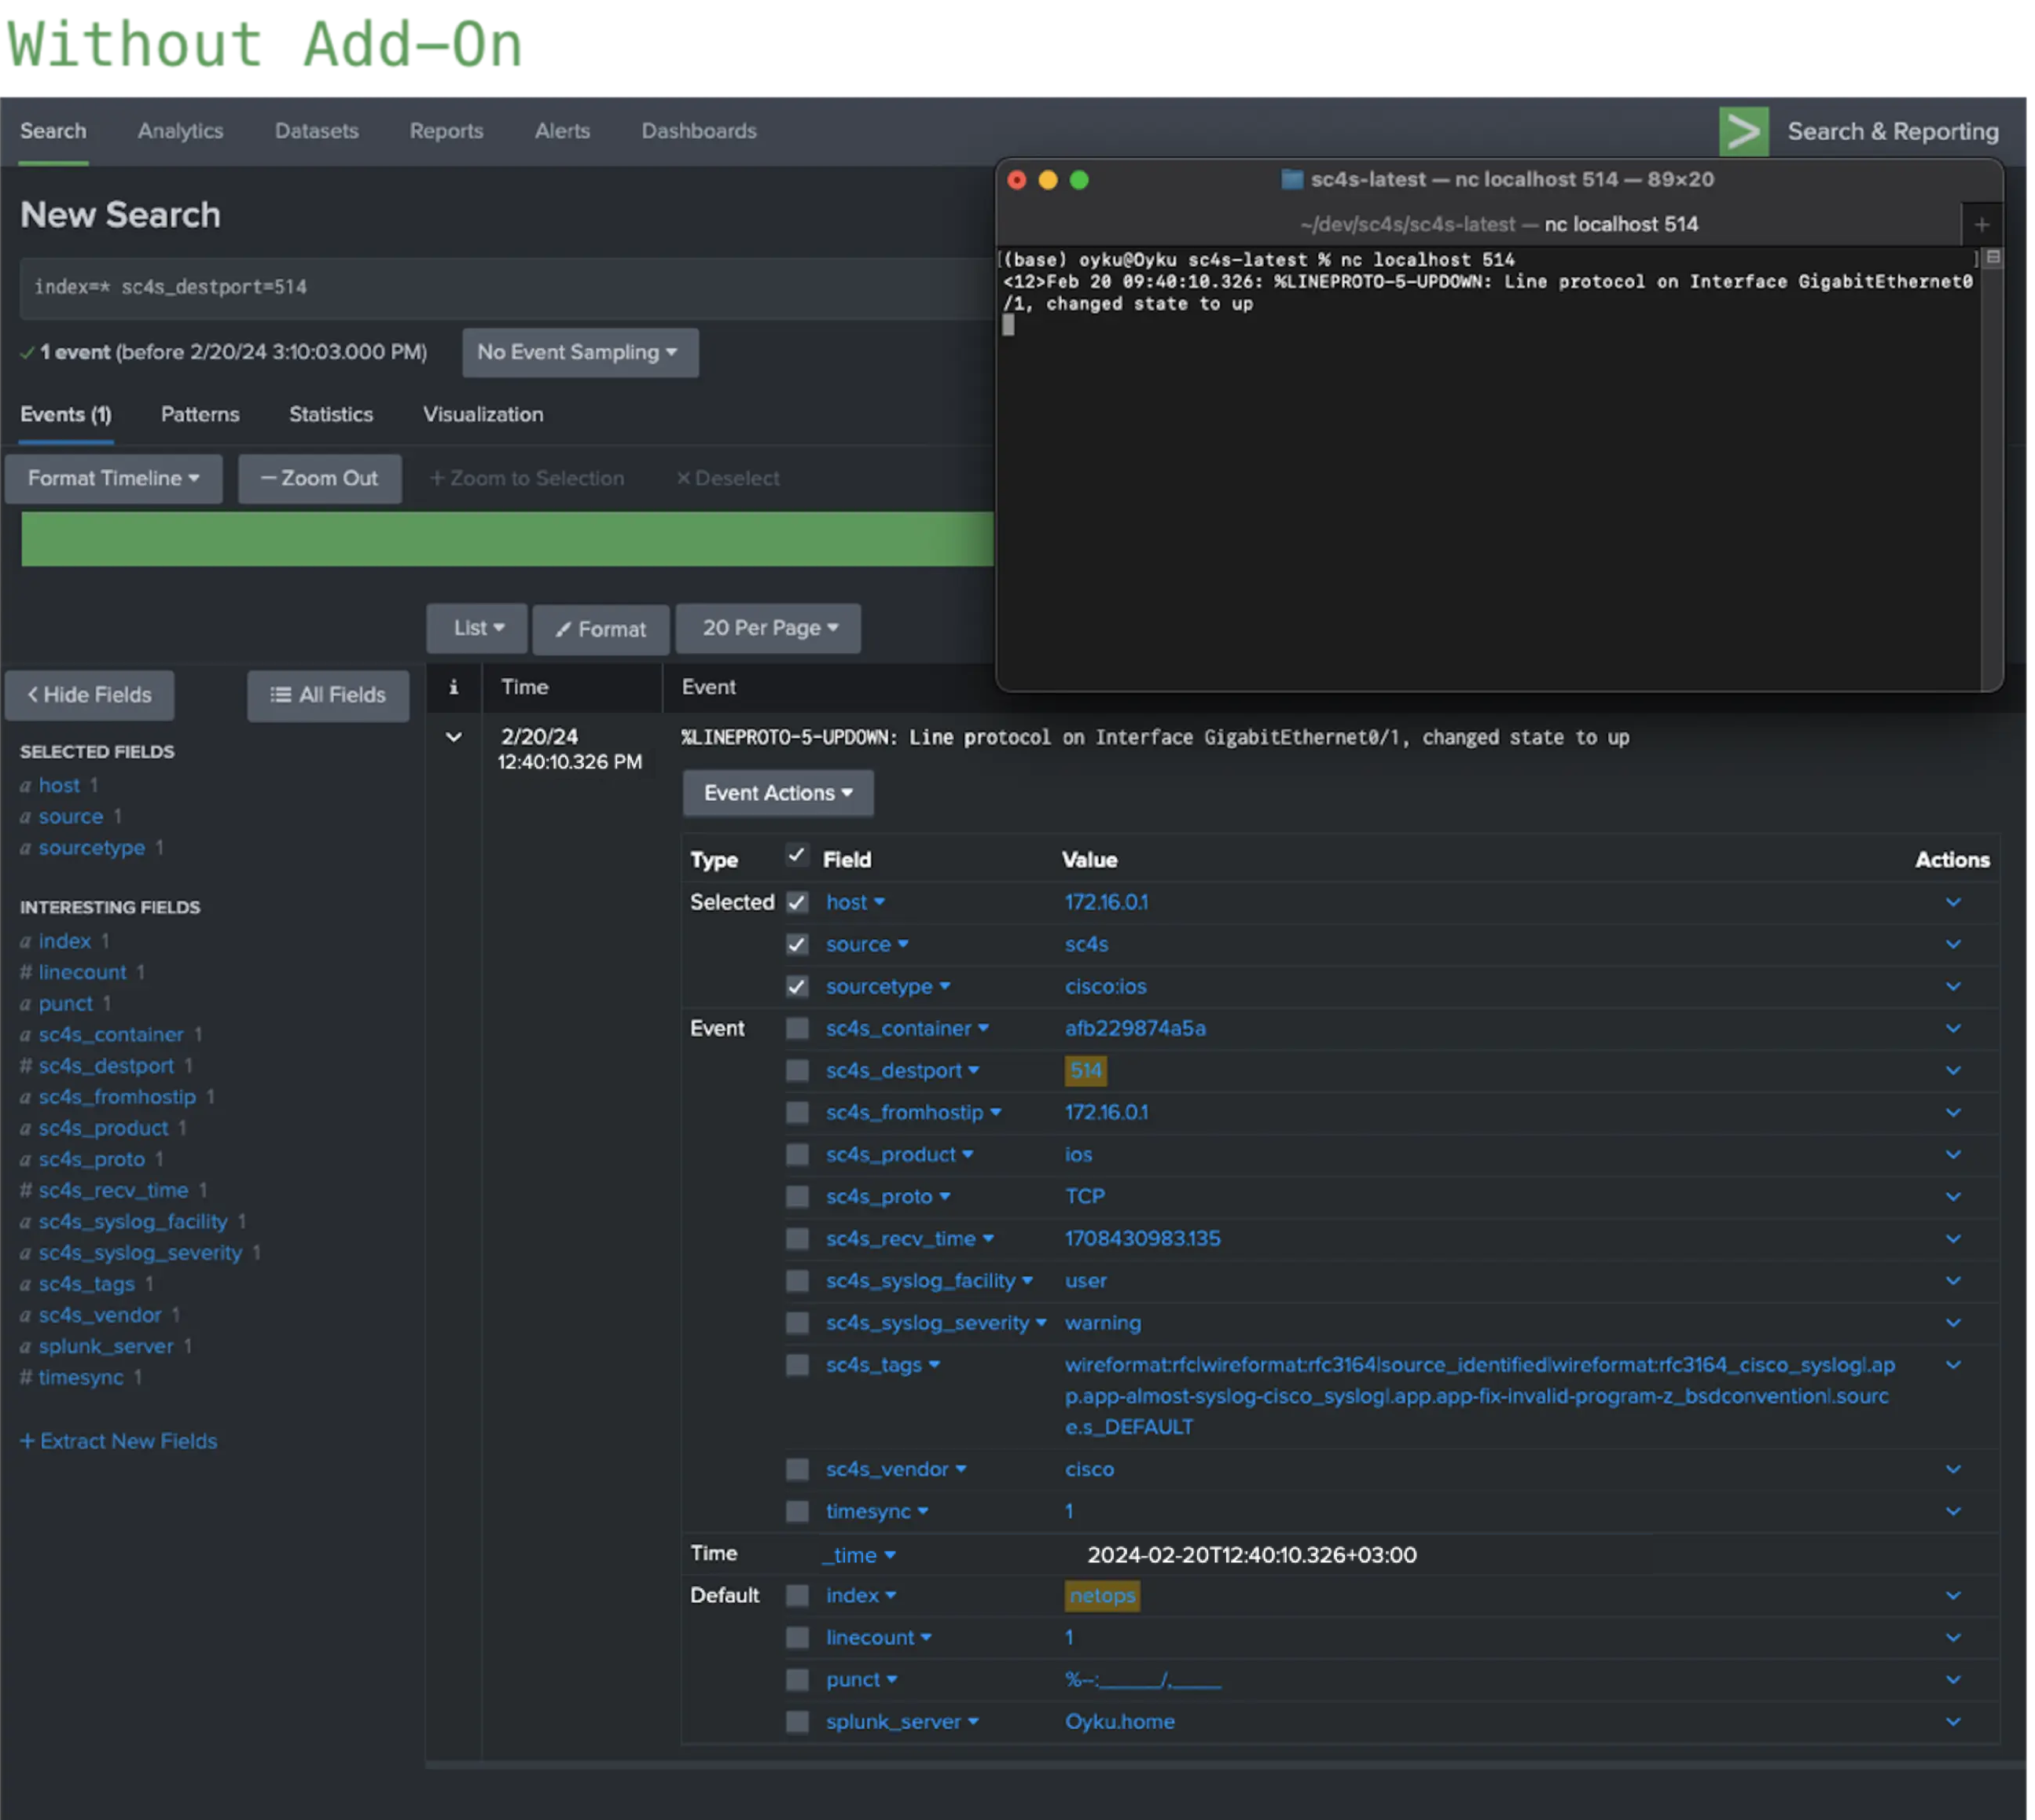
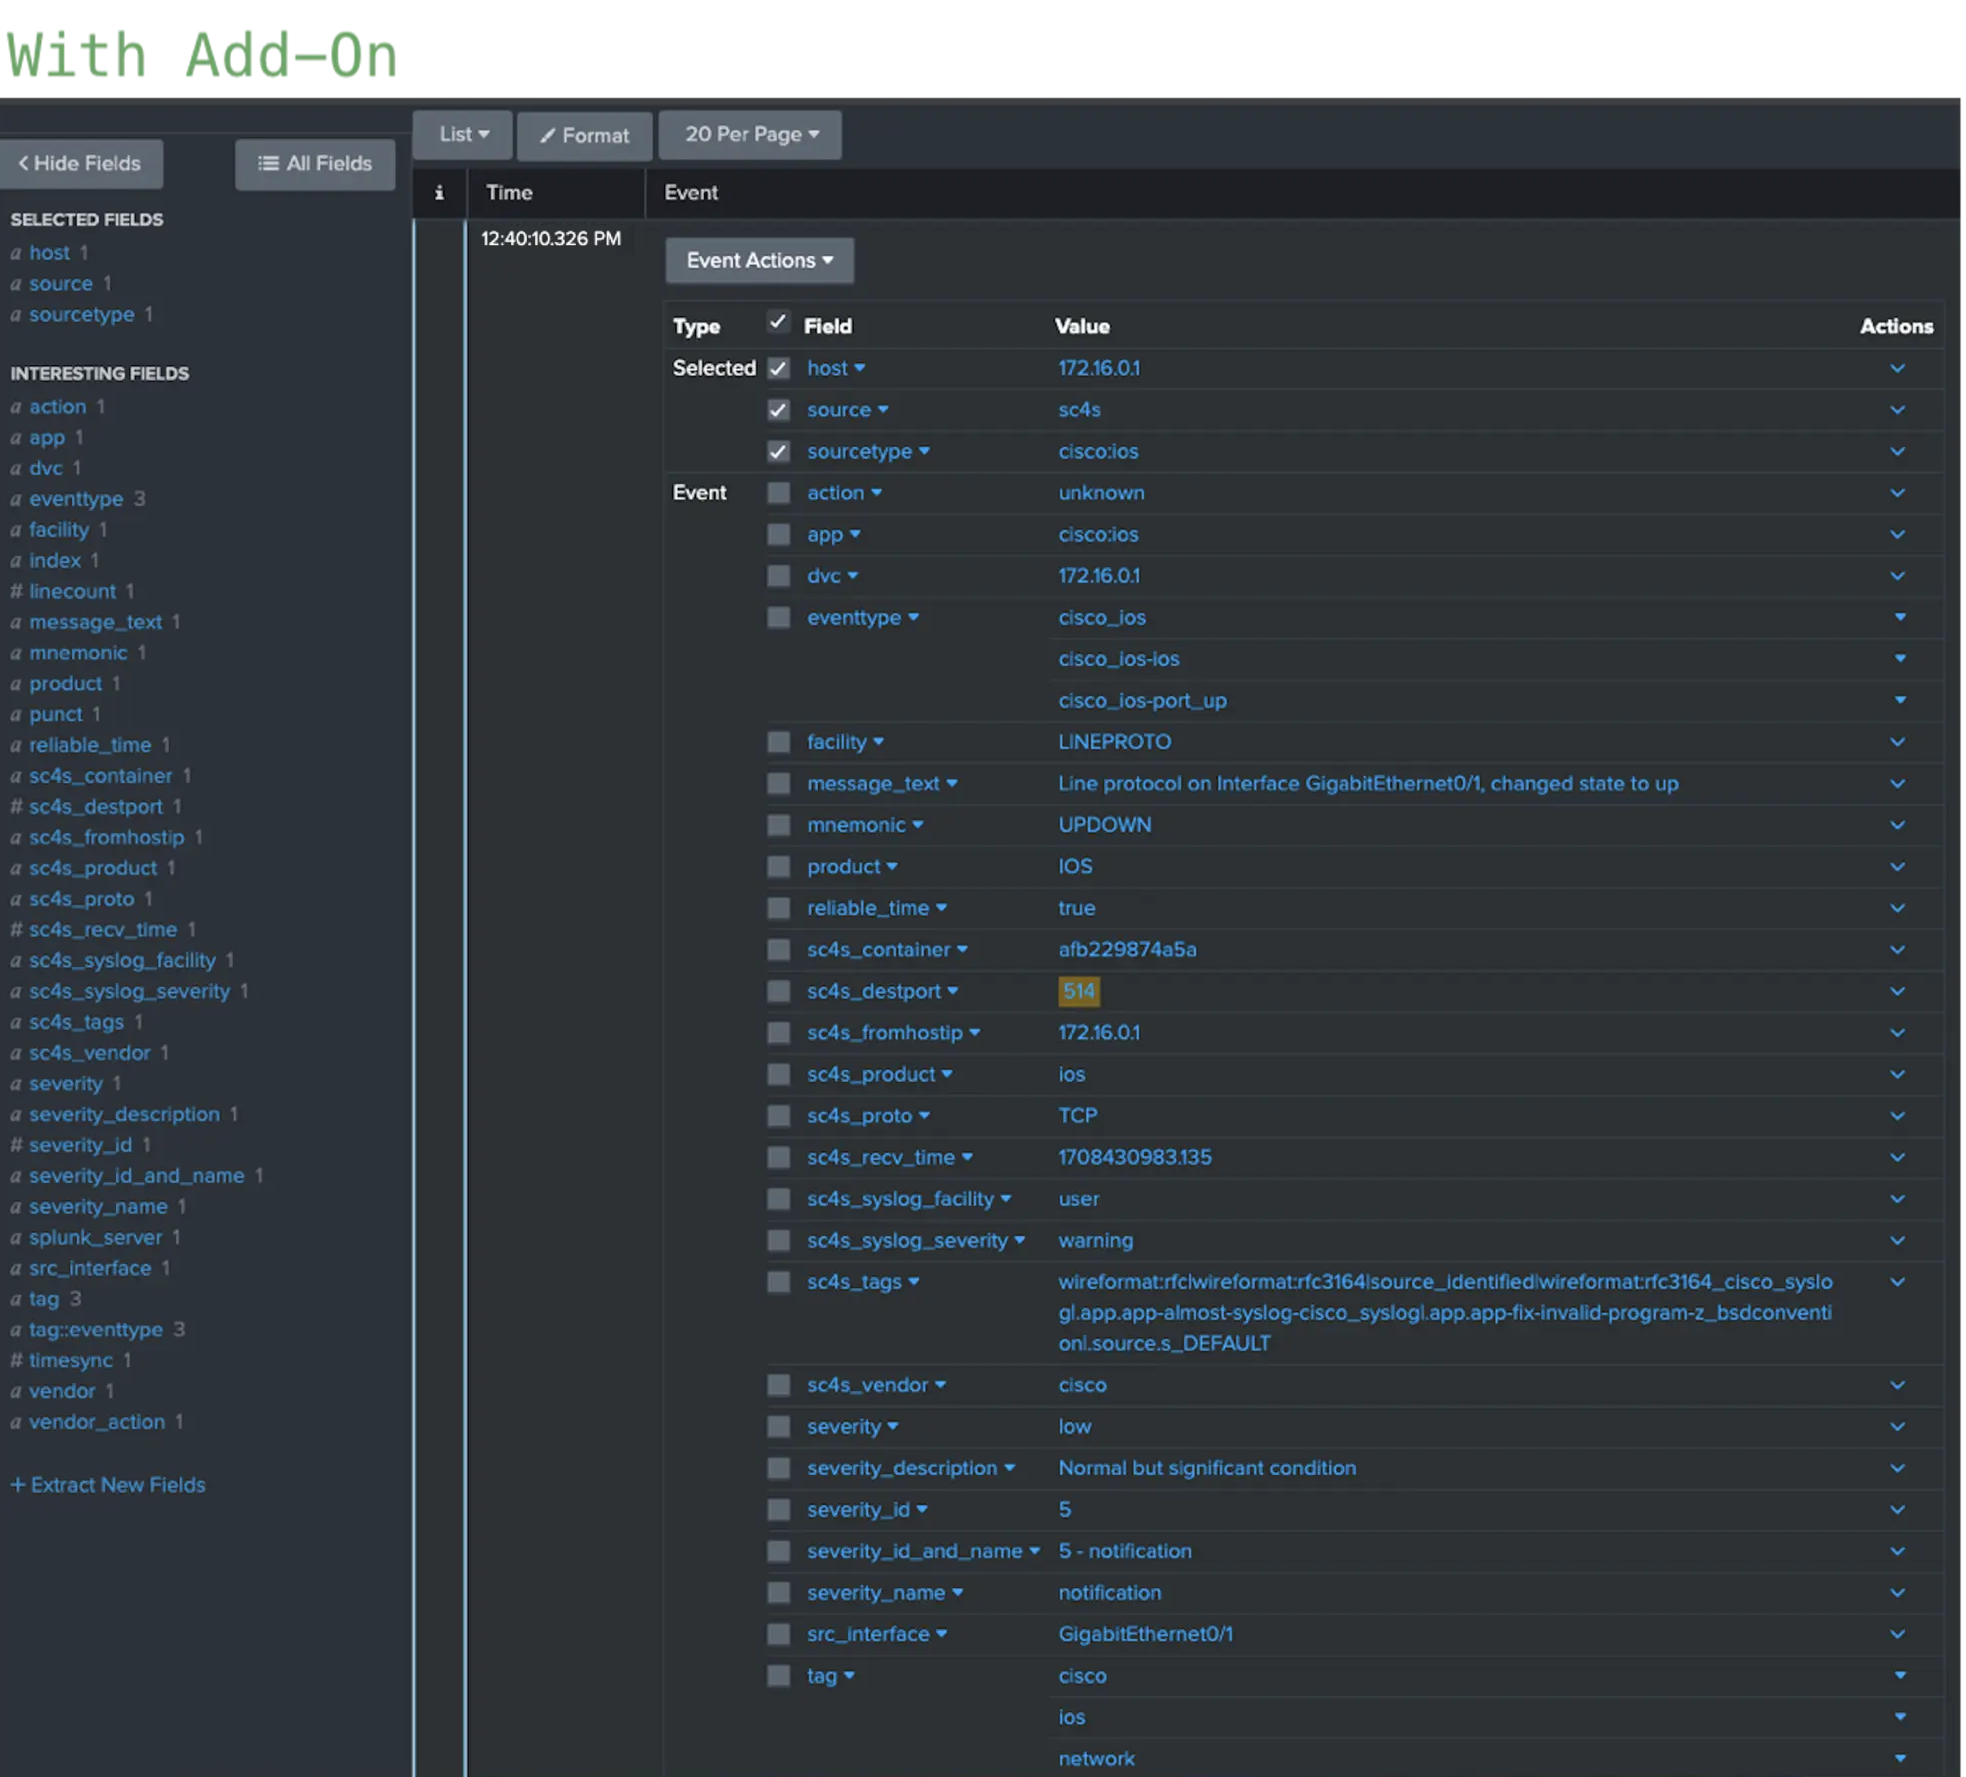
Figure 3: Results of Cisco IOS events coming through port 514 (with and without using the add-on). The outcomes with and without add-ons for port 514 is displayed in Figure 3. Utilizing the add-on facilitated comprehensive field parsing aligned with CIM standards, resulting in the event being tagged with “network,” “ios,” and “cisco.” Consequently, the event is searchable and compatible with datamodel commands such as tstats. Figure 4 indicates the outcome of the identical event shown in Figure 3, but this time transmitted from port 5140. Following the previously mentioned configuration, SC4S will designate port 5140 as a Cisco IOS port. If there is no custom parsing for this port or event type in SC4S, incoming events will be tagged as Cisco IOS but will continue to be parsed based on their respective products until stated otherwise.
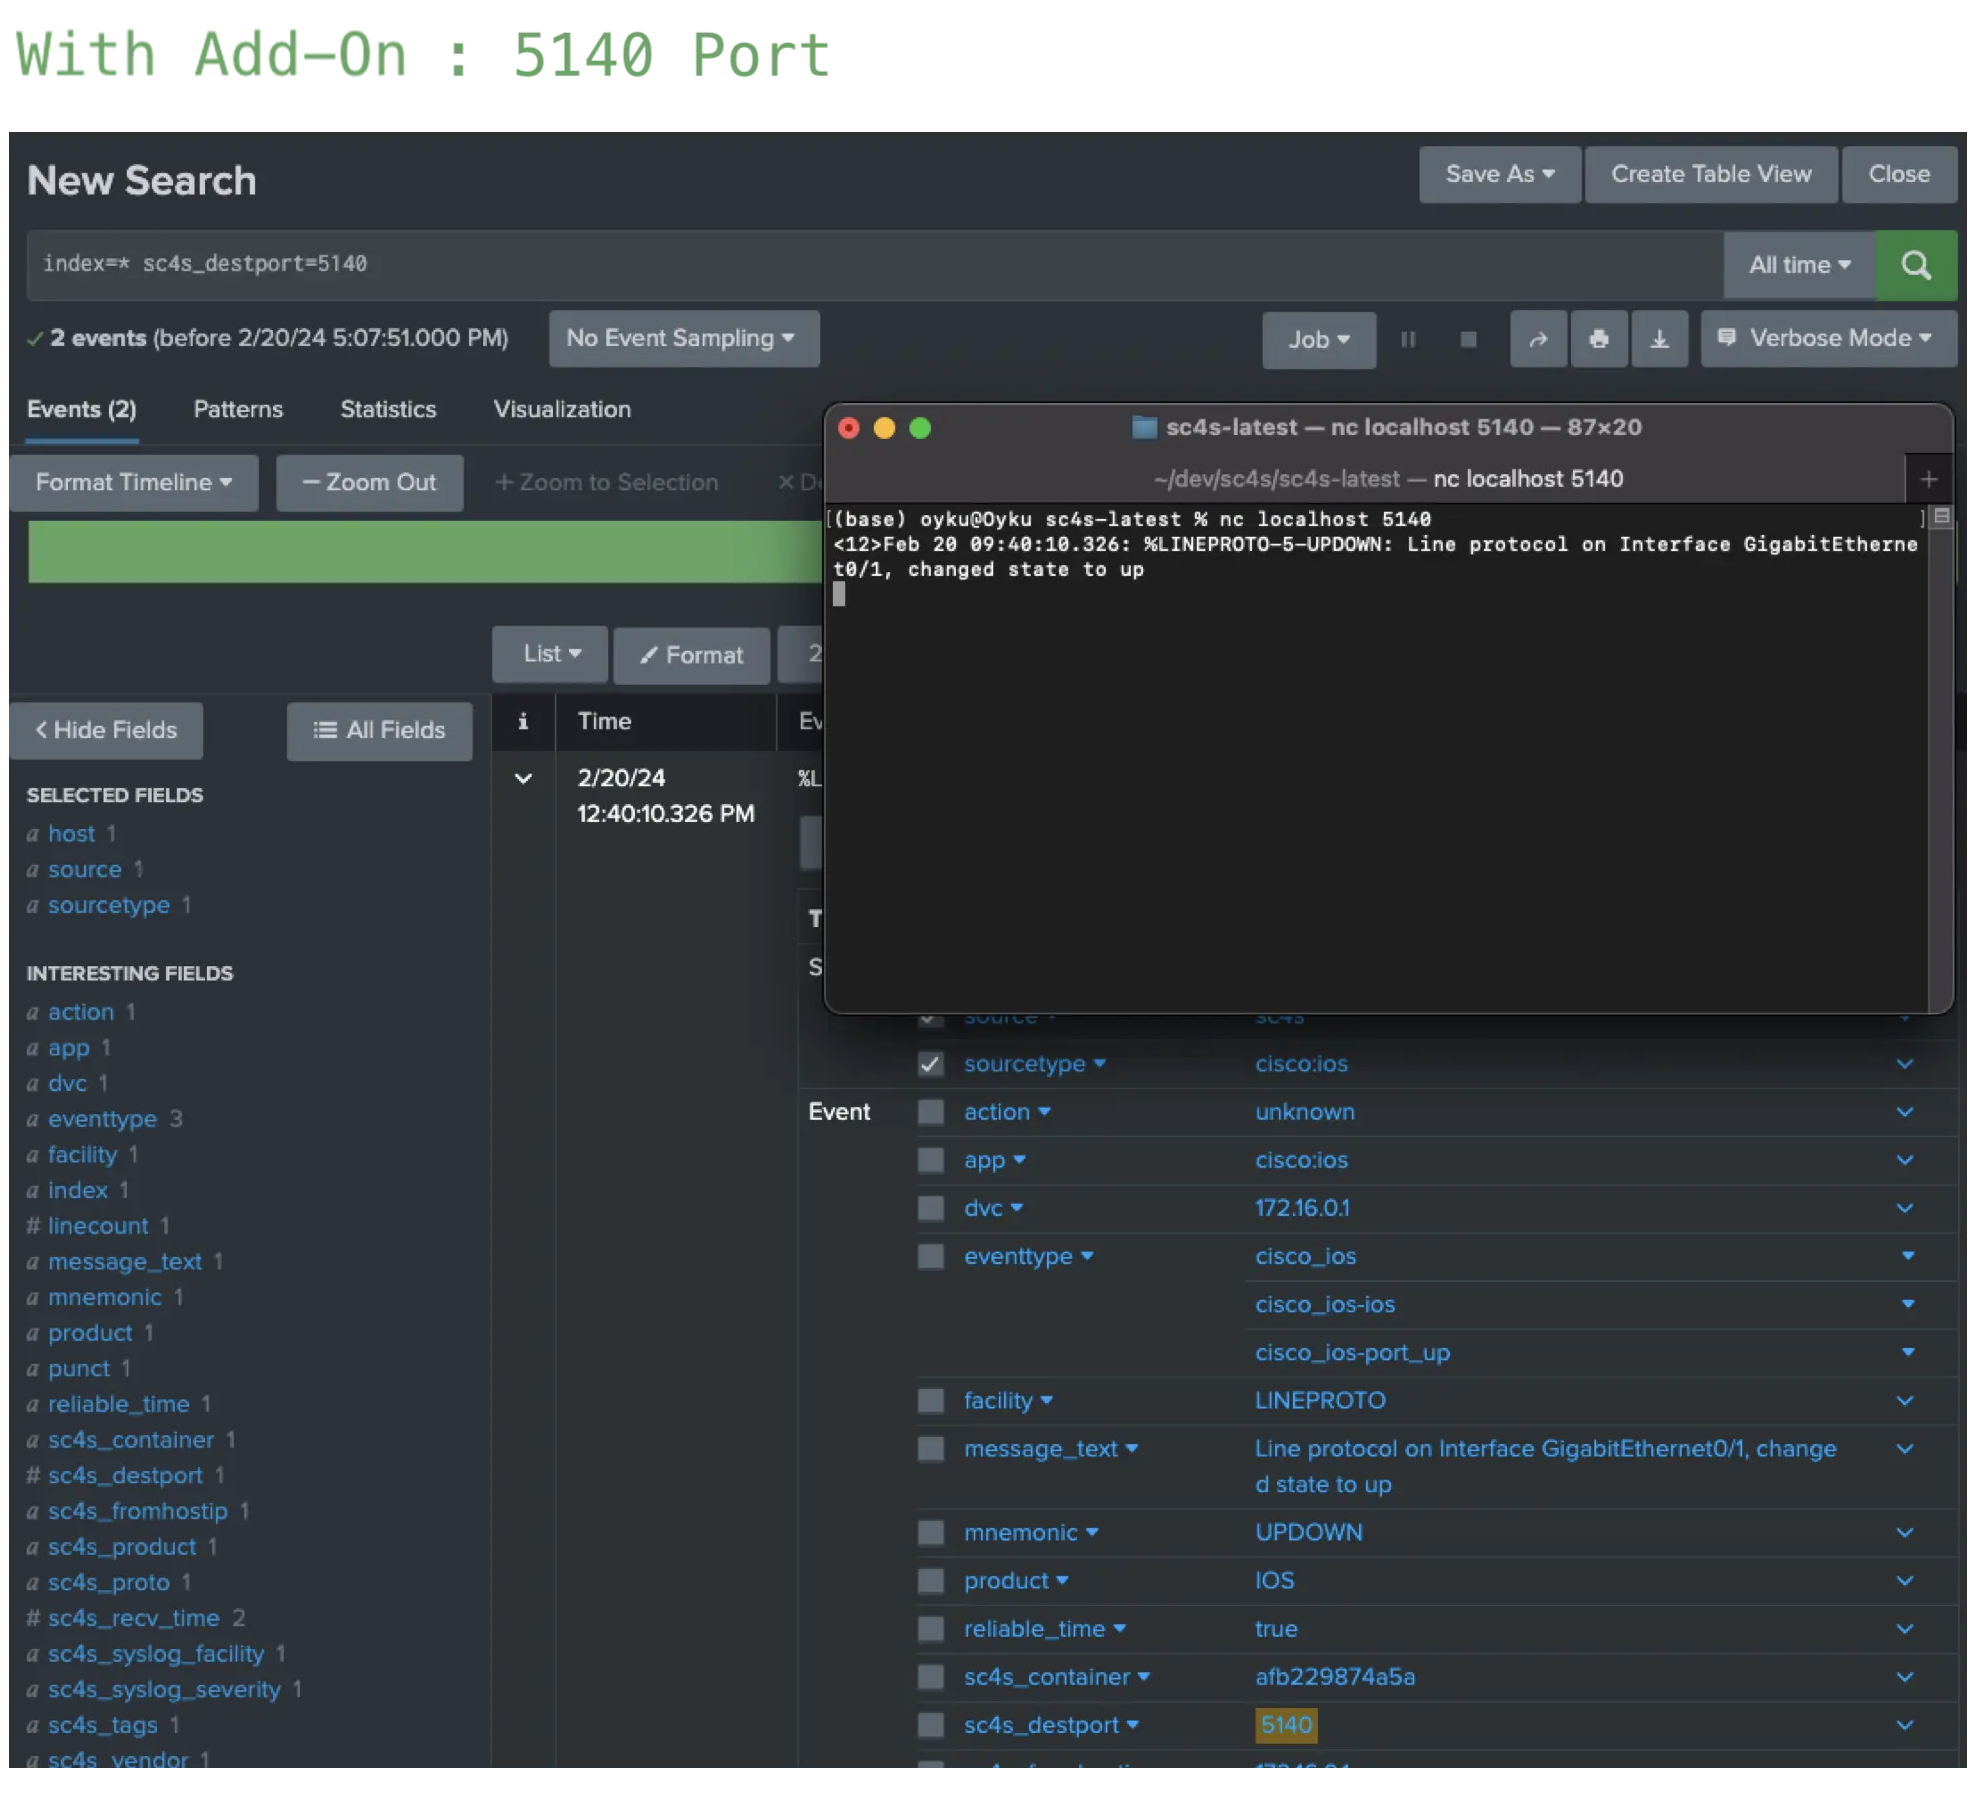
Figure 4: Result of Cisco IOS events coming through port 5140 (with using the add-on).
-
CASE 1.2 : SC4S recognizes and automatically parses successfully but a custom index will be used.
In this scenario, let’s assume we’re attempting the same Cisco IOS event as in CASE 1.1. In this scenario, let’s assume we’re attempting the same Cisco IOS event as in CASE 1.1, but this time we will change the default index for this event type.
Note: Please don’t forget to create a new index called cisco_test or whatever you will use in this case. In this example, the cisco_test index will be used.
There is a file named splunk_metadata.csv located in the local/context directory, which we previously mapped to our local, during installation. This file is utilized for customizing simple fields for known vendors. Upon reviewing the documentation, it can be seen that a key such as cisco_ios is defined for Cisco IOS. If you can simply add the below into the local/context/splunk_metadata.csv file, SC4S will send events directly into the cisco_test index as in Figure 5.
  # For splunk_metadata.csv

  cisco_ios,index,cisco_test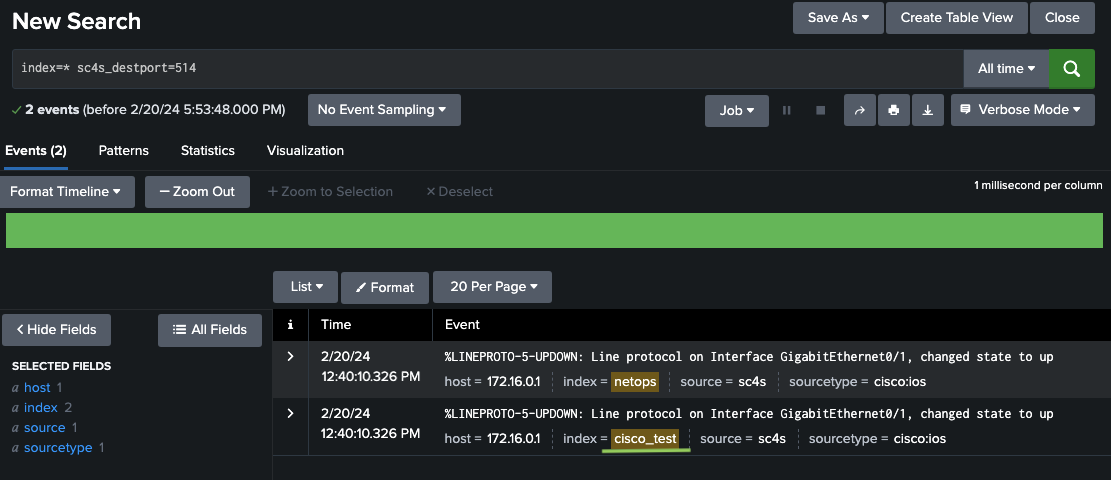
Figure 5: Result of Cisco IOS events that have cisco_test index.
-
CASE 1.3 : SC4S recognizes and automatically parses successfully but custom sourcetype will be used for message contents.
In this scenario, we will use the same event as in previous cases, but with a slight change in date and message to understand the differences. Let’s assume that if events contain %LINK-3-UPDOWN as below, the sourcetype of the event will be cisco:ios, otherwise cisco:ios:new.
Before starting configurations, we need to know that there are two different file formats under the local/context directory as compliance_meta_by_source.* and vendor_product_by_source.*. Generally, vendor_product_by_source.* files are indicated as known vendors but it doesn’t mean you can’t use compliance_meta_by_source.* for them too. On the other hand, custom vendors should use compliance_meta_by_source.* file. Also, there are some configuration examples for both files under the same directory as default. Because creating a filter with both files is not so different and complicated, we will continue with compliance_meta_by_source.*. If you want you can check the documentation page for further investigation about vendor_product_by_source.*.
Note: You need to find out your known vendor filter key from the documentation page to use vendor_product_by_source.* files but in compliance_meta_by_source.* you can create your filter key.
So, let’s continue with compliance_meta_by_source.* files. First of all, we need to make some changes on both the local/context/compliance_meta_by_source.conf and local/context/compliance_meta_by_source.csv files. You can see two different event examples below.
<12>Feb 21 09:00:00.000: %LINK-3-UPDOWN: Interface GigabitEthernet0/1, changed state to up
<12>Feb 21 09:00:00.000: %LINEPROTO-5-UPDOWN: Line protocol on Interface GigabitEthernet0/1, changed state to up
While the compliance_meta_by_source.conf file contains filters for known vendors, and the compliance_meta_by_source.csv file contains the changes to be made. So, if you add the following lines to the CSV and conf files respectively, and run SC4S again, the filters will be activated. You can see the results in Figure 6.
Note: These configurations are independent of any particular port. However, if you wish to define a specific port in the filter, you may use the 5140 port which was defined in Use Case 1.1. To do this, simply add filter f_cisco_ios_new_filter{tag(“.source.s_CISCO_IOS”)} into the compliance_meta_by_source.conf file. Additionally, keep in mind that you should still use the filter that is specific to the CSV file.
  # For compliance_meta_by_source.conf

  filter f_cisco_ios_new_filter{
      "${fields.sc4s_product}" eq "ios"
      and
      "${fields.sc4s_vendor}" eq "cisco"
      and
      message("%LINK-3-UPDOWN");
  };
# For compliance_meta_by_source.csv f_cisco_ios_new_filter,.splunk.sourcetype,cisco:ios:new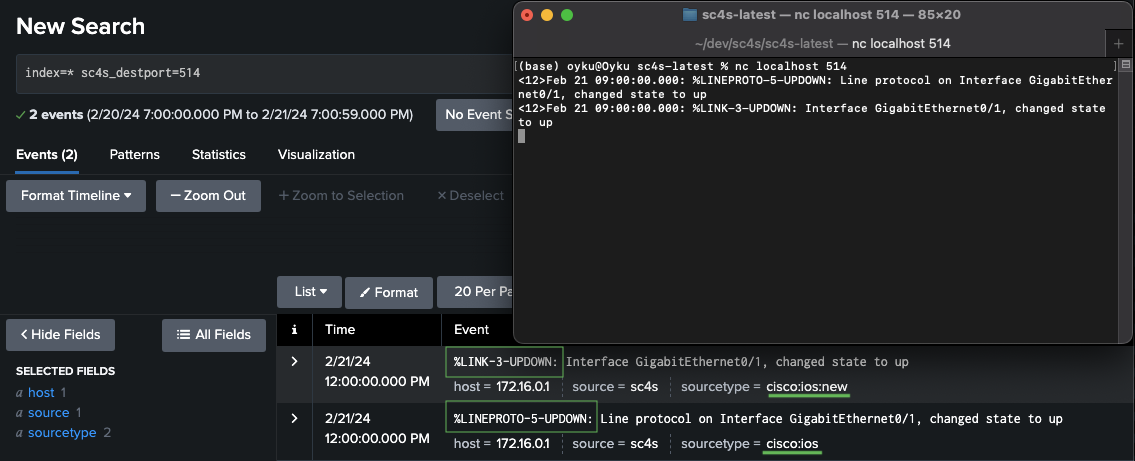
Figure 6: Result of Cisco IOS events with different resource types due to message contents.
2. Custom Vendor Use-Cases:
Some vendors/apps cannot be parsed by SC4S due to a lack of parsing configurations. Even though, the least known apps for “known vendors” may not be available. Information about all pre-defined parsers can be found on official SC4S documentation which was mentioned in the Known Vendor User-Cases section.
In this section, we will create both simple & complicated configuration files with different examples of custom vendors.
-
CASE 2.1 : SC4S can’t recognize and can’t parse automatically - to change index, sourcetype fields In this scenario, we will get events from a Custom Vendor on the 5141 port, and we’ll refer to this vendor as Custom Vendor for this case. Also, the index will be custom_vendor and sourcetype will be custom:vendor. To this, we will use the below event as an example.
<14> hostname "This is my example event"For custom vendors, you can simply create a filter in compliance_meta_by_source.* file. Yet, for creating and using more complicated filters, you may want to create a configuration file as app-custom_vendor.conf under the /local/config/app-parsers/ directory for your specific vendor. Also, we need to define a custom port to both the docker-compose.yml and env_file files as in our previous use cases. So, simply add below lines to docker-compose.yml, env_file and app-custom_vendor.conf files respectively, and re-run the SC4S. You can see the results in Figure 7.
  # Custom Vendor definition for docker-compose.yml

  - target: 5141
      published: 5141
      protocol: tcp
  - target: 5141
      published: 5141
      protocol: udp
# Custom Vendor definition for env_file SC4S_LISTEN_CUSTOM_VENDOR_UDP_PORT=5141 SC4S_LISTEN_CUSTOM_VENDOR_TCP_PORT=5141# Block parser for Custom Vendor for app-custom_vendor.conf block parser custom_vendor-parser() { channel { rewrite { r_set_splunk_dest_default( index("custom_vendor") sourcetype("custom:vendor") ); }; }; }; application custom_vendor[sc4s-network-source] { filter { tags(".source.s_CUSTOM_VENDOR"); }; parser { custom_vendor-parser(); }; };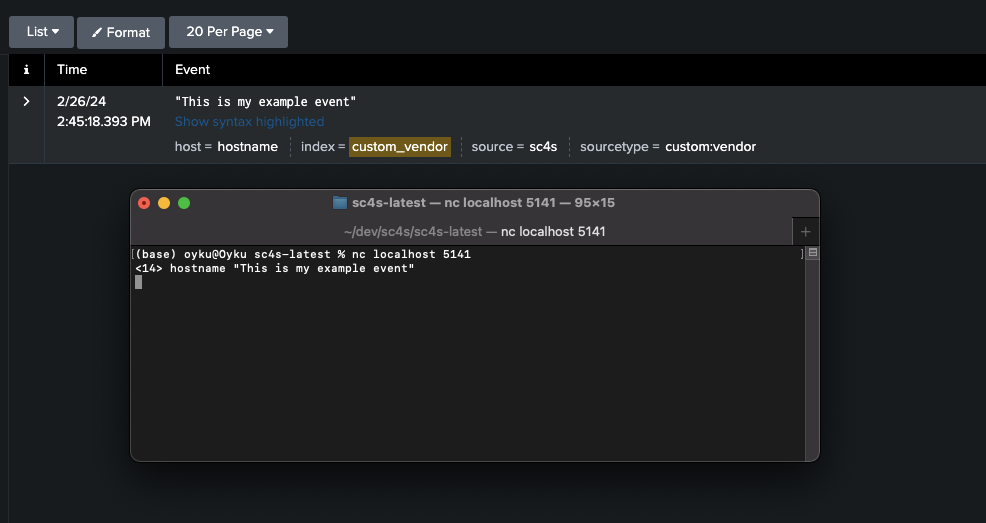
Figure 7: Result of “Custom Vendor” events with different resource types due to message contents.
-
CASE 2.2 : SC4S can’t recognize and can’t parse automatically - to change timestamp, index, sourcetype, and some custom fields due to message In this scenario, let’s assume we’re ingesting audit and network logs from the same vendor into Splunk on the same port, 5142, and we’ll refer to this vendor as Custom Vendor 2 in this case. Events sourcetypes will change due to their type field. If it is AUDIT, we will send them custom:vendor2:audit, otherwise it will be custom:vendor2:alert. You can find event examples below that will be used in this case.
  # Alert Example
  <14>{"Alert":{"app":"App4CustomVendor","severity":"Low","src_ip":"1.1.1.1","dest_host":"desthost","subject":"This is subject","type":"Alert","mitre tatic name":[],"mitre technique name":[],"mitre technique id":[],"timestamp":"19/02/2024 12:22:34 MSK"}}

  # Audit Example
  <14>{"Alert":{"app":"App4CustomVendor","severity":"Low","src_ip":"1.1.1.1","dest_host":"desthost","subject":"This is subject","type":"Audit","mitre tatic name":[],"mitre technique name":[],"mitre technique id":[],"timestamp":"19/02/2024 12:22:34 TRT"}}
If we examine the examples, we can see that some fields are not given correctly. This could be due to improper definition or the product’s characteristics. For example, Splunk has mitre_tatic_name, mitre_technique_name, and mitre_technique_id fields but in the events, these fields are slightly different. Also, all fields in the example events have the same pattern as Alert.field_name but we need fields independently. Lastly, there are different time zone definings at the end of the timestamp field. MSK and TRT indicate the same time zone (+3 UTC) in reality, but we need to customize the timestamp field in configuration files.
We will follow the same path as CASE 2.1 to define new configurations for both the event and custom port. Below lines will add to docker-compose.yml, env_file and local/config/app-parsers/app-custom_vendor_2.conf files respectively, and re-run the SC4S. Results can be seen in Figure 8.
  # Custom Vendor definition for docker-compose.yml

  - target: 5142
      published: 5142
      protocol: tcp
  - target: 5142
      published: 5142
      protocol: udp
# Custom Vendor 2 definition for env_file SC4S_LISTEN_CUSTOM_VENDOR2_UDP_PORT=5142 SC4S_LISTEN_CUSTOM_VENDOR2_TCP_PORT=5142# Block parser for Custom Vendor 2 - Audit/Alert for app-custom_vendor_2.conf block parser custom_vendor_2_syslog_app-parser() { channel { # create a prefix to create a custom fields parser { json-parser ( prefix(".json.")); }; # Because the event's timestamp pattern may change due to different causes, this is for not returning any error due to timestamp extractions in the future. if { # If the timestamp pattern is in the event, extract it as a timestamp field. parser { regexp-parser( prefix(".json.") patterns('(?<timestamp>\d{4} \w+ \d{1,2} \d{2}:\d{2}:\d{2})') template("${.json.Alert.timestamp}") ); }; # If so, add +0300 to the timestamp field and change the timestamp field (date) in the metadata. rewrite { set("${.json.timestamp} +0300", value(".metadata.date")); }; date-parser-nofilter( format('%Y %B %d %H:%M:%S %z') template("${.metadata.date}") ); }; if { # if type of the event is "Alert", index = "custom_vendor" & sourcetype = "custom:vendor:audit". filter { match("Audit", value(".json.Alert.type")) }; rewrite { r_set_splunk_dest_default( index('custom_vendor_2') sourcetype('custom:vendor2:audit') ); }; } else { # else, index = "custom_vendor" & sourcetype = "custom:vendor:alert". rewrite { r_set_splunk_dest_default( index('custom_vendor_2') sourcetype('custom:vendor2:alert') ); }; }; # rewrite Alert.<fields> as <fields> into MESSAGE parser { regexp-parser( patterns('"Alert":(?<msg>.+})}') template("${MESSAGE}") ); }; rewrite { set("${msg}", value("MESSAGE")); }; # rename if there are mitre fields if { rewrite { subst("mitre technique name", "mitre_technique_name", value("MESSAGE")); subst("mitre technique id", "mitre_technique_id", value("MESSAGE")); subst("mitre tactic name", "mitre_tactic_name", value("MESSAGE")); }; }; }; }; application custom_vendor_2_syslog_app[json] { filter { tags(".source.s_CUSTOM_VENDOR2") or match("App4CustomVendor" template("${MESSAGE}")); }; parser { custom_vendor_2_syslog_app-parser(); }; };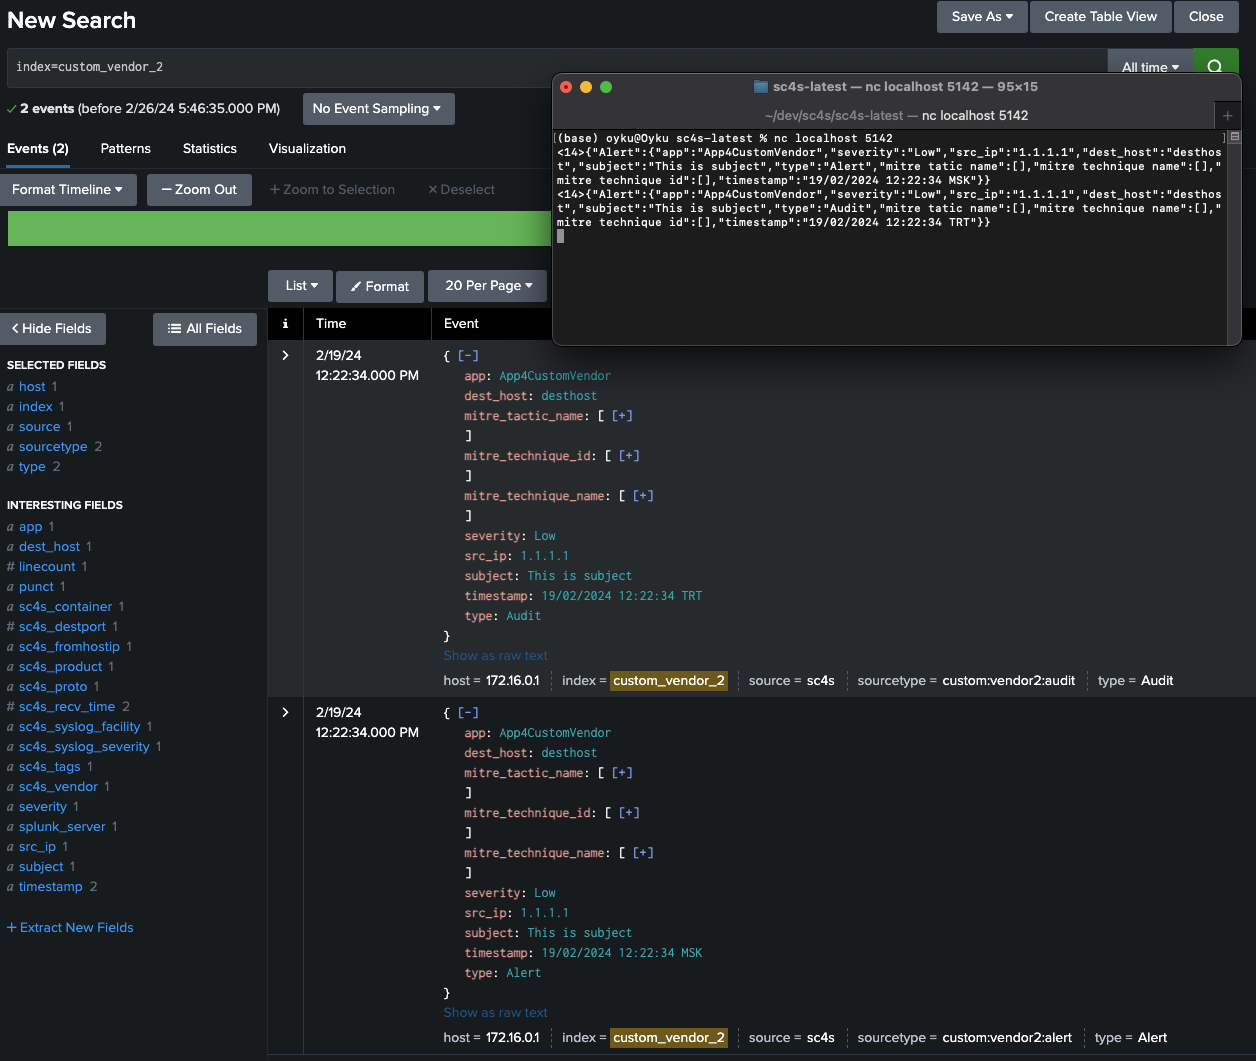
Figure 8: Result of “Custom Vendor” events with different resource types due to message contents. -
CASE 2.3 : SC4S can’t recognize and can’t parse automatically - to delete due to message context In this scenario, we will get events from a Custom Vendor 3 on the 5143 port. Also, the index will be custom_vendor_3 and the sourcetype will be custom:vendor3. Similar to the CASE 2.1, we will define index and sourcetype in the configuration file, but unlike that, we will not forward the events that include “unwanted event” text in the messages to Splunk but will filter them directly in SC4S. To this, we will use the below events as examples.
Note : You can only understand whether the filtered example works or not by doing the same example yourself because you can only see that the unfiltered sample is passed to the correct index and sourcetype in Figure 9. I can’t provide you with proof that the filter works.
  <14> hostname "This is my example event"
  <14> hostname "This is my unwanted event"
We will follow the same path as CASE 2.1 and CASE 2.2 to define new configurations for both the event and custom port. Below lines will add to docker-compose.yml, env_file and local/config/app-parsers/app-custom_vendor_3.conf files respectively, and re-run the SC4S. Results can be seen in Figure 9.
  # Custom Vendor 3 definition for docker-compose.yml

  - target: 5143
      published: 5143
      protocol: tcp
  - target: 5143
      published: 5143
      protocol: udp
# Custom Vendor 3 definition for env_file SC4S_LISTEN_CUSTOM_VENDOR_3_UDP_PORT=5143 SC4S_LISTEN_CUSTOM_VENDOR_3_TCP_PORT=5143# Block parser for Custom Vendor 3 for app-custom_vendor_3.conf block parser custom_vendor_3_syslog_app-parser() { channel { if { # If there is an "unwanted event" in the message, this event will be sent to the null queue (SC4S won't push events to the Splunk) parser { regexp-parser( prefix(".customvendor.") patterns('unwanted event') ); }; rewrite(r_set_dest_splunk_null_queue); }; # If the event doesn't include an "unwanted event" pattern, index = "custom_vendor_3" and sourcetype = "custom:vendor3" rewrite { r_set_splunk_dest_default( index("custom_vendor_3") sourcetype("custom:vendor3") ); }; }; }; application custom_vendor_3_syslog_app[sc4s-network-source] { filter { tags(".source.s_CUSTOM_VENDOR3"); }; parser { custom_vendor_3_syslog_app-parser(); }; };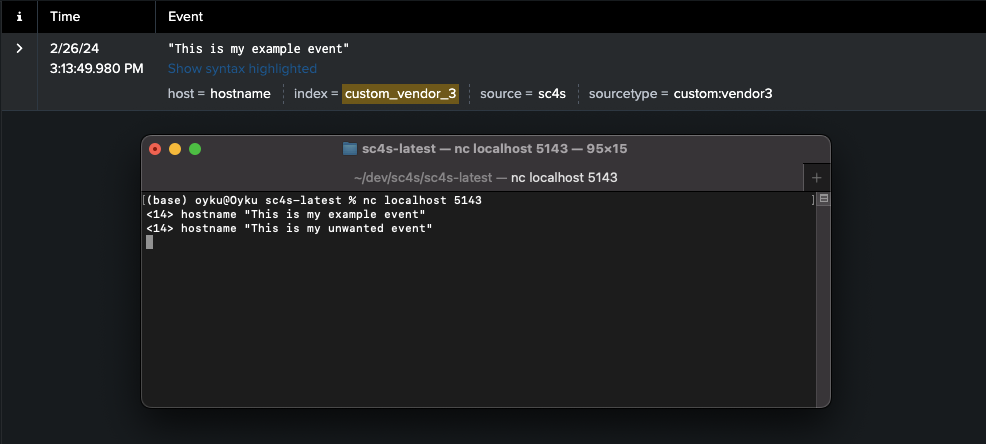
Figure 9: Result of “Custom Vendor 3” events.
Conclusion
To sum up, SC4S (Splunk Connect for Syslog) is a handy tool for simplifying the process of ingesting syslog-ng data into Splunk. Throughout this blog, we’ve covered the basics of SC4S, from installation to practical applications.
For known vendors, SC4S does the heavy lifting by automatically parsing syslog data. We’ve seen examples with Cisco IOS, where SC4S handles data and ensures compatibility with Splunk’s Common Information Model (CIM) with pre-created apps/add-ons.
Even with custom vendors, SC4S shines. It provides flexibility to adapt to unique logging requirements. By creating custom configurations and metadata files, users can tailor SC4S to their needs. We’ve explored examples showcasing SC4S’s ability to handle syslog data from custom vendors accurately.
In essence, SC4S is a versatile tool that makes syslog data ingestion into Splunk a breeze. Whether dealing with known or custom vendors, SC4S streamlines the process, enabling organizations to make the most of their log data for security and operational monitoring.
Also, thanks for reading such a long article. :)
References:
- [1] Splunk. (2024). Welcome to Splunk Connect for Syslog!. Splunk Connect for Syslog. https://splunk.github.io/splunk-connect-for-syslog/main/
- [2] Syslog-ng. (2024). syslog-ng Open Source Edition 3.25 - Administration Guide. https://www.syslog-ng.com/technical-documents/doc/syslog-ng-open-source-edition/3.25/administration-guide/