Splunk Cluster Manager Redundancy - Part 2: Implementation
Cluster manager redundancy is a mechanism designed to ensure high availability and resilience in Splunk’s distributed architecture. If one cluster manager becomes unavailable due to a failure or maintenance, another pre-configured cluster manager can seamlessly take over coordination duties for the indexers. Splunk provides multiple approaches to implement this, such as automatic failover with heartbeat or manual failover using DNS redirection (Splunk documentation). Also, I mentioned this subject on my previous blog. 😊
In this blog, we’re going with the manual + DNS-based approach for its simplicity and full control over the switch process. However, since we’re running everything on the same physical server with one network card (for testing and educational purposes), we’re not using distinct hostnames or external DNS. Instead, we’ll configure everything using the local IP. 😊
👉 So, don’t get hung up on why we’re applying redundancy this way - our goal is to make the mechanics of the setup crystal clear for you to replicate in your environment, whether production or lab.
Also:
- All examples and configurations will be demonstrated on macOS. Please don’t be mad at me. 😊
- You’ll need a Splunk Enterprise license to set up this type of environment.
- And since this blog is aimed at less experienced Splunk Architects, I’ll include helpful context around basic Linux commands and core Splunk concepts where relevant.
- You can check my previous blog about what the Cluster Manager Redundancy is. 😊
If you are ready, we can start with outlining the steps and configuring all Splunks on the same server. After that, we will continue to discuss and configure advanced options.
1. Overview
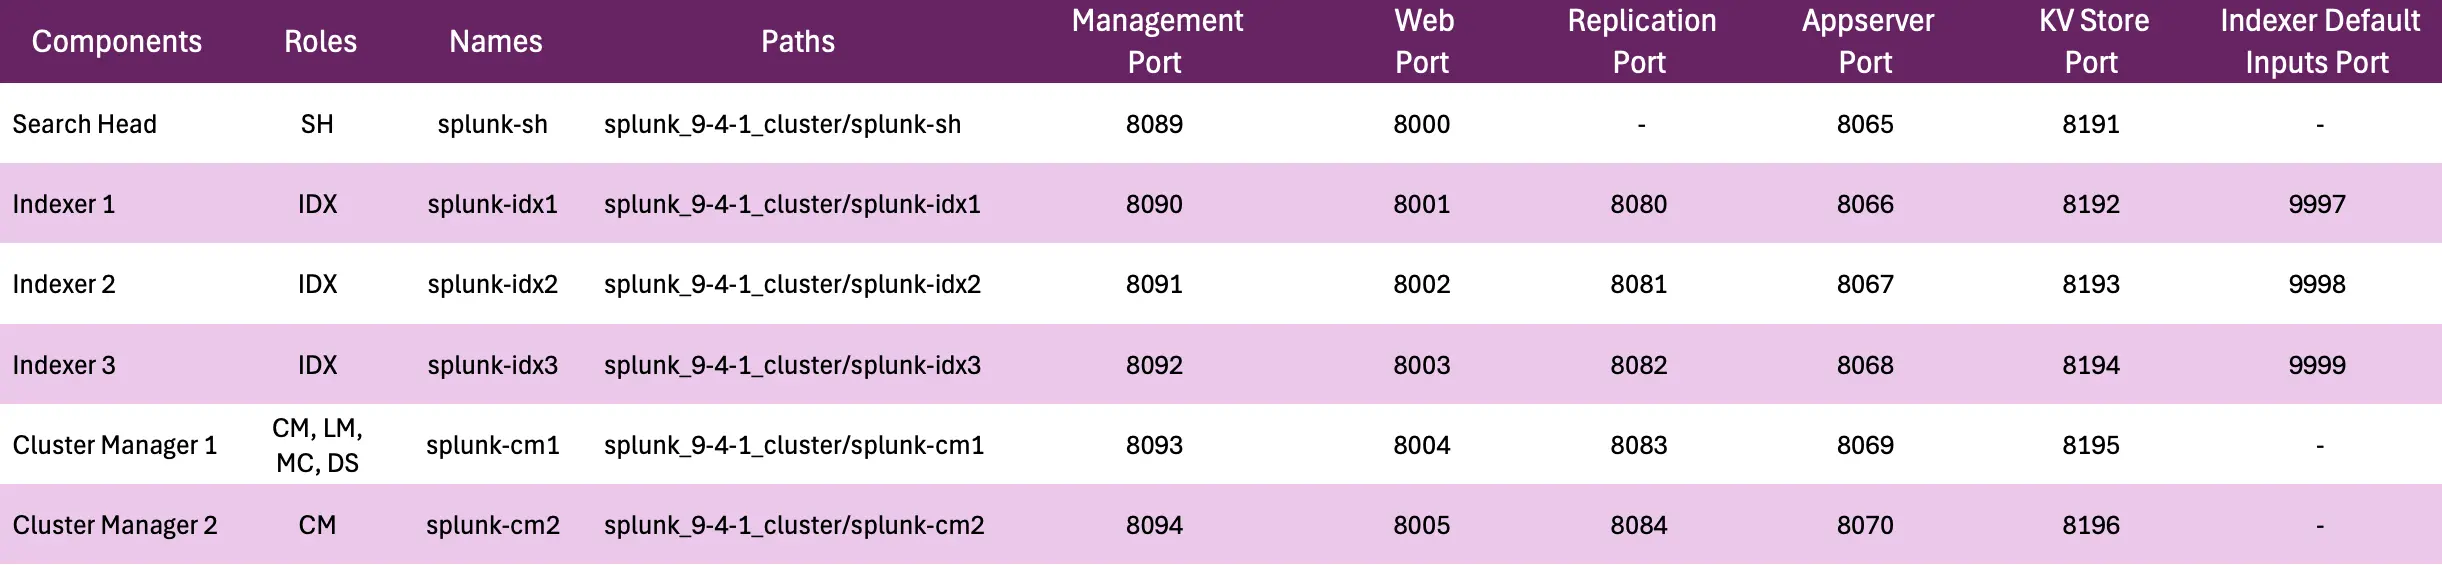
Distributed Clustered Deployment with multi-site (M2) contains at least 1 Search Head, 3 Indexers, 1 Cluster Manager, and other components. In our scenario, we will have 1 Search Head, 2 Indexers, and 1 Cluster Manager in site-1 with another Cluster Manager and the last Indexer in site-2, as shown in the table.
 |
|---|
| Figure 1 Description of the component that will be used in this study. |
If you’re not familiar with these components but still want to try this method, I recommend starting with Splunk documentation and taking some basic Splunk courses. There are free starter courses available under the “Splunk Enterprise and Splunk Cloud” section that you can find through the link I mentioned earlier. After you have learned some fundamental information, if you want to deepen your understanding of Splunk’s architecture and networking, I suggest exploring additional courses. Otherwise, you can jump into this blog. Also, if you encounter any problems or have questions about the topics discussed in this blog, feel free to contact me via my LinkedIn account.
2. Create Splunk Environment
2.1. Install Splunk Enterprise for Each Component
If you want to continue, you should start to create some directories for each of Splunk’s components. I simply created a directory called as splunk_9–4–1_cluster as a starter, because of using the 9.4.1 version of Splunk Enterprise. You can use the commands below to create all Splunk components.
mkdir splunk-sh splunk-idx1 splunk-idx2 splunk-idx3 splunk-cm1 splunk-cm2
wget -O splunk-9.4.1-e3bdab203ac8-darwin-intel.tgz "https://download.splunk.com/products/splunk/releases/9.4.1/osx/splunk-9.4.1-e3bdab203ac8-darwin-intel.tgz"

tar -C splunk-sh -xzf splunk-9.4.1-e3bdab203ac8-darwin-intel.tgz
tar -C splunk-idx1 -xzf splunk-9.4.1-e3bdab203ac8-darwin-intel.tgz
tar -C splunk-idx2 -xzf splunk-9.4.1-e3bdab203ac8-darwin-intel.tgz
tar -C splunk-idx3 -xzf splunk-9.4.1-e3bdab203ac8-darwin-intel.tgz
tar -C splunk-cm1 -xzf splunk-9.4.1-e3bdab203ac8-darwin-intel.tgz
tar -C splunk-cm2 -xzf splunk-9.4.1-e3bdab203ac8-darwin-intel.tgz
Secondly, you can either start all Splunks individually to decide their ports or simply edit their etc/system/local/web.conf files before starting them. I will follow search head (splunk-sh), indexer 1 (splunk-idx1), indexer 2 (splunk-idx2), indexer 3 (splunk-idx3), cluster master 1 (splunk-cm1), and cluster master 2 (splunk-cm2) order to start Splunk and provide configurations for the splunk-idx1. You may adjust the configurations as needed based on this example. By following my sequence, you won’t need to make any new configurations for splunk-sh, only for splunk-idx1, and the other components.
Let’s start with option 1:
Notes:
-
If you are as passionate about password security as I am, you can use the credentials user:password with admin:admin123. While the latter was a joke, it’s crucial to prioritize strong password choices. 😊
-
Also, because we are going to use default ports for the splunk-sh, please remember to start the Splunk service for the splunk-sh first. Otherwise, you need to make some adjustments.
-
You can use this start command to eliminate the whole reading process 😊
splunk-idx1/bin/splunk start --accept-license --answer-yes
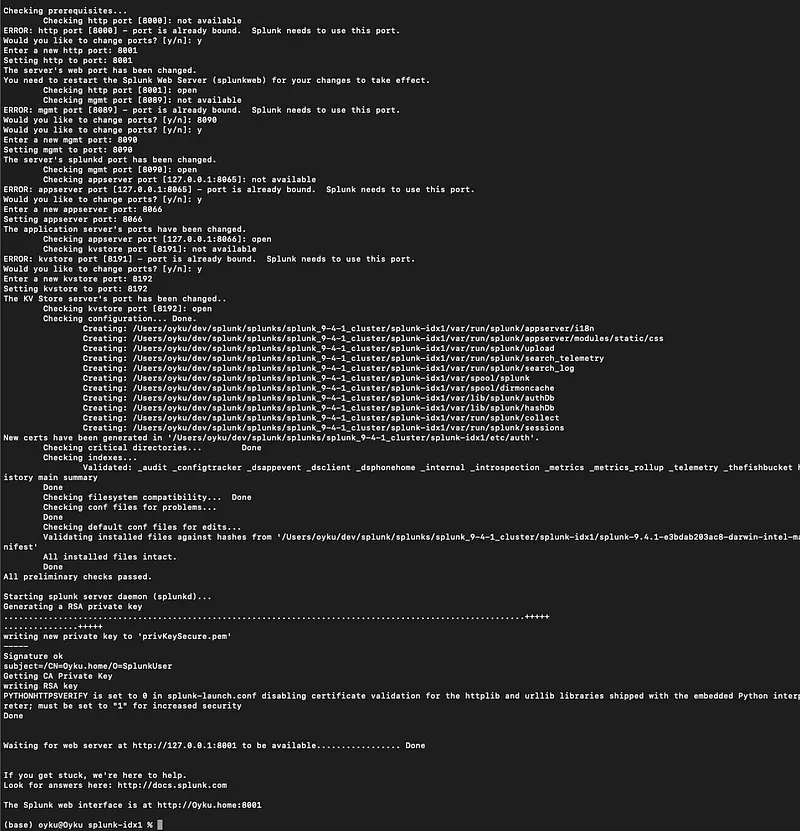
The image below shows what I changed while starting splunk-idx1 component. Because we didn’t create a cluster at this moment, I just changed the Web Port, the Management Port, the Appserver Port, and the KV Store Port of the splunk-idx1. After all configurations, we will disable the web port and change the replication ports on the indexers. After we’ve made all configurations and created the cluster architecture, we will disable the web port and change the replication and input ports on the indexers.
 |
|---|
| Figure 2 Terminal image of the Splunk installation with custom ports for the splunk-idx1 component. |
Option 2: Create a server.conf, web.conf, and user-seed.conf under the etc/system/local directories for each main directory of the Splunk components. Also, I will give you the example configs for the splunk-idx1.
# user-seed.conf
[user_info]
USERNAME = admin
PASSWORD = <your password>
# web.conf
[settings]
httpport = 8001
mgmtHostPort = 127.0.0.1:8090
appServerPorts = 8066
# server.conf
[general]
serverName = splunk-idx1

[kvstore]
port = 8192
After creating and editing these configs, you can start the Splunk service easily with the command below.
splunk-idx1/bin/splunk start --accept-license --answer-yes --no-prompt
2.2. Configure Environments as Their Roles
We will continue to create our cluster in this section, starting with the splunk-cm1. Please, just follow my lead and be patient, because this path is a little bit thorny. Also, don’t forget to restart after configuring each component, and add your Enterprise license to CM1 at the end of the configuration. 😊
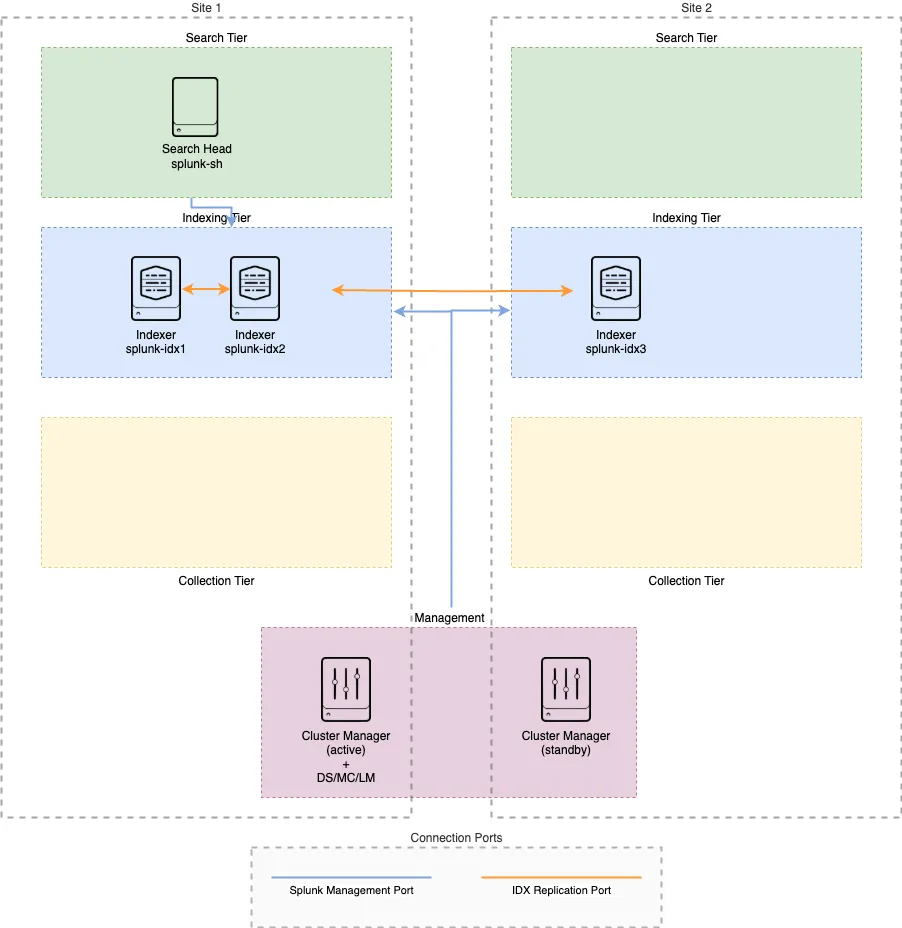
Lastly, we are creating a cluster as Splunk recommends and the architecture below, using the appropriate apps with correct naming conventions. 😊
🔔 Important Note:
Ensure that all cluster-related applications (except for the essential ones that need to differ between the Cluster Managers) are consistently deployed to both Cluster Managers using the Deployment Server. If you have any critical configuration files (such as server.conf, authentication.conf, indexes.conf, etc.) located in either etc/system/local, etc/apps on either Cluster Manager, these files should be manually/automatically synchronized between both nodes. This will help prevent any configuration inconsistencies during failover scenarios. Of course, because we are creating a test environment in our scenario, we have only one Deployment Server. If you want to create a highly available environment, I recommend adding another backup DS, MC, SH(s), etc., on site-2.
 |
|---|
| Figure 3 The Splunk architecture of the test environment. |
2.2.1. Configurations of the CM1:
# splunk_9–4–1_cluster/splunk-cm1/etc/system/local/server.conf

[general]
site = site1
serverName = splunk-cm1

[replication_port://8083]
disabled = false
# splunk_9–4–1_cluster/splunk-cm1/etc/system/local/inputs.conf

[default]
host = splunk-cm1
# splunk_9–4–1_cluster/splunk-cm1/etc/system/local/web.conf

[settings]
httpport = 8004
mgmtHostPort = 127.0.0.1:8093
appServerPorts = 8069
# splunk_9–4–1_cluster/splunk-cm1/etc/apps/oyku_all_search_base/local/web.conf

[settings]
enableSplunkWebSSL = true
# splunk_9–4–1_cluster/splunk-cm1/etc/apps/oyku_multisite_manager_base/local/server.conf
# Note: These are the configurations to create an active-passive cluster manager system.

[clustering]
multisite = true
mode = manager
available_sites = site1, site2
site_replication_factor = origin:1, total:3
site_search_factor = origin:1, total:2
pass4SymmKey = OykusTopSecretKey123
cluster_label = LocalCluster

manager_switchover_mode = manual
manager_uri = clustermanager:cm1, clustermanager:cm2

[clustermanager:cm1]
manager_uri = https://127.0.0.1:8093

[clustermanager:cm2]
manager_uri = https://127.0.0.1:8094
# splunk_9–4–1_cluster/splunk-cm1/etc/apps/oyku_all_search_outputs/local/outputs.conf
# Note: Since this is the Cluster Manager, we should disable indexing on this server and forward all logs to indexers. :)

[indexAndForward]
index = false

[tcpout]
defaultGroup = primary_indexers
forwardedindex.filter.disable = true
indexAndForward = false
forwardedindex.0.whitelist = .*
forwardedindex.1.blacklist = _.*
forwardedindex.2.whitelist = (_audit|_internal)

[tcpout:primary_indexers]
server = 127.0.0.1:9997, 127.0.0.1:9998, 127.0.0.1:9999
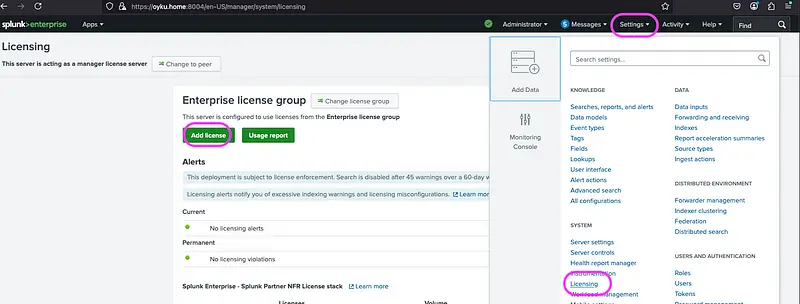
We should now add our license file below to the web UI on the CM1.
 |
|---|
| Figure 4 Illustration of adding a license file from UI. |
2.2.2. Configurations of the CM2:
# splunk_9–4–1_cluster/splunk-cm2/etc/system/local/server.conf

[general]
site = site2
serverName = splunk-cm2

[replication_port://8084]
disabled = false
# splunk_9–4–1_cluster/splunk-cm2/etc/system/local/inputs.conf

[default]
host = splunk-cm2
# splunk_9–4–1_cluster/splunk-cm2/etc/system/local/web.conf

[settings]
httpport = 8005
mgmtHostPort = 127.0.0.1:8094
appServerPorts = 8070
# splunk_9–4–1_cluster/splunk-cm2/etc/apps/oyku_all_search_base/local/web.conf

[settings]
enableSplunkWebSSL = true
# splunk_9–4–1_cluster/splunk-cm2/etc/apps/oyku_multisite_manager_base/local/server.conf
# Note: These are the configurations to create an active-passive cluster manager system.

[clustering]
multisite = true
mode = manager
available_sites = site1, site2
site_replication_factor = origin:1, total:3
site_search_factor = origin:1, total:2
pass4SymmKey = OykusTopSecretKey123
cluster_label = LocalCluster

manager_switchover_mode = manual
manager_uri = clustermanager:cm1, clustermanager:cm2

[clustermanager:cm1]
manager_uri = https://127.0.0.1:8093

[clustermanager:cm2]
manager_uri = https://127.0.0.1:8094
# splunk_9–4–1_cluster/splunk-cm2/etc/apps/oyku_full_license_server/local/server.conf
# Note: Because our license server is cm1, we should tell our other components. :)

[license]
manager_uri = https://127.0.0.1:8093
# splunk_9–4–1_cluster/splunk-cm2/etc/apps/oyku_manager_deploymentclient/local/deploymentclient.conf
# Note: Since we are using CM1 as the Deployment Server, we need to specify to CM2 where the deployment applications should be located. :)

[deployment-client]
# Set the phoneHome at the end of the PS engagement
# 10 minutes
# phoneHomeIntervalInSecs = 600

repositoryLocation = $SPLUNK_HOME/etc/manager-apps
serverRepositoryLocationPolicy = rejectAlways

[target-broker:deploymentServer]
targetUri = 127.0.0.1:8093
# splunk_9–4–1_cluster/splunk-cm2/etc/apps/oyku_all_search_outputs/local/outputs.conf
# Note: Since this is the Cluster Manager, we should disable indexing on this server and forward all logs to indexers. :)

[indexAndForward]
index = false

[tcpout]
defaultGroup = primary_indexers
forwardedindex.filter.disable = true
indexAndForward = false
forwardedindex.0.whitelist = .*
forwardedindex.1.blacklist = _.*
forwardedindex.2.whitelist = (_audit|_internal)

[tcpout:primary_indexers]
server = 127.0.0.1:9997, 127.0.0.1:9998, 127.0.0.1:9999
2.2.3. Configurations of the IDX1:
# splunk_9–4–1_cluster/splunk-idx1/etc/system/local/server.conf
# Note: Because we don't need a KVStore in the indexers, we can disable it.

[general]
serverName = splunk-idx1

[kvstore]
disabled = true
port = 8192

[replication_port://8080]
disabled = false
# splunk_9–4–1_cluster/splunk-idx1/etc/system/local/inputs.conf
# BASE SETTINGS
[default]
host = splunk-idx1

[splunktcp://9997]
# splunk_9–4–1_cluster/splunk-idx1/etc/system/local/web.conf

[settings]
httpport = 8001
mgmtHostPort = 127.0.0.1:8090
appServerPorts = 8066
# splunk_9–4–1_cluster/splunk-idx1/etc/apps/oyku_site1_indexer_base/local/server.conf

[general]
# This can have a value ranging from site1..site63. The numbers do *not* have
# to go in order, the first logical site can be site8, the second site12,
# all that matters is that the site number falls in the right range, and
# that when specific site names are used in the site_replication_factor of
# the manager's config, there must be a valid match.
site = site1

[clustering]
multisite = true
# splunk_9–4–1_cluster/splunk-idx1/etc/apps/oyku_full_license_server/local/server.conf
# Note: Because our license server is cm1, we should tell our other components. :)

[license]
manager_uri = https://127.0.0.1:8093
# splunk_9–4–1_cluster/splunk-idx1/etc/apps/oyku_cluster_indexer_base/local/indexes.conf

# Allowed values here are 0 (no replication) or auto (replicate to meet the CM policy)
# Note that this deliberately replicates the _introspection index, which is not
# included in the base _cluster app in product.
[default]
repFactor = auto

# Modify bucket settings to increase performance and reduce storage
# Enable the newer compression format introduced in Splunk 7.2
journalCompression = zstd

# Enables various performance and space-saving improvements for tsidx files
# Set level 3 for Splunk 7.2 and higher or level 4 for Splunk 8.1 and higher
tsidxWritingLevel = 4
# splunk_9–4–1_cluster/splunk-idx1/etc/apps/oyku_cluster_indexer_base/local/server.conf

[clustering]
mode = peer
manager_uri = https://127.0.0.1:8093
pass4SymmKey = OykusTopSecretKey123
# splunk_9–4–1_cluster/splunk-idx1/etc/apps/oyku_cluster_indexer_base/local/web.conf
# Note: Since we do not need a web UI for indexers, we can disable them. :)

[settings]
startwebserver = false
2.2.3. Configurations of the IDX2:
# splunk_9–4–1_cluster/splunk-idx2/etc/system/local/server.conf
# Note: Because we don't need a KVStore in the indexers, we can disable it.

[general]
serverName = splunk-idx2

[kvstore]
disabled = true
port = 8193

[replication_port://8081]
disabled = false
# splunk_9–4–1_cluster/splunk-idx2/etc/system/local/inputs.conf
# BASE SETTINGS

[default]
host = splunk-idx2

[splunktcp://9998]
# splunk_9–4–1_cluster/splunk-idx2/etc/system/local/web.conf

[settings]
httpport = 8002
mgmtHostPort = 127.0.0.1:8091
appServerPorts = 8067
# splunk_9–4–1_cluster/splunk-idx2/etc/apps/oyku_site1_indexer_base/local/server.conf

[general]
# This can have a value ranging from site1..site63. The numbers do *not* have
# to go in order, the first logical site can be site8, the second site12,
# all that matters is that the site number falls in the right range, and
# that when specific site names are used in the site_replication_factor of
# the manager's config, there must be a valid match.
site = site1

[clustering]
multisite = true
# splunk_9–4–1_cluster/splunk-idx2/etc/apps/oyku_full_license_server/local/server.conf
# Note: Because our license server is cm1, we should tell our other components. :)

[license]
manager_uri = https://127.0.0.1:8093
# splunk_9–4–1_cluster/splunk-idx2/etc/apps/oyku_cluster_indexer_base/local/indexes.conf

# Allowed values here are 0 (no replication) or auto (replicate to meet the CM policy)
# Note that this deliberately replicates the _introspection index, which is not
# included in the base _cluster app in product.
[default]
repFactor = auto

# Modify bucket settings to increase performance and reduce storage
# Enable the newer compression format introduced in Splunk 7.2
journalCompression = zstd

# Enables various performance and space-saving improvements for tsidx files
# Set level 3 for Splunk 7.2 and higher or level 4 for Splunk 8.1 and higher
tsidxWritingLevel = 4
# splunk_9–4–1_cluster/splunk-idx2/etc/apps/oyku_cluster_indexer_base/local/server.conf

[clustering]
mode = peer
manager_uri = https://127.0.0.1:8093
pass4SymmKey = OykusTopSecretKey123
# splunk_9–4–1_cluster/splunk-idx2/etc/apps/oyku_cluster_indexer_base/local/web.conf
# Note: Since we do not need a web UI for indexers, we can disable them. :)

[settings]
startwebserver = false
2.2.3. Configurations of the IDX1:
# splunk_9–4–1_cluster/splunk-idx3/etc/system/local/server.conf
# Note: Because we don't need a KVStore in the indexers, we can disable it.

[general]
serverName = splunk-idx3

[kvstore]
disabled = true
port = 8194

[replication_port://8082]
disabled = false
# splunk_9–4–1_cluster/splunk-idx3/etc/system/local/inputs.conf
# BASE SETTINGS

[default]
host = splunk-idx3

[splunktcp://9999]
# splunk_9–4–1_cluster/splunk-idx3/etc/system/local/web.conf

[settings]
httpport = 8003
mgmtHostPort = 127.0.0.1:8092
appServerPorts = 8068
# splunk_9–4–1_cluster/splunk-idx3/etc/apps/oyku_site2_indexer_base/local/server.conf

[general]
# This can have a value ranging from site1..site63. The numbers do *not* have
# to go in order, the first logical site can be site8, the second site12,
# all that matters is that the site number falls in the right range, and
# that when specific site names are used in the site_replication_factor of
# the manager's config, there must be a valid match.
site = site2

[clustering]
multisite = true
# splunk_9–4–1_cluster/splunk-idx3/etc/apps/oyku_full_license_server/local/server.conf
# Note: Because our license server is cm1, we should tell our other components. :)

[license]
manager_uri = https://127.0.0.1:8093
# splunk_9–4–1_cluster/splunk-idx3/etc/apps/oyku_cluster_indexer_base/local/indexes.conf

# Allowed values here are 0 (no replication) or auto (replicate to meet the CM policy)
# Note that this deliberately replicates the _introspection index, which is not
# included in the base _cluster app in product.
[default]
repFactor = auto

# Modify bucket settings to increase performance and reduce storage
# Enable the newer compression format introduced in Splunk 7.2
journalCompression = zstd

# Enables various performance and space-saving improvements for tsidx files
# Set level 3 for Splunk 7.2 and higher or level 4 for Splunk 8.1 and higher
tsidxWritingLevel = 4
# splunk_9–4–1_cluster/splunk-idx3/etc/apps/oyku_cluster_indexer_base/local/server.conf

[clustering]
mode = peer
manager_uri = https://127.0.0.1:8093
pass4SymmKey = OykusTopSecretKey123
# splunk_9–4–1_cluster/splunk-idx3/etc/apps/oyku_cluster_indexer_base/local/server.conf
# Note: Since we do not need a web UI for indexers, we can disable them. :)

[settings]
startwebserver = false
2.2.6. Configurations of the SH:
# splunk_9–4–1_cluster/splunk-sh3/etc/system/local/server.conf
# Note: Because we don't need a KVStore in the indexers, we can disable it.

[general]
site = site1
serverName = splunk-sh

[clustering]
multisite = true
mode = searchhead
manager_uri = https://127.0.0.1:8093
pass4SymmKey = OykusTopSecretKey123
# splunk_9–4–1_cluster/splunk-sh/etc/system/local/inputs.conf

[default]
host = splunk-sh
# splunk_9–4–1_cluster/splunk-sh/etc/apps/oyku_all_deploymentclient/local/deploymentclient.conf
# Note: Since we are using CM1 as the Deployment Server, we need to inform SH about this as well. :)

[deployment-client]
# Set the phoneHome at the end of the PS engagement
# 10 minutes
# phoneHomeIntervalInSecs = 600

[target-broker:deploymentServer]
# Change the targetUri to point to deployment server
targetUri = 127.0.0.1:8093
# splunk_9–4–1_cluster/splunk-sh/etc/apps/oyku_all_search_base/local/web.conf

[settings]
enableSplunkWebSSL = true
# splunk_9–4–1_cluster/splunk-sh/etc/apps/oyku_all_search_outputs/local/outputs.conf
# Note: Since this is the Search Head, we should disable indexing on this server and forward all logs to indexers. :)

[indexAndForward]
index = false

[tcpout]
defaultGroup = primary_indexers
forwardedindex.filter.disable = true
indexAndForward = false
forwardedindex.0.whitelist = .*
forwardedindex.1.blacklist = _.*
forwardedindex.2.whitelist = (_audit|_internal)

[tcpout:primary_indexers]
server = 127.0.0.1:9997, 127.0.0.1:9998, 127.0.0.1:9999
# splunk_9–4–1_cluster/splunk-sh/etc/apps/oyku_full_license_server/local/server.conf
# Note: Because our license server is cm1, we should tell our other components. :)

[license]
manager_uri = https://127.0.0.1:8093
2.3. Configuring Monitoring Console
If you follow my instructions carefully, you will reach the top. Congrats! 🥳
Now, we are going to configure the Monitoring Console, as written in the Splunk documentation.
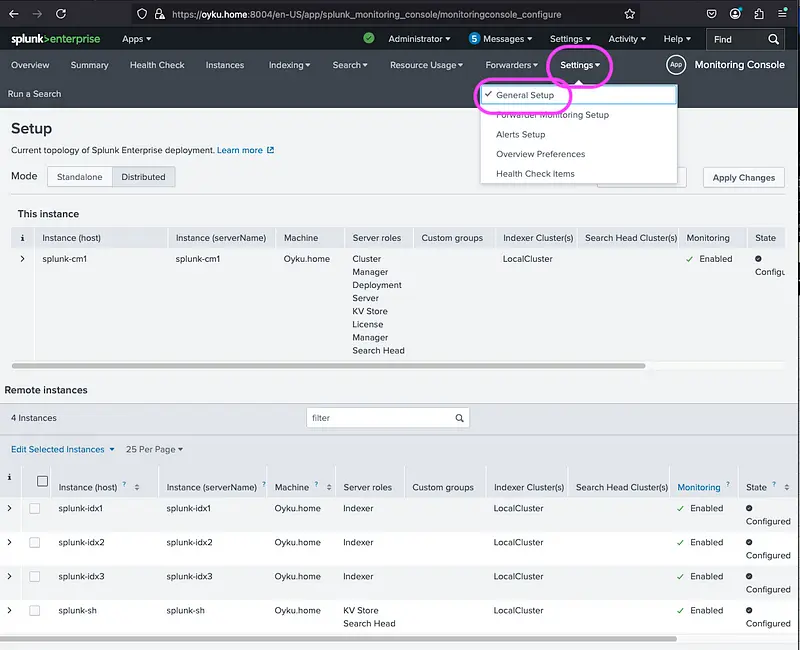 |
|---|
| Figure 5 Illustration of configuring the monitoring console in the distributed mode. |
## 3. Wrapping Up
With everything configured step by step, we’ve successfully set up a fully functional Splunk multisite indexer cluster (M2) with cluster manager redundancy - all running on a single server. This architecture, though compact, reflects how redundancy and failover logic work in production environments. Once your configuration is complete, you’ll be able to monitor your cluster’s redundancy state visually, just like in the image below. Active and standby components can be seen clearly. 😊
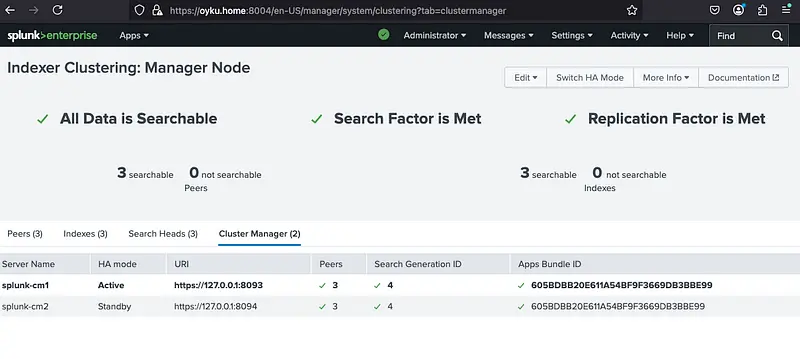 |
|---|
| Figure 6 Monitoring activity of the Cluster Managers. |
Because we configured it as manual method, you can manually switch activeness between cluster managers whenever needed by running:
$SPLUNK_HOME/bin/splunk cluster-manager-redundancy -switch-mode active
Yet, don’t forget to edit all server.conf files contain the management port of the CM1 on the indexers & search head manually as well. Before or after using this command. Also, you can check the status of the cluster managers with;
$SPLUNK_HOME/bin/splunk cluster-manager-redundancy -show-status
After some configuration changes and applying the switch-mode command, we just achieved the image below. Now, the new active cluster manager is the CM2. 🥳
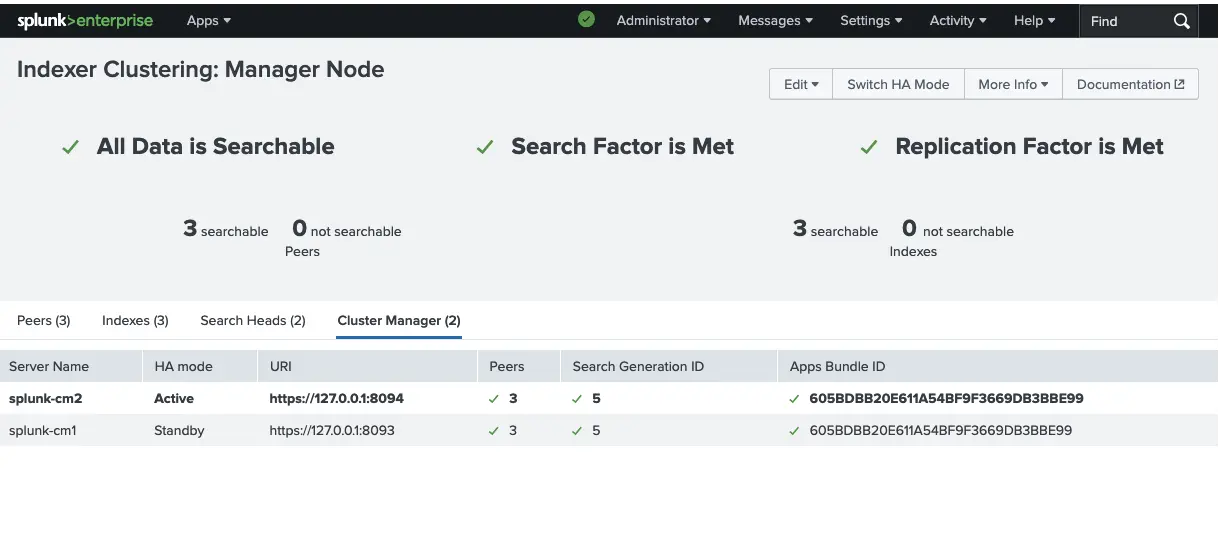 |
|---|
| Figure 7 Monitoring activity of the Cluster Managers after changing the active one. |
This setup not only gives you hands-on experience with distributed Splunk environments, but also lets you safely explore manual failover and resilience planning without requiring multiple machines. Hopefully, this guide helps you build confidence in configuring and operating complex Splunk topologies.
While manual switchover is effective for local testing and learning, managing failover manually in production environments can be risky and prone to errors, especially in high-availability or mission-critical setups. Therefore, it is often advisable to implement automated orchestration methods, such as DNS scripts or load balancer health checks. These methods can help seamlessly add new MC/DS servers on the other site with all necessary configurations or allow for automatic operation when suitable and supported by your infrastructure.
Now it’s your turn — spin it up, break it, recover it, and learn from it. 😊 And when you’re ready to scale, think automation.
Happy Splunking! 🚀
References:
- [1] Splunk. (2022). Implement cluster manager redundancy https://docs.splunk.com/Documentation/Splunk/9.4.1/Indexer/CMredundancy#Use_a_load_balancer_to_support_cluster_manager_redundancy
- [2] Can, Ö. (2025). Cluster Manager Redundancy in Splunk: What It Is, Why It Matters.
- [3] Splunk. (2021). Splunk Validated Architectures https://www.splunk.com/en_us/pdfs/white-paper/splunk-validated-architectures.pdf
- [4] Splunk. (2018). Components of a Splunk Enterprise deployment http://docs.splunk.com/Documentation/Splunk/9.4.0/Capacity/ComponentsofaSplunkEnterprisedeployment
- [5] Splunk. (2025). Configure the Monitoring Console in distributed moden https://docs.splunk.com/Documentation/Splunk/latest/DMC/Configureindistributedmode