Building a Highly Available Splunk Deployment Server Cluster (POC)
🌸 1. Overview
In many Splunk environments, the Deployment Server (DS) is an essential part of the setup, even though it’s often overlooked. While it doesn’t directly handle data like indexers or search heads, it plays a key role in keeping everything organized and working smoothly:
- It decides which apps get deployed to which clients.
- It manages the configuration of forwarders.
- It controls when and how we make configuration changes.
You might have heard the saying:
“If the DS is down, nothing breaks immediately.”
While this is somewhat true and can seem efficient, having the DS down for an extended period can cause some real headaches. For instance, if we need to change client configurations directly on the clients or switch to another DS without knowing if it’s set up in a cluster or master-child configuration, the original DS may not recognize the new applications, checksums, or any changes made in the serverclass.conf file. This can lead to it reverting all the configurations we’ve worked hard to put in place.
To help tackle these common challenges, we want to:
- Prevent a single DS from becoming a weak link in our operations.
- Make sure we can implement urgent configuration changes even if the DS is down.
- Save ourselves from the hassle of manually recovering or reconfiguring thousands of agents.
So, a big question arises:
Can we create a redundant Deployment Server setup that is simple, transparent, and predictable?
This proof of concept (POC) dives into that question and gathers insights from the official Splunk documentation on setting up a Deployment Server Cluster, with a few tweaks of our own. 🪄
Friendly reminder: If you’re not familiar with Keepalived, it might be helpful to do a little research first or check out another similar option. We’ll be using a VIP in the deploymentclient.conf for seamless operation. And if you want to know more about Keepalived, check out my friend’s blog series on Understanding Keepalived for High Availability.
If you’re interested in setting up a solid redundancy structure for your Splunk environment, you might want to check out my previous blog series on Splunk Cluster Manager Redundancy. This blog is designed to help you create a basic Distributed Clustered Deployment (M2) with cluster manager redundancy. Plus, I’ve included some handy configuration files for you to reference along the way.
2. Deployment Server Cluster
Since the release of version 9.2, Splunk Enterprise has introduced some handy shared log file directories:
client_events: This is where you’ll find information about your clients._splunk_ds_info: This directory contains server class configuration files that are shared between agent management servers.
To get your deployment server (DS) cluster up and running, you’ll want to make sure the client_events and deployment-apps directories are shared with each other. It’s pretty simple to use the same mount points for these directories on all your deployment servers, as explained in the documentation.
Once everything is shared and set up correctly, your deployment servers will be able to work together to manage the clients smoothly. Plus, passive deployment servers will have the ability to view the status of active clients using the same files and directories.
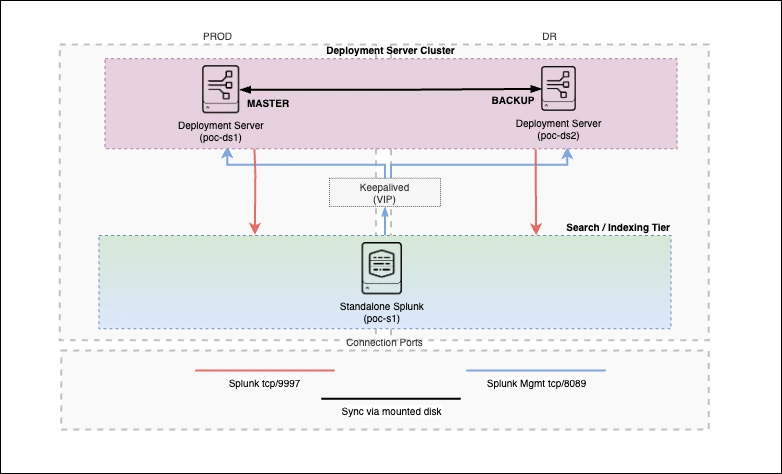
🗂️ 3. Environment Overview
Welcome to my proof of concept (POC)! The aim here isn’t to create a full-blown enterprise-grade load balancer solution. Instead, we’re keeping it simple with:
- Two Deployment Servers
- A single virtual endpoint for all our agents
- Shared state for deployment metadata
- Automatic failover that doesn’t require agents to change anything
In a nutshell: We want our agents to always communicate through the same address, and we should be able to lose one Deployment Server without any hiccups.
To keep things realistic yet easy to manage, I’ve put together the following POC architecture for you.
3.1. Prerequisites:
Before we dive in, please note that this setup is designed for macOS (ARM). If you’re using a different operating system, you might need to tweak a few steps.
For example, we’ll be using UTM for emulation, but other VM software can be handy if you’re on Windows.
Here’s what you’ll need:
- UTM on Apple Silicon (for virtualization)
- Ubuntu 24.04.3 - x86_64 ISO (emulated) running on two UTM servers as Deployment Servers (Splunk Enterprise v.10.0.2)
- A host with a Splunk Enterprise (v.10.0.2) instance configured similarly to S1
- Keepalived and some basic configurations
 |
|---|
| Figure 1 Splunk POC architecture. |
You can find all the configuration files and apps I mention in this post in the GitHub Repository. Here’s a simplified look at the repository structure:
splunk_ds_ha/
├── README.md
├── s1_configurations/
│   ├── etc_system_local/
|   │   ├── inputs.conf
|   │   └── server.conf
|   │
│   └── etc_apps/
|       └── poc_all_deploymentclient/
|
├── ds1_configurations/
│   ├── etc_system_local/
|   │   ├── server.conf
|   │   ├── serverclass.conf
|   │   └── user-seed.conf
|   │
│   └── etc_apps/
|       ├── poc_all_search_base/
|       ├── poc_all_search_outputs/
|       └── poc_full_license_server/
|
├── ds2_configurations/
│   ├── etc_system_local/
|   │   ├── server.conf
|   │   ├── serverclass.conf
|   │   └── user-seed.conf
|   │
│   └── etc_apps/
|       ├── poc_all_search_base/
|       ├── poc_all_search_outputs/
|       └── poc_full_license_server/
|
└── deployment-apps/
    ├── poc_all_deploymentclient/
    ├── poc_all_indexes/
    └── poc_all_search_base/
All the configuration files referenced here are stored in that repository. I’ve kept things concise so that the blog stays engaging.
Now, let’s roll up our sleeves and start building something awesome! 🌸
3.2 Setup: step by step
Here’s a high-level flow of what we’ll be doing in this POC. Each step is designed to be straightforward and easy to replicate. Let’s get started!
- Let’s get started by installing Splunk Enterprise on your local host!
- First off, go ahead and install Splunk Enterprise.
- Once that’s done, you’ll want to copy all the relevant apps and configurations from our GitHub Repository. Just be sure to change the placeholder
targetUriURL in thedeploymentclient.conffile to the correct VIP on your UTMs. -
For the configurations, take the files from the
s1_configurations/etc_system_localdirectory and place them in$SPLUNK_HOME/etc/system/local/. Then, move the directories froms1_configurations/etc_appsto$SPLUNK_HOME/etc/apps/.splunk_ds_ha/ ... ├── s1_configurations/ │ ├── etc_system_local/ | │ ├── inputs.conf | │ └── server.conf | │ │ └── etc_apps/ | └── poc_all_deploymentclient/ ... - Start Splunk and verify that it is fully operational. This instance will later act as a deployment client.
-
Let’s create a shared directory (
shared_apps) on the host!- First things first, we need to set up a shared directory that both of our deployment servers can access.
- Quick Reminder: Make sure to adjust the permissions so the
splunkuser can read and write to it. -
Inside this shared directory, let’s create two folders:
   shared_apps/
   ├── deployment-apps
   └── client_events
-
Now, let’s set up two ubuntu in UTM
- Go ahead and create two Ubuntu 24.04.3 emulator, naming them DS1 and DS2.
- In UTM, head over to
Settings > Sharingand configure it to point both VMs to the same shared directory (shared_apps) on the host. -
Once we start the VMs, we’ll mount the shared directory on both DS1 and DS2 by running these commands:
mkdir -p /mnt/shared_apps echo "share /mnt/shared_apps 9p trans=virtio,version=9p2000.L,rw,_netdev,nofail,auto" | sudo tee -a /etc/fstab sudo systemctl daemon-reload sudo mount -a df -h sudo chown -R splunk:splunk /mnt/shared_apps - Finally, let’s check the
/mnt/shared_appsdirectory together to ensure it’s visible and that you have the necessary read and write permissions.
-
Set up
splunkusers and install Splunk (Don’t start yet!).First off, let’s get Splunk installed! You can choose between the tgz or package installation methods. Depending on your choice, you may or may not need to create a
splunkuser.On both DS1 and DS2:
- If you’re using the tgz method, please create the
splunkuser.
useradd -d /opt/splunk/ splunk sudo usermod -s /bin/bash splunk- Install Splunk Enterprise 10.0.2 using either the tgz or package method.
Important: Please do not start Splunk just yet! If you do, it might create some files and directories that we’ll need to clean up later for the deployment server (DS) cluster configuration.
Troubleshooting Tip: If Splunk starts too early, it could generate unwanted files in the following locations. In this step, we can clean up them:
$SPLUNK_HOME/etc/deployment-apps/_splunk_ds_info/$SPLUNK_HOME/var/log/client_events/- It may also create the file
$SPLUNK_HOME/var/run/serverclass.xml.
- If you’re using the tgz method, please create the
-
Bind shared directories into Splunk paths.
As we move forward, note that the
/opt/splunk/var/log/client_events/directory won’t exist yet, and that’s totally okay!On both deployment servers:
- Bind deployment apps:
mount --bind /mnt/shared_apps/deployment-apps /opt/splunk/etc/deployment-apps - Bind client events:
  mkdir -p /opt/splunk/var/log/client_events
  mount --bind /mnt/shared_apps/client_events /opt/splunk/var/log/client_events
Now, copy the
deployment-apps/directory from the repository directly into theshared_apps/deployment-apps/directory.Important: Make sure to update any placeholder URLs in the files with the correct ones.
- Bind deployment apps:
-
Apply DS-specific configurations.
Head over to the GitHub Repository and find the configurations for your deployment servers:
     splunk_ds_ha/
     ...
     ├── ds1_configurations/
     │   ├── etc_system_local/
     |   │   ├── server.conf
     |   │   ├── serverclass.conf
     |   │   └── user-seed.conf
     |   │
     │   └── etc_apps/
     |       ├── poc_all_search_base/
     |       ├── poc_all_search_outputs/
     |       └── poc_full_license_server/
     |
     ├── ds2_configurations/
     │   ├── etc_system_local/
     |   │   ├── server.conf
     |   │   ├── serverclass.conf
     |   │   └── user-seed.conf
     |   │
     │   └── etc_apps/
     |       ├── poc_all_search_base/
     |       ├── poc_all_search_outputs/
     |       └── poc_full_license_server/
     ...
The most important configuration file here is
serverclass.conf, which you’ll find in bothetc_apps/directories. Remember, these files need to be identical, and contains the key option for this POC:[global] syncMode = sharedDirImportant: Don’t forget to edit any placeholder URLs in those files!
-
Start Splunk on both Deployment Servers
Now it’s time to bring Splunk to life!
- Start Splunk on both DS1 and DS2.
- Verify that both instances start cleanly without issues.
-
Install and configure keepalived
Let’s ensure high availability with Keepalived!
- Install keepalived on both DS1 and DS2.
sudo apt update sudo apt install -y keepalived- Next, create a script to check the status of Splunk on both DS.
sudo tee /etc/keepalived/check_splunk.sh >/dev/null <<'EOF' #!/usr/bin/env bash set -e SPLUNK_HOME="/opt/splunk" # check if the splunkd is up $SPLUNK_HOME/bin/splunk status |grep "splunkd is running" EOF sudo chmod +x /etc/keepalived/check_splunk.sh- on DS1, set up Keepalived:
sudo tee /etc/keepalived/keepalived.conf >/dev/null <<EOF global_defs { router_id DS1 } vrrp_script chk_splunk { script "/etc/keepalived/check_splunk.sh" interval 5 timeout 5 fall 2 rise 2 weight -80 } vrrp_instance VI_1 { state MASTER interface IFACE_PLACEHOLDER virtual_router_id 51 priority 150 advert_int 1 nopreempt authentication { auth_type PASS auth_pass SplunkDS123! } unicast_src_ip DS1_IP_PLACEHOLDER unicast_peer { DS2_IP_PLACEHOLDER } virtual_ipaddress { VIP_PLACEHOLDER/24 dev IFACE_PLACEHOLDER } track_script { chk_splunk } } EOF- on DS2 do the same but with slightly different configurations:
sudo tee /etc/keepalived/keepalived.conf >/dev/null <<EOF global_defs { router_id DS2 } vrrp_script chk_splunk { script "/etc/keepalived/check_splunk.sh" interval 5 timeout 2 fall 3 rise 3 weight -20 } vrrp_instance VI_1 { state BACKUP interface IFACE_PLACEHOLDER virtual_router_id 51 priority 100 advert_int 1 nopreempt authentication { auth_type PASS auth_pass SplunkDS123! } unicast_src_ip DS2_IP_PLACEHOLDER unicast_peer { DS1_IP_PLACEHOLDER } virtual_ipaddress { VIP_PLACEHOLDER/24 dev IFACE_PLACEHOLDER } track_script { chk_splunk } } EOF- Configure a Virtual IP (VIP) and find out what are your UTM ips/interface.
- Replace the placeholders (
<INTERFACE-PLACEHOLDER>,<DS1-PLACEHOLDER>,<DS2-PLACEHOLDER>, and<DS-VIP-PLACEHOLDER>) in the configuration files with your actual settings, such as the interface and IP addresses. Then run the following commands on both DS:
sudo sed -i \ -e "s/IFACE_PLACEHOLDER/<INTERFACE-PLACEHOLDER>/g" \ -e "s/DS1_IP_PLACEHOLDER/<DS1-PLACEHOLDER>/g" \ -e "s/DS2_IP_PLACEHOLDER/<DS2-PLACEHOLDER>/g" \ -e "s/VIP_PLACEHOLDER/<DS-VIP-PLACEHOLDER>/g" \ /etc/keepalived/keepalived.conf sudo systemctl enable --now keepalived sudo systemctl status keepalived --no-pager-
Configure health checks based on splunk status
-
After starting keepalived, verify which node owns the VIP with the command below:
ip -4 addr show dev <INTERFACE-PLACEHOLDER>- Test VIP reachability
Finally, you should be able to see your clients in the Splunk UI under
Settings > Agent Management. Please be patient if it takes some time for the apps and clients to appear! 🐣 -
Create a serverclass from the DS1 UI (
Settings > Agent Management > Server classes)Remember to follow the Splunk name conventions as a best practice. 🐣
- Create a serverclass (for example:
sc_s1_apps). - Assign apps with wildcard usage as
poc_*. Also, configure them with restart behavior. - Add the local Splunk instance as a deployment client.
- Create a serverclass (for example:
-
Verify application deployment and shared state
At this stage:
- Apps should be deployed to the Splunk instance. Keep in mind that you might need to be patient due to the restart option.
Next, you should also see the same client in the DS2 UI! 🥳
Optional Checks: You can verify client events and checksum information under the
shared_apps/client_events/directory to confirm there are no unexpected changes.Note: Changes made through the UI are automatically shared. However,
CLI-basedchanges will require a reload on the DS where those changes were made. -
Test failover
- Stop Splunk on DS1.
- Verify that the VIP moves to DS2 using the command we discussed previously:
ip -4 addr show dev <INTERFACE-PLACEHOLDER>From DS2 logs and the UI of S1, check that:
- The client remains connected.
- No app redeployment occurs if checksums are unchanged
To verify, you can check the
client_eventfiles. For instance, myappevents_*file shows only the events below for an app calledpoc_all_search_baseafter the DS1 and DS2 modifications, indicating it didn’t reload again:{"datetime":"01-10-2026 11:11:55.158 +0300","log_level":"INFO","component":"DSappevent","data":{"key":"638ad0c520c118da61f4c96683287adc_sc_s1_apps_poc_all_search_base","clientId":"638ad0c520c118da61f4c96683287adc","serverClassName":"sc_s1_apps","appName":"poc_all_search_base","action":"Download","failedReason":"''","checksum":"12890411723215581178","result":"Ok","timestamp":1768032715}} {"datetime":"01-10-2026 11:11:55.158 +0300","log_level":"INFO","component":"DSappevent","data":{"key":"638ad0c520c118da61f4c96683287adc_sc_s1_apps_poc_all_search_base","clientId":"638ad0c520c118da61f4c96683287adc","serverClassName":"sc_s1_apps","appName":"poc_all_search_base","action":"Install","failedReason":"''","checksum":"12890411723215581178","result":"Ok","timestamp":1768032715}}Alternatively, you can use the command below to see if ds2 reloads the apps again:
  index=_internal  host="poc-ds2"
  | rex field=_raw "issueReload\":(?<issue_reload>[^\,]+)"
  | search issue_reload = *
If there’s an issue during this process, I promise you’ll know something isn’t working! 🔮
- Recover DS1
- Start Splunk on DS1
- Verify VIP behavior
ip -4 addr show dev <INTERFACE-PLACEHOLDER>- Confirm both DS instances are healthy and consistent
4. Troubleshooting
Here are some friendly reload tips in case you encounter issues. If you face the error Failed to reload. This deployment server cannot acquire the lock file '/opt/splunk/splunk/etc/deployment-apps/splunk tmp/splunk ds lock.lock', here’s what you can do:
- This error means the DS can’t write the lock file. You can refer to Splunk Support answers link1 and link2 for further details.
- Stop Splunk.
- Add the option below:
# $SPLUNK_HOME/etc/splunk-launch.conf OPTIMISTIC_ABOUT_FILE_LOCKING = 1 - Clean the lock file.
- Option 1: Run
$SPLUNK_HOME/bin/splunk clean locks - Option 2: Manually delete the
local_shared_apps/deployment-apps/_splunk_tmp/_splunk_ds_lockfile.
- Option 1: Run
- Start Splunk again.
A Quick Note: It’s recommended to switch from a CIFS filesystem to an NFS filesystem.
This is a known side effect of implementing this feature, but there’s a workaround with the setting mentioned above. Just be cautious, as using this setting might lead to some data loss, so read up on it carefully before making any changes.
Hope this helps, and feel free to reach out if you need more assistance! 😊
5. Summary & Final thoughts
What did we achieve with this POC?
✅ No single point of failure for the Deployment Server
✅ Agents consistently connect to the same address (VIP)
✅ Smooth failover without agent reconfiguration
✅ Shared state keeps our configurations in sync
✅ Simple and easy-to-observe behavior
So, when one Deployment Server goes down:
- The VIP gracefully moves
- Agents keep on phoning home
- Configuration management doesn’t skip a beat
Exactly what we aimed for!
Just a quick note:
- This setup isn’t meant to replace enterprise load balancers.
- It’s also not officially supported by Splunk as a reference architecture.
But that being said, it is:
- A practical POC that you can confidently use in production with the right configurations
- A fantastic learning opportunity
- A solid stepping stone for more advanced designs
If you’re aware of the trade-offs, this pattern can be incredibly helpful!
What could we explore next?
- Swap the shared filesystem for NFS or clustered storage
- Introduce REST-based health checks
- Add monitoring during VIP transitions
- Test it at scale with hundreds or even thousands of agents
💬 I’d love to hear your thoughts, ideas, or questions! How do you tackle similar challenges?
Feel free to connect with me on LinkedIn or drop a comment on my blog.
Thanks for reading! And remember, if you’re diving into Splunk internals, you’re definitely not alone! 😊
Until next time, Happy Splunking! 👋🔍
References:
-
[1] Seynur (2025). seynur-demos/splunk_ds_ha [GitHub repository]. GitHub. Retrieved from https://github.com/seynur/seynur-demos/tree/main/splunk/splunk_ds_ha
-
[2] Splunk Inc. (2025). Implement an Agent Management Cluster. Retrieved from https://help.splunk.com/en/splunk-enterprise/administer/update-your-deployment/10.0/configure-the-agent-management-system/implement-an-agent-management-cluster
-
[3] Splunk Inc. (2024). Deployment server and serverclass.conf. Retrieved from https://docs.splunk.com/Documentation/Splunk/latest/Updating/Aboutdeploymentserver
-
[4] UTM Project. (2024). UTM documentation: Linux virtualization on macOS. Retrieved from https://docs.getutm.app/
-
[5] Gevrek, H. (2025). Understanding keepalived for high availability (Part 1). Retrieved from https://blog.seynur.com/keepalived/2025/11/07/keepalived-part1.html
-
[6] Can, Ö. (2025). Splunk Cluster Manager Redundancy - Part 1: What it is, why it matters. Retrieved from https://blog.seynur.com/splunk/2025/04/24/cluster-manager-redundancy-in-splunk.html
-
[7] Splunk Inc. (2025). Deployment Server Cluster Feature Does not Work When Using a CIFS Filesystem. Retrieved from https://splunk.my.site.com/customer/s/article/DS-Cluster-not-working-on-CIFS-filesystem-Unable-to-deliver-splunk-ds-lock-lock
-
[8] Splunk Inc. (2026). Top 4 reasons for Deployment server Web UI page not displaying or hanging in a Deployment server cluster. Retrieved from https://splunk.my.site.com/customer/s/article/Deployment-server-in-hung-state-in-a-Deployment-server-cluster
-
[9] Splunk Inc. (2026). Deployment Server Cluster setup guide. Retrieved from https://splunk.my.site.com/customer/s/article/Deployment-server-in-hung-state-in-a-Deployment-server-cluster